Articles contributed by the community, curated for your enjoyment and reading.
Filters
ResetCauliflower Steaks with Cauliflower Purée
The idea for this recipe came to me after I discovered an amazing documentary series on Netflix called Chef’s Table, which debuted last year. Each episode of the show focuses on a world-renowned chef and gives an intimate view of their life, their restaurants and their journey to mastering their craft. It’s beautifully done and so inspiring — I binge-watched the entire first season in just a few days. You can watch the trailer below. One of the featured chefs on the series is Dan Barber, the chef and co-owner of Blue Hill in Manhattan and Blue Hill at Stone Barns in Pocantico Hills, New York. After learning about him, I was eager to try some of his recipes; a quick Google search led me to his Cauliflower Steak with Cauliflower Purée in Bon Appétit and Food52’s Genius Recipes column. The recipe goes along with Barber’s nose-to-tail, whole-farm eating approach, as he uses the center of the cauliflower to make the “steaks” and the remaining florets to make the purée. I love the idea as a way to jazz up the trendy cauliflower steak, so I decided to feature my own slightly adapted version here. What you’ll need to make Cauliflower steaks How to make Cauliflower steaks To begin, use a sharp knife to cut two 1-inch-thick slices from the center of the cauliflower. Cut the remaining florets into 1/2-inch pieces. In a medium pot, bring the broth and 1/2 teaspoon of salt to a boil. Add the cauliflower and bring back to a boil. Cover, reduce the heat to low and steam for about 15 minutes, or until cauliflower is very tender. Use a slotted spoon to transfer the cauliflower to a food processor. Add 1/2 cup of the broth from the pot, along with the butter. Process until smooth, then add the thyme and process until just combined. Heat 1-1/2 tablespoons vegetable oil in a large ovenproof skillet over medium-high heat. Add the cauliflower steaks to the skillet, nice side down (whichever side is prettier), and then drizzle the cauliflower steaks with the remaining 1/2 tablespoon oil. Sprinkle each steak with 1/4 teaspoon salt and a few grinds of black pepper. Cook until the first side is golden brown, 4-5 minutes. Flip the cauliflower steaks over and transfer the pan to the oven. Bake until tender, about 10 minutes. Rewarm the cauliflower purée. Then, divide the purée between 2 plates, and top each with a cauliflower steak, nice side up. Please find original recipe here.
Margherita Pizza
Savor the classic flavors (and colors) of Italy with a crispy thin-crust Margherita pizza that rivals your favorite pizzeria! Margherita pizza is a beloved Italian classic that traces its roots back to Naples, where it was first created in honor of Queen Margherita of Savoy. The story goes that during her visit to Naples in 1889, she was served a pizza featuring the colors of the Italian flag: red from tomatoes, white from mozzarella cheese, and green from fresh basil. This simple yet flavorful pizza quickly became a symbol of Italian pride and has since captured the hearts of pizza lovers around the world. A traditional Margherita pizza is made with a few key ingredients: a rich tomato sauce, creamy mozzarella, fragrant basil leaves, and sometimes a sprinkle of grated Parmesan. While it's often baked in a wood-fired oven for that perfect crispy crust, you can easily recreate this delicious pizza at home with just a hot oven and a sheet pan. I recommend using a homemade pizza dough for the best results, though store-bought dough works just as well. The sauce is a quick, no-cook Neapolitan style made from canned San Marzano tomatoes, which you can prepare in just five minutes! When making Margherita pizza, the key is simplicity. The magic is in the quality of the ingredients, so don't overload your pizza with too many toppings. A little sauce and cheese go a long way — too much can make the pizza soggy. Less is definitely more when it comes to this iconic pizza! What You’ll Need To Make Margherita Pizza Homemade pizza dough is ideal, but store-bought may be substituted (these dough balls weigh about 1 pound each). San Marzano tomatoes are a variety of plum tomatoes that originate from the town of San Marzano sul Sarno, near Naples, Italy. They have a sweeter, less acidic, and more concentrated flavor than typical roma tomatoes. Many supermarkets carry them but don’t worry if you can’t find them; regular crushed tomatoes will work. Look for a fresh mozzarella ball that is not packed in water. (Or, if the cheese is packed in water, be sure to dry it well.) Also, it’s important to use authentic Parmigiano Reggiano, which you can identify by looking at the rind, which is embossed with the name over and over. If the cheese is already grated, it should be labeled “Parmigiano Reggiano,” not “Parmesan.” Step-By-Step Instructions Make the sauce by combining the crushed tomatoes, olive oil, garlic, salt, pepper, and sugar in a small bowl. Mix to combine. Alternatively, if you prefer a smoother sauce, you can blend the ingredients in a food processor or blender. (Note: This recipe makes enough sauce for four pizzas. You can refrigerate extra sauce for up to one week, or freeze for up to three months.) On a lightly floured surface, using your hands, stretch and press one ball of dough into an 12-inch round. Transfer the dough to a cornmeal-dusted baking sheet, and gently stretch it out again so that it maintains its shape. Spread 1/4 cup + 2 tablespoons of the sauce over the dough, leaving a 1/2-inch border around the edges. Slide the baking sheet into the oven and bake for 7 minutes, until the crust is partially cooked. Remove from the oven, and scatter half of the mozzarella cubes over the sauce, followed by half of the Parmigiano-Reggiano. Slide the pan back into the oven and cook until the crust is golden brown and the cheese is melted and bubbling, about 4 minutes more. Remove the pizza from the oven and transfer to a cutting board. Sprinkle with the basil and slice. Repeat with the remaining pizza dough and ingredients. (If you’d like to bake the two pizzas at the same time, you can fire up two ovens. Or, if you don’t mind the crust a little thicker, you can form the two dough balls into 8×12-inch rectangles and place them side by side on the baking sheet.) Please find original recipe link here.
Building Secure, Scalable, and Elegant ASP.NET Core Web API
Introduction: In the world of modern web development, building robust and efficient APIs is essential for creating scalable and maintainable applications. ASP.NET Core provides a powerful framework for developing Web APIs, and in this blog post, we’ll explore a meticulously crafted ASP.NET Core Web API project template designed to deliver a secure, scalable, and elegant solution. Whether you’re a seasoned developer or just starting your journey with ASP.NET Core, this project template embodies best coding practices and architectural principles to help you build high-quality APIs with confidence. Project Overview: The ASP.NET Core Web API project template follows a clean architecture pattern, which promotes separation of concerns and modularity. It consists of three main directories: Core: Contains the core business logic, including domain models and services. Infrastructure: Handles infrastructure concerns such as data access and external services. API: Serves as the API layer, including controllers and extensions for handling HTTP requests and responses. Key Features: 1. Clean Architecture: The project structure is organized to promote a clear separation of concerns, making it easier to understand, test, and maintain the application. Here’s an example of the project structure: ├── src │ ├── Core │ ├── Infrastructure │ └── API ├── tests │ ├── Core.Tests │ ├── Infrastructure.Tests │ └── API.Tests └── README.md 2. SOLID Design Principles: The codebase follows SOLID principles, enhancing maintainability and extensibility. For example, the UserService class in the Core layer adheres to the Single Responsibility Principle (SRP) by encapsulating user-related business logic: // Core/Services/UserService.cs public class UserService { private readonly IUserRepository _userRepository; public UserService(IUserRepository userRepository) { _userRepository = userRepository; } public async Task<User> GetUserById(int userId) { // Logic to fetch user by Id from repository return await _userRepository.GetUserById(userId); } // Other methods... } 3. Repository Pattern: The repository pattern abstracts the data access layer and provides a consistent interface for working with data. Here’s an example of a repository class in the Infrastructure layer: // Infrastructure/Repositories/UserRepository.cs public class UserRepository : IUserRepository { private readonly DbContext _dbContext; public UserRepository(DbContext dbContext) { _dbContext = dbContext; } public async Task<User> GetUserById(int userId) { // Logic to fetch user by Id from database return await _dbContext.Users.FirstOrDefaultAsync(u => u.Id == userId); } // Other repository methods... } 4. Entity Framework Core: Entity Framework Core is used as the ORM tool for data access. The ApplicationDbContext class in the Infrastructure layer represents the database context: // Infrastructure/Data/ApplicationDbContext.cs public class ApplicationDbContext : DbContext { public DbSet<User> Users { get; set; } // Other DbSets... protected override void OnModelCreating(ModelBuilder modelBuilder) { // Configure entity mappings... } } 5. JWT for Token-based Authentication: Token-based authentication is implemented using JSON Web Tokens (JWT) for managing user sessions, authentication, and authorization securely. Here’s an example of an authentication controller in the API layer: // API/Controllers/AuthenticationController.cs public class AuthenticationController : ControllerBase { private readonly IAuthService _authService; public AuthenticationController(IAuthService authService) { _authService = authService; } [HttpPost("login")] public async Task<IActionResult> Login(LoginRequestModel model) { // Authenticate user and generate JWT token var token = await _authService.GenerateToken(model.Username, model.Password); return Ok(new { Token = token }); } // Other authentication methods... } 6. API Versioning: API versioning is embraced to support evolutionary changes while maintaining backward compatibility. Here’s an example of versioned controllers in the API layer: // API/Controllers/V1/UsersController.cs [ApiController] [ApiVersion("1.0")] [Route("api/v{version:apiVersion}/users")] public class UsersController : ControllerBase { // Controller methods for version 1.0 of the API... } // API/Controllers/V2/UsersController.cs [ApiController] [ApiVersion("2.0")] [Route("api/v{version:apiVersion}/users")] public class UsersController : ControllerBase { // Controller methods for version 2.0 of the API... } 7. Dependency Injection: ASP.NET Core’s built-in dependency injection container is used for managing and injecting dependencies throughout the application. Here’s an example of service registration in the Startup class: // API/Startup.cs public void ConfigureServices(IServiceCollection services) { services.AddScoped<IUserService, UserService>(); services.AddScoped<IUserRepository, UserRepository>(); // Other service and repository registrations... } 8. Unit Testing: Separate test projects are included for unit testing the core, infrastructure, and API layers, ensuring code quality and reliability. Here’s an example of a unit test for the UserService class: Getting Started: https://github.com/kawser2133/web-api-project To use this project template, follow these steps: Ensure that you have the .NET 7 SDK installed on your machine. Clone or download the repository to your local machine. Open the solution in your preferred IDE (e.g., Visual Studio, Visual Studio Code). Build the solution to restore NuGet packages and compile the code. Configure the necessary database connection settings in the appsettings.json file of the Infrastructure project. Run the Update-Database command in the Package Manager Console to create the database. Run the application by starting the Project.API project. Conclusion: The ASP.NET Core Web API project template provides a solid foundation for building secure, scalable, and elegant APIs. By following best coding practices, architectural principles, and design patterns, developers can create robust APIs that meet the demands of modern web applications. Whether you’re building a small-scale project or a large enterprise application, this project template equips you with the tools and guidelines necessary for success. Please find original article link here.
Egyptian Barley Salad with Pomegranate Vinaigrette
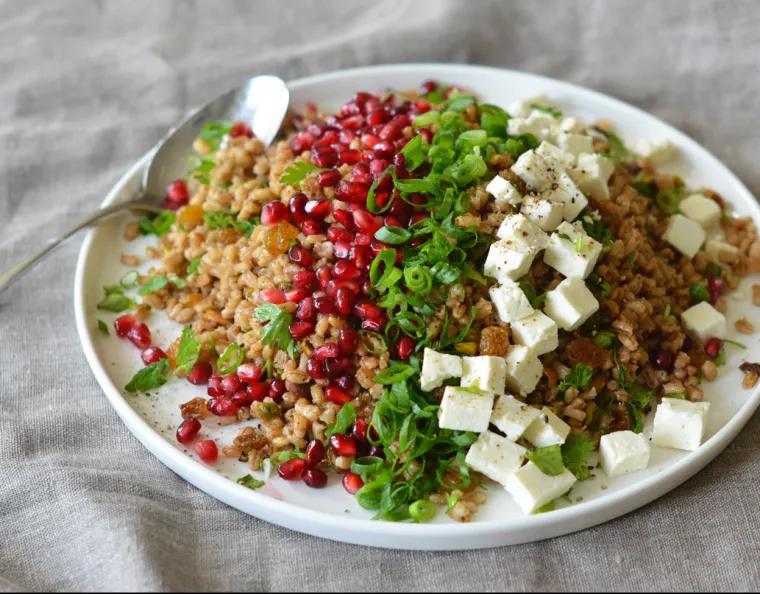
Inspired by the flavors of Egypt, this gorgeous barley salad is adorned with feta, scallions, pistachios, raisins and pomegranate seeds. Modestly adapted from The Complete Make-Ahead Cookbook from America’s Test Kitchen, this Middle Eastern barley salad incorporates crunchy pistachios, tangy pomegranate molasses, earthy spices, and sweet golden raisins. Salty feta, scallions, and juicy pomegranate seeds adorn the top of the dish, making a gorgeous composed salad with lively flavors and textures. It’s a wonderful dish to keep in the fridge for healthy lunches, and it also makes a festive-looking potluck dish for the holidays. What you’ll need to make Egyptian Barley Salad Step-by-Step Instructions Begin by cooking the barley. In order for the grains to remain distinct, rather than cohesive as in a pilaf, America’s Test Kitchen uses the “pasta method” to boil the barley. Drain the barley, then spread it on a rimmed baking sheet to cool. Meanwhile, make the dressing by whisking together the olive oil, pomegranate molasses, lemon juice, sugar, cinnamon, cumin, and salt. (Note that pomegranate molasses is sold at some large grocers, Whole Foods, or Middle Eastern markets. You can also buy it online.) Toss with the cooled barley, cilantro, raisins, and pistachios. Spread the barley salad evenly onto a serving platter and arrange feta, scallions, and pomegranate seeds in diagonal rows on top. Drizzle with extra olive oil and serve. Find original recipe link here.
Understanding Cookies and Sessions in Web Development
Introduction: Understanding Cookies and Sessions in Web Development – In web development, managing user data and state is crucial for creating personalized and secure experiences. Two common mechanisms for achieving this are cookies and sessions. In this article, we will explore what cookies and sessions are, their differences, and how they are used in web applications. Cookies: Cookies are small pieces of data stored on the user’s browser. They are sent between the client and the server with each HTTP request, allowing the server to recognize the user. Cookies are typically used for: Client-Side Storage: Cookies are stored on the client’s browser, making them an excellent choice for lightweight data that doesn’t require extensive server-side resources. Persistent Data: If you need to retain information between sessions and across different pages, cookies are suitable. They have expiration dates that can be set for short or extended periods. User Preferences: Cookies are commonly employed for storing user preferences, language settings, or themes, providing a personalized experience. How Cookies Work: When a user visits a website, the server sends a Set-Cookie header with the response. The cookie is then stored on the user’s browser. On subsequent requests, the cookie is sent back to the server using the Cookie header. Set-Cookie: user_id=123; expires=Wed, 01 Jan 2025 00:00:00 GMT; path=/ Here, a cookie named “user_id” is set with an expiration date and a path indicating its scope. Cookies in ASP.NET Core: ASP.NET Core provides a convenient way to work with cookies using the HttpContext.Response and HttpContext.Request objects. 1. Setting a Cookie: Cookies are small pieces of data sent by the server and stored on the client’s browser. Here’s how you can set a cookie in an ASP.NET Core controller action: // In a controller action public IActionResult SetCookie() { // Set a cookie with a key-value pair Response.Cookies.Append("user_id", "123", new CookieOptions { Expires = DateTime.Now.AddDays(7), // Cookie expiration date HttpOnly = true, // The cookie is not accessible via JavaScript Secure = true, // The cookie is only sent over HTTPS SameSite = SameSiteMode.Strict // Restricts the cookie to the same site }); return View(); } 2. Reading a Cookie: To read the value of a cookie, use the HttpContext.Request object in a controller action: public IActionResult ReadCookie() { // Retrieve the value of the "user_id" cookie string userId = Request.Cookies["user_id"]; // Use the retrieved value as needed return View(); } 3. Deleting a Cookie: Deleting a cookie involves setting its expiration date to a past date: public IActionResult DeleteCookie() { // Delete the "user_id" cookie by setting its expiration date to the past Response.Cookies.Delete("user_id"); return View(); } Sessions: Sessions are a way to store user-specific information on the server. Unlike cookies, which are stored on the client-side, sessions exist on the server and are identified by a unique session ID stored in a cookie on the user’s browser. Sessions are typically used for: Server-Side Storage: Sessions store data on the server, making them more secure for sensitive information. They are ideal for managing user authentication tokens and other confidential details. Temporary Data: If you only need to retain information for the duration of a user’s visit, sessions are well-suited. They automatically expire when the user closes the browser. Complex Data Structures: Sessions are preferable when dealing with larger sets of data or complex data structures, as the server handles the storage and retrieval. How Sessions Work: Session Creation: When a user visits a website, a unique session ID is generated, and a session object is created on the server. Session ID in Cookie: The session ID is sent to the user’s browser via a cookie. Server-Side Storage: The server uses the session ID to retrieve and store user-specific data in the session object. Session Expiry: Sessions usually have an expiration time, and when a user remains inactive for a specified period, the session is terminated. Sessions in ASP.NET Core: ASP.NET Core provides an abstraction for session management, and it can be configured to use various storage providers, such as in-memory storage, distributed cache, or a database. 1. Enabling Session: Sessions provide a way to store user-specific information on the server. In the Startup.cs file, configure services, and add session middleware: public void ConfigureServices(IServiceCollection services) { services.AddDistributedMemoryCache(); // In-memory cache for simplicity, use a more robust solution in production services.AddSession(options => { options.IdleTimeout = TimeSpan.FromMinutes(30); // Session timeout options.Cookie.HttpOnly = true; // The session cookie is not accessible via JavaScript options.Cookie.IsEssential = true; // Mark the session cookie as essential }); // Other service configurations... } public void Configure(IApplicationBuilder app, IHostingEnvironment env) { app.UseSession(); // Enable session middleware // Other middleware configurations... } 2. Storing and Retrieving Data in Session: Now, let’s see how to store and retrieve data in a session: public IActionResult SetSession() { HttpContext.Session.SetString("user_name", "John Doe"); HttpContext.Session.SetInt32("user_age", 25); return View(); } public IActionResult ReadSession() { string userName = HttpContext.Session.GetString("user_name"); int? userAge = HttpContext.Session.GetInt32("user_age"); // Use the retrieved values as needed return View(); } 3. Session Timeout: Adjust the session timeout to control how long session data is retained: services.AddSession(options => { options.IdleTimeout = TimeSpan.FromMinutes(30); // Session timeout // ... }); 4. Session Essentiality: Mark a session cookie as essential to ensure its presence: services.AddSession(options => { // ... options.Cookie.IsEssential = true; // Mark the session cookie as essential }); Differences: Location: Cookies are stored on the client-side. Sessions are stored on the server-side. Data Storage: Cookies store small amounts of data (4KB per domain). Sessions can store larger amounts of data on the server. Security: Cookies can be manipulated or stolen, posing security risks. Sessions are more secure as session data is stored on the server. Conclusion: Cookies and sessions are fundamental components of web development, offering ways to manage user data and maintain state. The choice between cookies and sessions depends on the specific requirements of your application. While cookies are suitable for storing small, client-side data, sessions are preferable for managing larger amounts of server-side data. Understanding these mechanisms is essential for creating efficient and secure web applications. Please find original article here.
Fusilli alla Caprese
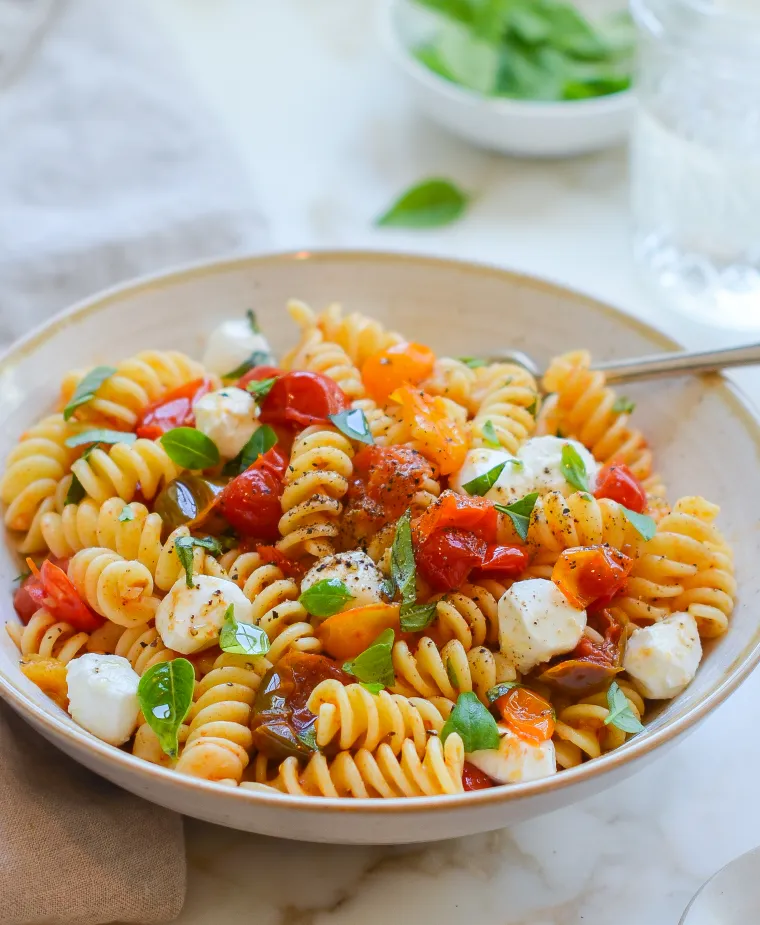
Simple yet spectacular, this fusilli alla Caprese requires just a handful of ingredients, comes together quickly, and is delicious hot or cold. Sometimes cooking weeknight dinners can feel like a chore, but when a dish is as simple and spectacular as this one, it can be therapy. Adapted from Giada De Laurentis, fusilli alla Caprese calls for just a handful of good-quality ingredients – and the sauce cooks in less time than it takes to boil the pasta! What’s more, it’s delicious cold, should you have any leftover. Thank you to my dear friend Kelly Santoro for sharing the recipe with me. What You’ll Need To Make Fusilli Alla Caprese Since the recipe calls for so few ingredients, it’s important not to skimp on quality. You’ll need good extra-virgin olive oil, fresh minced garlic (no jarred stuff!), sweet cherry tomatoes, fresh basil, and fresh mozzarella. Fusilli is the ideal pasta shape for this recipe – because of its corkscrew shape, the sauce clings nicely to it. But if you’re unable to find fusilli in your store, rotini, penne, or farfalle pastas are all good alternatives. If your store happens to carry packages of assorted colors of cherry tomatoes, I love the color they add to the dish; if not no worries – it will still be lovely. For the cheese, I like to use mozzarella pearls; these are the tiniest mozzarella balls, named for their size. Most large supermarkets carry them conveniently packaged in 8-oz pouches but, if you can’t find them, simply buy a ball of fresh mozzarella and dice it into cubes. How To Make Fusilli Alla Caprese Begin by boiling the fusilli until al dente. You’ll need to reserve 1/2 cup of the cooking water to use in the sauce. It’s easy to forget when you drain the pasta, so I always set out a liquid measuring cup as a visual reminder. Next, use a small serrated knife to halve the cherry tomatoes. Make the sauce: in a large skillet, heat the olive oil over medium heat. Add the garlic and sauté until fragrant, 1 to 2 minutes; do not burn. Add the halved tomatoes, salt, and pepper and increase the heat to medium-high. Cook, stirring occasionally, until the tomatoes start to soften and burst, 4 to 5 minutes. Using a fork, smash the tomatoes into a chunky sauce. Add the drained fusilli to the pan and toss to combine. Right before serving, toss in the basil and mozzarella pearls. (It’s important to do this at the last minute so the cheese doesn’t melt too much.) Taste and adjust seasoning, adding the reserved pasta water little by little if the pasta seems dry. Spoon into bowls and serve. Please find original recipe link here.
Pasta with Sun-Dried Tomato Pesto and Mozzarella Pearls
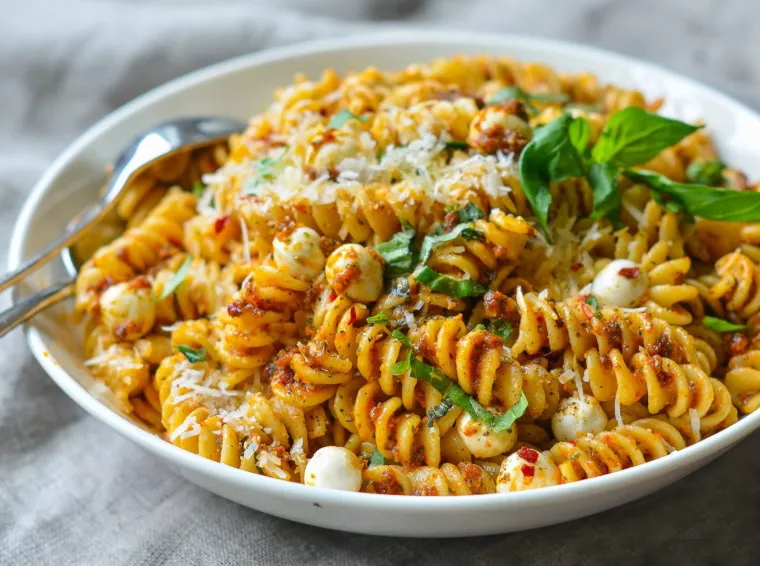
Quick, simple and family-approved — this pasta with sun-dried tomato pesto and fresh mozzarella pearls is delicious hot or cold. Quick, simple, and family-approved, this pasta with sun-dried tomato pesto and fresh mozzarella pearls makes a fabulous weeknight supper, and it also doubles as a vibrant pasta salad for a cookout. Pair it with a simple arugula salad and warm crusty bread. Or for a more substantial meal, grill some Italian sausages to serve alongside. The pesto yields enough for two dinners, and it freezes nicely, too. What you’ll need to make pasta with sun-dried tomato pesto STEP-BY-STEP INSTRUCTIONS To begin, bring a large pot of salted water to a boil. (Add enough salt so that the water tastes like the sea.) Cook the pasta according to the package instructions until al dente. You’ll need to reserve some of the cooking water for the sauce. It’s easy to forget to do this, so I always set a liquid measuring cup out as a visual reminder. Meanwhile, make the pesto. In the bowl of a food processor fitted with the steel blade, combine the sun-dried tomatoes with their oil, garlic, salt, red pepper flakes, sugar, basil, pine nuts, Parmigiano-Reggiano and olive oil. Pulse, scraping down the sides as necessary, until the mixture is finely puréed. Divide the mixture in half. Set aside. Reserve about 1 cup of the pasta cooking water (you’ll need it for the sauce), then drain the pasta. Add the pasta back to the pan. Add half of the pesto and stir to combine, adding the reserved pasta water little by little, until the pasta is well-coated and moistened. I usually use about 3/4 cup of the pasta water, but you may need more or less. (Refrigerate or freeze the remaining pesto for another meal.) Taste and adjust seasoning with more salt and red pepper flakes, if necessary. Right before serving, toss in 2 tablespoons chopped basil and the mozzarella pearls (it’s important to do this right before serving so the cheese doesn’t melt from the heat of the pan). Transfer to a serving dish or pasta bowls and serve with more grated Parmigiano-Reggiano. Please find original recipe link here.
Quinoa Pilaf with Shiitake Mushrooms, Carrots and Pecans
This quinoa pilaf is gussied up with sautéed onions, carrots, shiitake mushrooms and pecans. It makes an earthy and hearty dish. This quinoa pilaf is the kind of dish that will remind you that eating healthy doesn’t have to leave you hungry. It’s one of the reasons I love quinoa (pronounced keen-wah). It looks like couscous and eats like a grain but it’s actually the tiny seed of a plant related to leafy greens like spinach and Swiss chard. Quinoa is incredibly high in protein and fiber and contains all of the essential amino acids your body needs. What’s more? It’s gluten-free, cooks quickly (just 15 minutes!) and can take on limitless flavors. Here, the quinoa is gussied up with sautéed onions, carrots, shiitake mushrooms, and pecans to make an earthy and hearty dish. What you’ll need to make Quinoa Pilaf One of the secrets to making delicious quinoa is to ignore the instructions on the package, which almost always call for too much liquid and result in mushy quinoa. For quinoa that is light, fluffy and slightly crunchy, the ideal ratio is 1 cup quinoa to 1-2/3 cup liquid. How to make quinoa pilaf To begin, bring the chicken broth and quinoa to a boil, then cover the pot and simmer for 15 minutes. It will look like this when it’s done… In the meantime, cook the onions gently in olive oil until they start to soften. Add the diced carrots and thyme and continue to cook until the carrots are just tender. Next, stir in the shiitake mushrooms and garlic, and continue cooking until the mushrooms are done. Finally, stir in the cooked quinoa, pecans, and parsley. That’s all there is to it. Transfer to a serving dish and enjoy as a hearty side or meatless main course. Enjoy. Please find original recipe link here.
Cheesy Baked Spaghetti Squash with Marinara Sauce
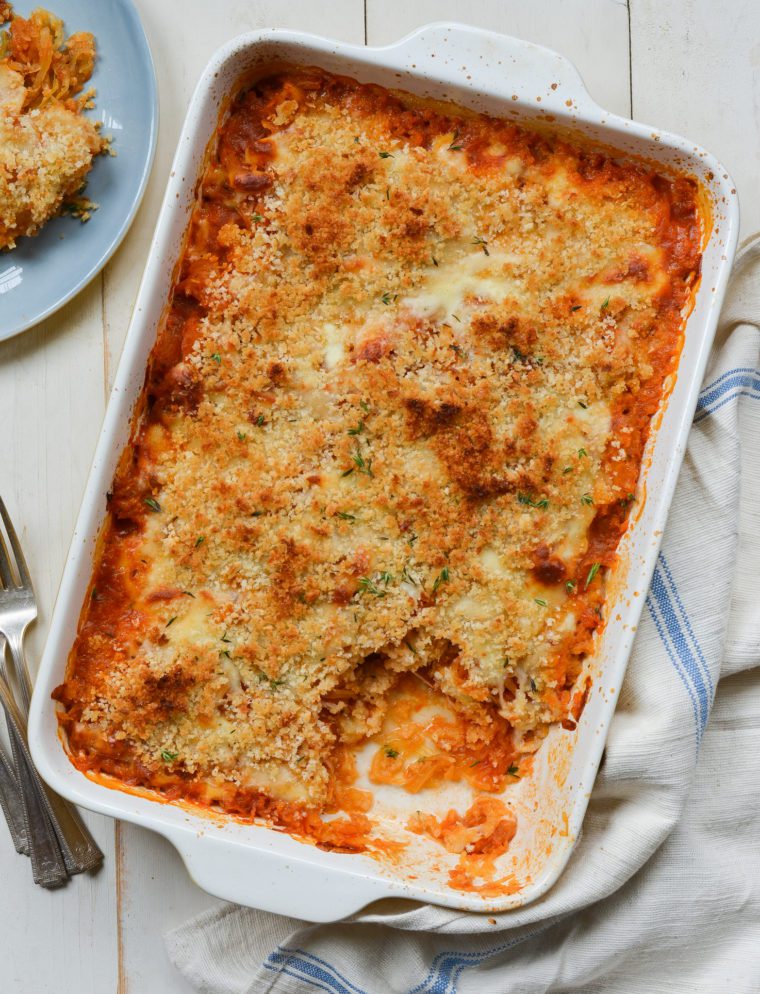
This cheesy spaghetti squash casserole is vegetarian comfort food. Spaghetti squash is a gift from the diet gods. When roasted, it miraculously transforms into low-carb, low-cal, spaghetti-like strands. Here, I toss it with good-quality jarred marinara sauce, top it with shredded cheese and crispy bread crumbs, and bake it until gooey and golden brown. The casserole makes a comforting vegetarian main course or side dish for meatballs or Italian sausage. If you’ve never cooked spaghetti squash, it can be a little intimidating because it’s one of those large, awkward vegetables you’re not quite sure how to go at. For this recipe, I use two medium squash rather than one large one, as the smaller squash are easier to cut. I also sharpen my chef’s knife before I get started; it makes all the difference. (Pro tip: you’re much more likely to cut yourself with a dull knife than a sharp one. I use an electric knife sharpener regularly to keep my knives in tip-top shape.) What You’ll Need To Make Cheesy Baked Spaghetti Squash Step-by-Step Instructions Step 1: Prep the Spaghetti Squash Using a very sharp chef’s knife, cut a sliver off of the stem end of each squash (this creates a flat surface to cut the squash in half). Stand each squash upright on a cutting board and slice through them top to bottom to cut each squash in half (use your body weight to press the knife down). Using a soup spoon, scrape out the seeds and discard them. Step 2: Roast the Spaghetti Squash Place the squash halves cut-side-up on a foil-lined baking sheet. Drizzle with the oil and sprinkle evenly with 1 teaspoon salt and 1/2 teaspoon pepper. Flip the squash halves so they are cut-side-down. Roast for 40 to 50 minutes, or until the squash is golden brown underneath and the flesh is tender when pierced with a fork. You should be able to scrape the strands away from the skin easily. Flip the squash halves so they are cut-side-up, and let sit until cool enough to handle. Use a fork to scrape out and fluff the strands. Step 3: Toss the Spaghetti Squash with Sauce and Seasonings Increase the oven temperature to 425°F. Place the strands in a large bowl. Add the marinara sauce, 3/4 teaspoon salt, 1/4 teaspoon pepper, and thyme. Toss gently until the squash is evenly coated. Taste and add adjust seasoning if necessary. Step 4: Assemble and Bake Transfer the mixture to a 9 x 13-inch baking dish. Sprinkle the mozzarella cheese evenly over top, followed by the Parmigiano-Reggiano. In a small bowl, combine the melted butter with the panko, and mix until the panko is evenly coated. Sprinkle the panko mixture evenly over the cheese. Bake for 25 to 30 minutes, or until the top is golden. Let cool for a few minutes, then sprinkle with more fresh thyme and serve. Please find original recipe link here.
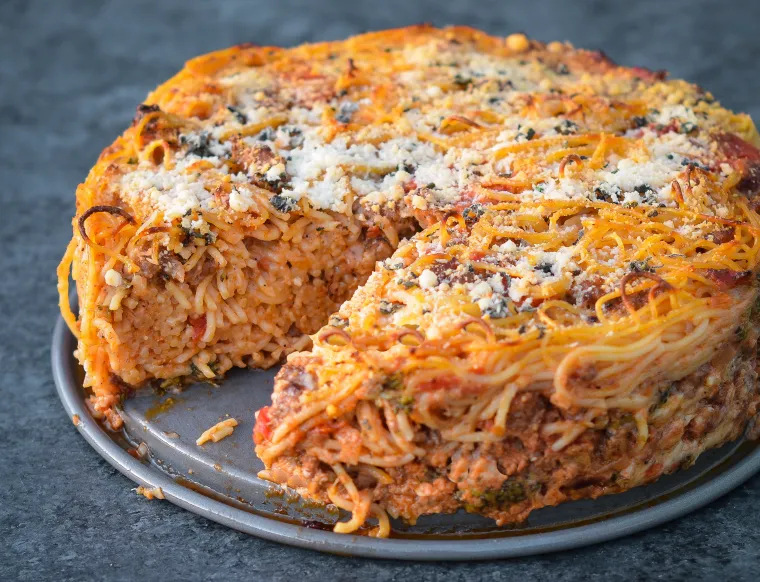
Gail Simmons’ Epic Spaghetti Pie
Spaghetti pie is a big affair, impressive in both stature and ingredients — perfect for a hungry crowd. Featured on the cover of her beautiful new cookbook, Bringing It Home: Favorite Recipes From A Life of Adventurous Eating, Gail Simmons’ Spaghetti Pie made with broccoli and Italian sausage is, according to my husband, one of the best things I have ever made. EVER. I suppose I could take offense since it’s not even one of my own recipes but I totally agree with him. It’s similar to sausage lasagna or baked ziti with sausage, only way more impressive to serve. Fair warning: the recipe calls for a jaw-dropping amount of cheese. All I can tell you is that it’s worth it. Gail writes, “Spaghetti pie is a big affair, impressive in both stature and ingredients, and meant to serve a hungry crowd. You don’t have to wait for your next party to make it, though. If you don’t have enough eaters to tackle it, there’s a bonus: Slices of the savory pie make the best leftovers of all time.” The recipe requires a springform pan, which is a good investment if you don’t have one, but you could easily use a large baking dish and serve the “pie” lasagna-style if need be. What you’ll need to make spaghetti pie How to make spaghetti pie To begin, heat the oil in a large skillet over medium-high heat. Add the onion and garlic and cook for 1 minute. Add the broccoli and 1 tablespoon of water and cook until the broccoli is crisp-tender, 2 to 3 minutes. Add the sausage. Cook, breaking the meat into small bits, until cooked through, about 6 minutes. Stir in the tomato paste and cook for 1 minute. Then add the crushed drained tomatoes and 1/4 teaspoon salt. (Note that it’s best to use canned whole tomatoes and crush them yourself over diced tomatoes, since diced canned tomatoes contain a firming agent, calcium chloride, that makes them slow to break down.) Cook, stirring occasionally and scraping any bits from the pan, until the liquid is mostly evaporated, about 5 minutes. Remove from the heat and set aside. Meanwhile, cook the spaghetti just until very al dente, 7 to 8 minutes (look for a white spot in the center when you bite into a strand). Drain the pasta (do not rinse) and reserve the pot. In a medium bowl, whisk together the milk, eggs, pepper, and 3/4 teaspoon salt. Combine the spaghetti and milk mixture in the pot; add in the sausage-broccoli mixture, cheddar, fontina, and 1 cup of the Parmesan. Stir until well combined. Transfer the pasta mixture to a springform pan wrapped in aluminum foil (wrapping the pan in foil protects against leakage). Using a spatula, smooth the top. Set the pan on a rimmed baking sheet and bake until the edges are golden and bubbling, about 35 minutes. Remove the pan from the oven. Turn on the broiler. Sprinkle the pie with the sage and remaining 1/2 cup Parmesan. Broil 4 to 5 inches from the heat until the cheese is golden, 2 to 3 minutes. Remove from the oven and run a knife around the inside of the pan. Let the pie rest for about 10 minutes, then release and remove the sides of the pan. Cut the pie into slices and serve warm. Enjoy! Please find original recipe link here.


