Articles contributed by the community, curated for your enjoyment and reading.
Filters
Reset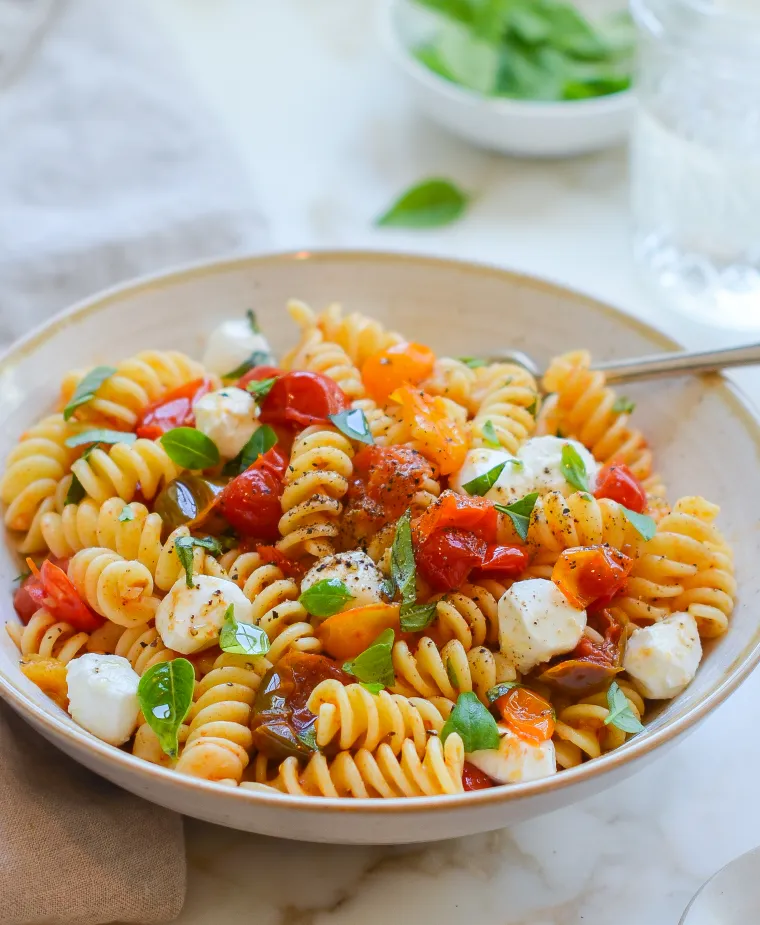
Fusilli alla Caprese
Simple yet spectacular, this fusilli alla Caprese requires just a handful of ingredients, comes together quickly, and is delicious hot or cold. Sometimes cooking weeknight dinners can feel like a chore, but when a dish is as simple and spectacular as this one, it can be therapy. Adapted from Giada De Laurentis, fusilli alla Caprese calls for just a handful of good-quality ingredients – and the sauce cooks in less time than it takes to boil the pasta! What’s more, it’s delicious cold, should you have any leftover. Thank you to my dear friend Kelly Santoro for sharing the recipe with me. What You’ll Need To Make Fusilli Alla Caprese Since the recipe calls for so few ingredients, it’s important not to skimp on quality. You’ll need good extra-virgin olive oil, fresh minced garlic (no jarred stuff!), sweet cherry tomatoes, fresh basil, and fresh mozzarella. Fusilli is the ideal pasta shape for this recipe – because of its corkscrew shape, the sauce clings nicely to it. But if you’re unable to find fusilli in your store, rotini, penne, or farfalle pastas are all good alternatives. If your store happens to carry packages of assorted colors of cherry tomatoes, I love the color they add to the dish; if not no worries – it will still be lovely. For the cheese, I like to use mozzarella pearls; these are the tiniest mozzarella balls, named for their size. Most large supermarkets carry them conveniently packaged in 8-oz pouches but, if you can’t find them, simply buy a ball of fresh mozzarella and dice it into cubes. How To Make Fusilli Alla Caprese Begin by boiling the fusilli until al dente. You’ll need to reserve 1/2 cup of the cooking water to use in the sauce. It’s easy to forget when you drain the pasta, so I always set out a liquid measuring cup as a visual reminder. Next, use a small serrated knife to halve the cherry tomatoes. Make the sauce: in a large skillet, heat the olive oil over medium heat. Add the garlic and sauté until fragrant, 1 to 2 minutes; do not burn. Add the halved tomatoes, salt, and pepper and increase the heat to medium-high. Cook, stirring occasionally, until the tomatoes start to soften and burst, 4 to 5 minutes. Using a fork, smash the tomatoes into a chunky sauce. Add the drained fusilli to the pan and toss to combine. Right before serving, toss in the basil and mozzarella pearls. (It’s important to do this at the last minute so the cheese doesn’t melt too much.) Taste and adjust seasoning, adding the reserved pasta water little by little if the pasta seems dry. Spoon into bowls and serve. Please find original recipe link here.

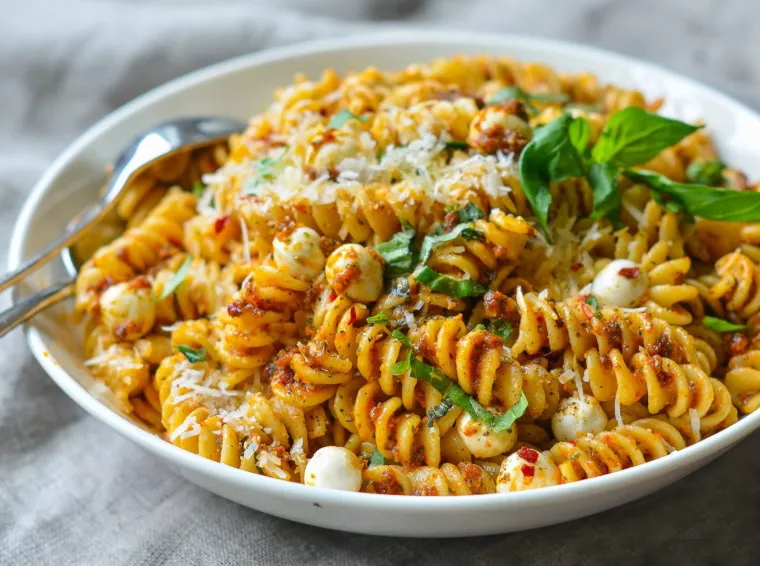
Pasta with Sun-Dried Tomato Pesto and Mozzarella Pearls
Quick, simple and family-approved — this pasta with sun-dried tomato pesto and fresh mozzarella pearls is delicious hot or cold. Quick, simple, and family-approved, this pasta with sun-dried tomato pesto and fresh mozzarella pearls makes a fabulous weeknight supper, and it also doubles as a vibrant pasta salad for a cookout. Pair it with a simple arugula salad and warm crusty bread. Or for a more substantial meal, grill some Italian sausages to serve alongside. The pesto yields enough for two dinners, and it freezes nicely, too. What you’ll need to make pasta with sun-dried tomato pesto STEP-BY-STEP INSTRUCTIONS To begin, bring a large pot of salted water to a boil. (Add enough salt so that the water tastes like the sea.) Cook the pasta according to the package instructions until al dente. You’ll need to reserve some of the cooking water for the sauce. It’s easy to forget to do this, so I always set a liquid measuring cup out as a visual reminder. Meanwhile, make the pesto. In the bowl of a food processor fitted with the steel blade, combine the sun-dried tomatoes with their oil, garlic, salt, red pepper flakes, sugar, basil, pine nuts, Parmigiano-Reggiano and olive oil. Pulse, scraping down the sides as necessary, until the mixture is finely puréed. Divide the mixture in half. Set aside. Reserve about 1 cup of the pasta cooking water (you’ll need it for the sauce), then drain the pasta. Add the pasta back to the pan. Add half of the pesto and stir to combine, adding the reserved pasta water little by little, until the pasta is well-coated and moistened. I usually use about 3/4 cup of the pasta water, but you may need more or less. (Refrigerate or freeze the remaining pesto for another meal.) Taste and adjust seasoning with more salt and red pepper flakes, if necessary. Right before serving, toss in 2 tablespoons chopped basil and the mozzarella pearls (it’s important to do this right before serving so the cheese doesn’t melt from the heat of the pan). Transfer to a serving dish or pasta bowls and serve with more grated Parmigiano-Reggiano. Please find original recipe link here.
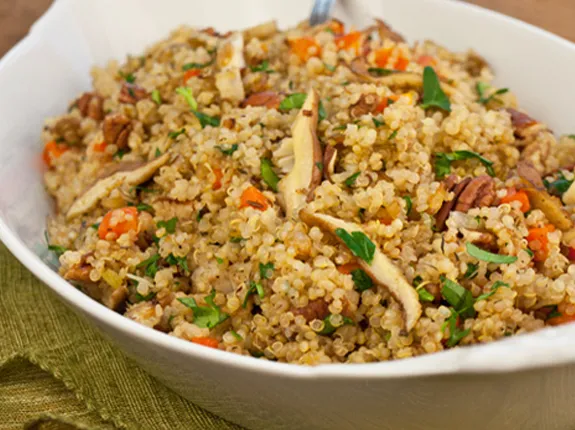
Quinoa Pilaf with Shiitake Mushrooms, Carrots and Pecans
This quinoa pilaf is gussied up with sautéed onions, carrots, shiitake mushrooms and pecans. It makes an earthy and hearty dish. This quinoa pilaf is the kind of dish that will remind you that eating healthy doesn’t have to leave you hungry. It’s one of the reasons I love quinoa (pronounced keen-wah). It looks like couscous and eats like a grain but it’s actually the tiny seed of a plant related to leafy greens like spinach and Swiss chard. Quinoa is incredibly high in protein and fiber and contains all of the essential amino acids your body needs. What’s more? It’s gluten-free, cooks quickly (just 15 minutes!) and can take on limitless flavors. Here, the quinoa is gussied up with sautéed onions, carrots, shiitake mushrooms, and pecans to make an earthy and hearty dish. What you’ll need to make Quinoa Pilaf One of the secrets to making delicious quinoa is to ignore the instructions on the package, which almost always call for too much liquid and result in mushy quinoa. For quinoa that is light, fluffy and slightly crunchy, the ideal ratio is 1 cup quinoa to 1-2/3 cup liquid. How to make quinoa pilaf To begin, bring the chicken broth and quinoa to a boil, then cover the pot and simmer for 15 minutes. It will look like this when it’s done… In the meantime, cook the onions gently in olive oil until they start to soften. Add the diced carrots and thyme and continue to cook until the carrots are just tender. Next, stir in the shiitake mushrooms and garlic, and continue cooking until the mushrooms are done. Finally, stir in the cooked quinoa, pecans, and parsley. That’s all there is to it. Transfer to a serving dish and enjoy as a hearty side or meatless main course. Enjoy. Please find original recipe link here.
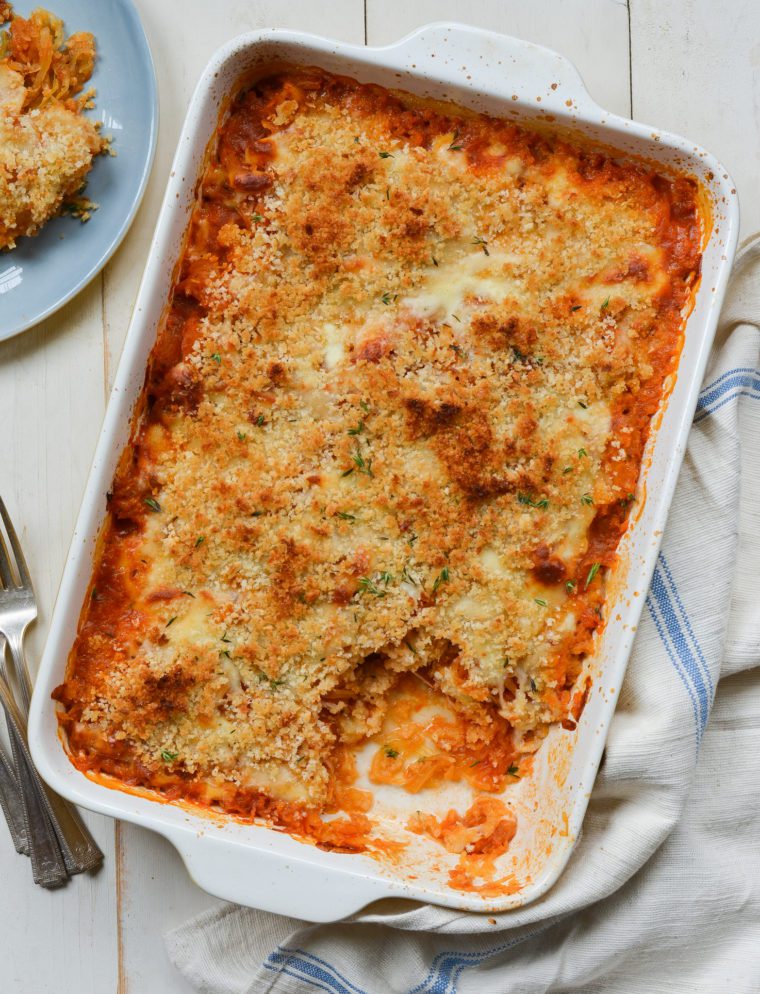
Cheesy Baked Spaghetti Squash with Marinara Sauce
This cheesy spaghetti squash casserole is vegetarian comfort food. Spaghetti squash is a gift from the diet gods. When roasted, it miraculously transforms into low-carb, low-cal, spaghetti-like strands. Here, I toss it with good-quality jarred marinara sauce, top it with shredded cheese and crispy bread crumbs, and bake it until gooey and golden brown. The casserole makes a comforting vegetarian main course or side dish for meatballs or Italian sausage. If you’ve never cooked spaghetti squash, it can be a little intimidating because it’s one of those large, awkward vegetables you’re not quite sure how to go at. For this recipe, I use two medium squash rather than one large one, as the smaller squash are easier to cut. I also sharpen my chef’s knife before I get started; it makes all the difference. (Pro tip: you’re much more likely to cut yourself with a dull knife than a sharp one. I use an electric knife sharpener regularly to keep my knives in tip-top shape.) What You’ll Need To Make Cheesy Baked Spaghetti Squash Step-by-Step Instructions Step 1: Prep the Spaghetti Squash Using a very sharp chef’s knife, cut a sliver off of the stem end of each squash (this creates a flat surface to cut the squash in half). Stand each squash upright on a cutting board and slice through them top to bottom to cut each squash in half (use your body weight to press the knife down). Using a soup spoon, scrape out the seeds and discard them. Step 2: Roast the Spaghetti Squash Place the squash halves cut-side-up on a foil-lined baking sheet. Drizzle with the oil and sprinkle evenly with 1 teaspoon salt and 1/2 teaspoon pepper. Flip the squash halves so they are cut-side-down. Roast for 40 to 50 minutes, or until the squash is golden brown underneath and the flesh is tender when pierced with a fork. You should be able to scrape the strands away from the skin easily. Flip the squash halves so they are cut-side-up, and let sit until cool enough to handle. Use a fork to scrape out and fluff the strands. Step 3: Toss the Spaghetti Squash with Sauce and Seasonings Increase the oven temperature to 425°F. Place the strands in a large bowl. Add the marinara sauce, 3/4 teaspoon salt, 1/4 teaspoon pepper, and thyme. Toss gently until the squash is evenly coated. Taste and add adjust seasoning if necessary. Step 4: Assemble and Bake Transfer the mixture to a 9 x 13-inch baking dish. Sprinkle the mozzarella cheese evenly over top, followed by the Parmigiano-Reggiano. In a small bowl, combine the melted butter with the panko, and mix until the panko is evenly coated. Sprinkle the panko mixture evenly over the cheese. Bake for 25 to 30 minutes, or until the top is golden. Let cool for a few minutes, then sprinkle with more fresh thyme and serve. Please find original recipe link here.
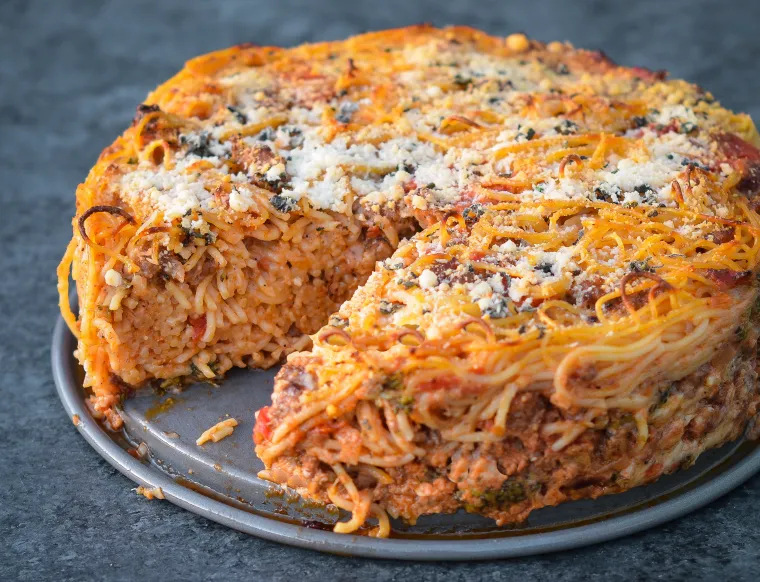
Gail Simmons’ Epic Spaghetti Pie
Spaghetti pie is a big affair, impressive in both stature and ingredients — perfect for a hungry crowd. Featured on the cover of her beautiful new cookbook, Bringing It Home: Favorite Recipes From A Life of Adventurous Eating, Gail Simmons’ Spaghetti Pie made with broccoli and Italian sausage is, according to my husband, one of the best things I have ever made. EVER. I suppose I could take offense since it’s not even one of my own recipes but I totally agree with him. It’s similar to sausage lasagna or baked ziti with sausage, only way more impressive to serve. Fair warning: the recipe calls for a jaw-dropping amount of cheese. All I can tell you is that it’s worth it. Gail writes, “Spaghetti pie is a big affair, impressive in both stature and ingredients, and meant to serve a hungry crowd. You don’t have to wait for your next party to make it, though. If you don’t have enough eaters to tackle it, there’s a bonus: Slices of the savory pie make the best leftovers of all time.” The recipe requires a springform pan, which is a good investment if you don’t have one, but you could easily use a large baking dish and serve the “pie” lasagna-style if need be. What you’ll need to make spaghetti pie How to make spaghetti pie To begin, heat the oil in a large skillet over medium-high heat. Add the onion and garlic and cook for 1 minute. Add the broccoli and 1 tablespoon of water and cook until the broccoli is crisp-tender, 2 to 3 minutes. Add the sausage. Cook, breaking the meat into small bits, until cooked through, about 6 minutes. Stir in the tomato paste and cook for 1 minute. Then add the crushed drained tomatoes and 1/4 teaspoon salt. (Note that it’s best to use canned whole tomatoes and crush them yourself over diced tomatoes, since diced canned tomatoes contain a firming agent, calcium chloride, that makes them slow to break down.) Cook, stirring occasionally and scraping any bits from the pan, until the liquid is mostly evaporated, about 5 minutes. Remove from the heat and set aside. Meanwhile, cook the spaghetti just until very al dente, 7 to 8 minutes (look for a white spot in the center when you bite into a strand). Drain the pasta (do not rinse) and reserve the pot. In a medium bowl, whisk together the milk, eggs, pepper, and 3/4 teaspoon salt. Combine the spaghetti and milk mixture in the pot; add in the sausage-broccoli mixture, cheddar, fontina, and 1 cup of the Parmesan. Stir until well combined. Transfer the pasta mixture to a springform pan wrapped in aluminum foil (wrapping the pan in foil protects against leakage). Using a spatula, smooth the top. Set the pan on a rimmed baking sheet and bake until the edges are golden and bubbling, about 35 minutes. Remove the pan from the oven. Turn on the broiler. Sprinkle the pie with the sage and remaining 1/2 cup Parmesan. Broil 4 to 5 inches from the heat until the cheese is golden, 2 to 3 minutes. Remove from the oven and run a knife around the inside of the pan. Let the pie rest for about 10 minutes, then release and remove the sides of the pan. Cut the pie into slices and serve warm. Enjoy! Please find original recipe link here.

White Bean Ragout
This quick ragout of white beans and sweet tomatoes might just be my favorite recipe of the summer. This quick ragout of white beans and sweet summer tomatoes in a robustly flavored broth might just be my favorite recipe of the summer. The tomatoes — just barely cooked — burst in your mouth when you bite into them, and fresh herbs and a splash of balsamic vinegar liven the dish up. Serve it as a meatless main course, ideally with toasted garlic bread for sopping up the broth, or as a side dish to grilled meat. What you’ll need to make White bean ragout I suggest using dried beans if you can — it’s hardly any more work than putting them on the stove and forgetting about them — but canned will work fine in a pinch. Just be sure to use a brand you’re familiar with. I’ve had good results with Goya, but others (particularly the organic brands) can be downright mushy because they don’t contain any firming agents. If you want beans with a nice bite to them and wish to avoid the additives, the only way is to soak and cook the beans yourself. How to make white bean ragout Begin by cooking the onions in olive oil until soft and translucent. Add the garlic (I always use my garlic press) and cook for a minute more. Stir in the cherry tomatoes. Then add the beans, chicken broth, tomato paste, and balsamic vinegar. Simmer for a few minutes to warm the beans and tomatoes, then season to taste with salt and pepper. Stir in the fresh herbs right before serving so they keep their pretty green color. Enjoy! Find original recipe link here.
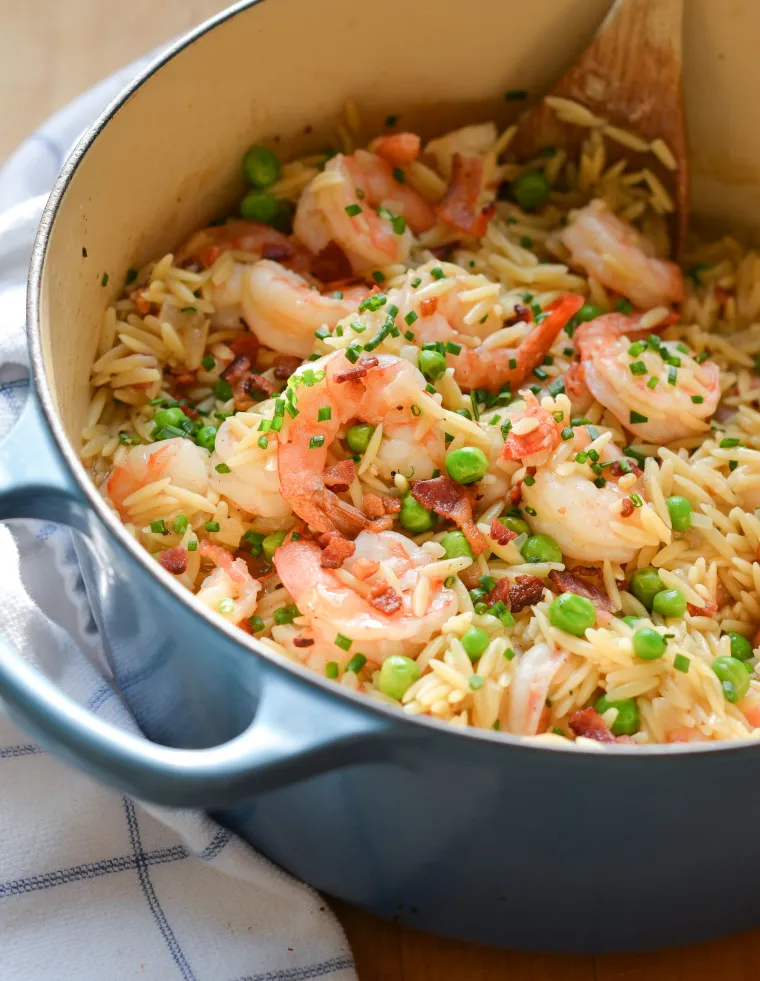
Orzo Risotto with Shrimp, Peas & Bacon
Rice-shaped orzo is cooked like risotto in this easy, one-pot pasta dish. In this easy one-pot recipe, rice-shaped orzo pasta is cooked like risotto, an Italian dish of rice slowly cooked in broth with other ingredients like meat, seafood, and vegetables. However, unlike traditional risotto, orzo “risotto” doesn’t require constant tending to and stirring – all of the broth is added at once and the pasta cooks almost unattended. My starting point for the recipe was a simple shrimp and orzo risotto from The Ultimate Meal Prep Cookbook by America’s Test Kitchen, but I added crispy bacon, peas, and Creole seasoning to amp up the flavor and give the dish a little Southern flair. What You’ll Need To Make Orzo Risotto with Shrimp, Peas & Bacon Step-by-Step Instructions Melt one tablespoon of the butter in a Dutch oven or large pot over medium-high heat and add the bacon. Cook, stirring frequently, until crisp, 6 to 8 minutes. Using a slotted spoon, transfer the bacon to a paper towel-lined plate and set aside. Reduce the heat to medium and add the onion. Cook, stirring frequently, until softened, about 3 minutes. Add the garlic and cook 1 minute more. Do not brown. Stir in the orzo and cook, stirring frequently, until lightly toasted, 2 to 3 minutes. Stir in the broth, salt, pepper, and Cajun/Creole seasoning and bring to a boil. Reduce the heat to low, cover, and simmer, stirring once midway through, until the orzo is creamy and nearly tender, about 10 minutes. Stir the shrimp and peas into the orzo. Cover and cook over low heat until the shrimp are opaque throughout and the orzo is tender, about 5 minutes. Off the heat, stir in the remaining tablespoon of butter, the lemon juice, and chives. Right before serving, stir in the crispy bacon. Taste and adjust seasoning, if necessary, then spoon into bowls and serve.
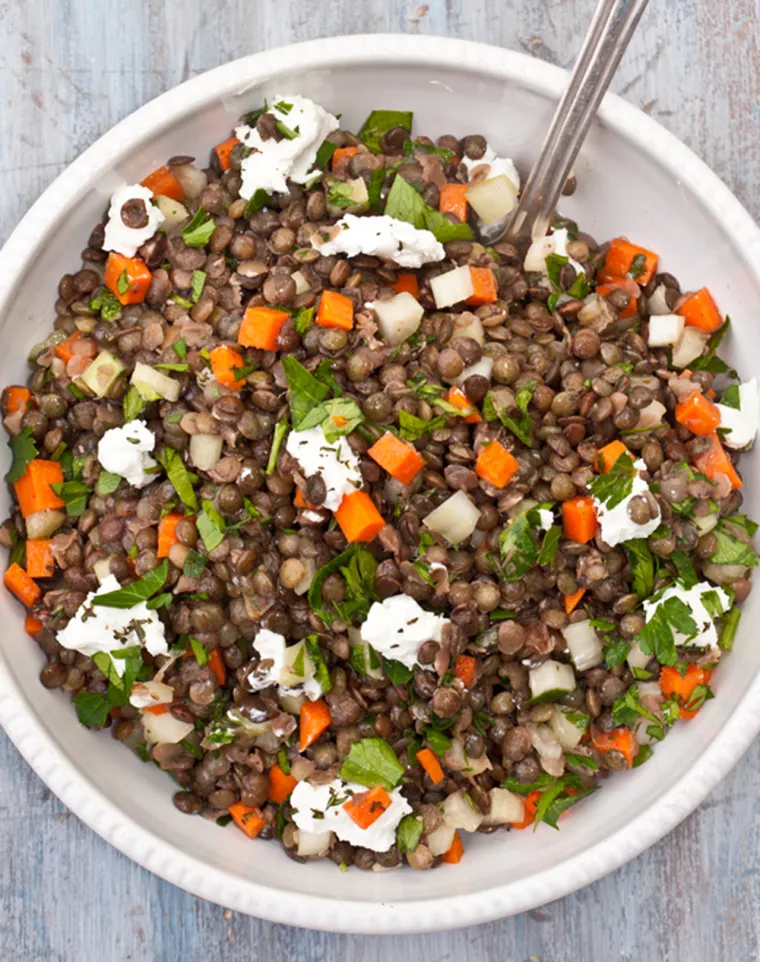
French Lentil Salad with Goat Cheese
This hearty lentil salad is perfect for a light dinner or a wholesome on-the-go lunch. I make this lentil salad when I get tired of hasty on-the-go lunches and am craving something wholesome. It’s made with French green lentils, which are ideal for salads (and some soups) because they hold their shape when cooked. These lentils are grown in the rich volcanic soil near Le Puy en Velay in the Auvergne region of France and have a wonderful earthy flavor. You can find them in the bulk section at Whole Foods or other specialty food shops. Unlike dried beans, lentils don’t require pre-soaking prior to being cooked. You simply pick over the little legumes, remove any that look broken or damaged, and cook for 20-30 minutes. So easy! Ingredients 1 cup French green lentils (or common brown or green lentils) 3 cups chicken broth 1 bay leaf 1 large carrot, finely diced 2 ribs celery, finely diced 1 teaspoon finely chopped fresh thyme (or ½ teaspoon dried) 3 tablespoons chopped fresh parsley 1 garlic clove, minced 1 teaspoon Dijon mustard 1 teaspoon honey ½ teaspoon salt ¼ teaspoon ground black pepper 2 tablespoons freshly squeezed lemon juice, from one lemon ¼ cup extra virgin olive oil, best quality such as Lucini or Colavita 3 ounces goat cheese Instructions Before cooking the lentils, make sure you rinse them well and pick over them to remove any small rocks or debris. Combine lentils, chicken broth and bay leaf in a medium saucepan. Bring to a boil, then turn heat down and simmer until lentils are tender, 25-30 minutes for French green lentils or 20-25 minutes for common brown or green lentils. Remove bay leaf, strain and let cool. In a large bowl, combine all remaining ingredients except goat cheese. Add cooled lentils and toss to combine. Taste and adjust seasoning if necessary. Transfer salad to serving dish, crumble goat cheese over top and serve. Note: When preparing this recipe, be sure to build in at least 10 minutes to cool the lentils after they have cooked.

Understanding .NET Object Mapping
Understanding .NET Object Mapping: In the world of .NET development, working with objects and data transformation is a common task. To simplify this process, various object mapping libraries have emerged. In this guide, I’ll explore four popular .NET object mapping libraries: AutoMapper, TinyMapper, Mapster, and Inline Mapping. I’ll also provide examples and delve deeper into scenarios where each library shines. Introduction to Object Mapping Object mapping, also known as object-to-object mapping, is the process of converting data from one object type to another. This is particularly useful when you need to transform data between different layers of your application or when integrating with external services or databases. Common Use Cases a. Database Mapping When working with databases, you often need to map the result of a database query to a .NET object or entity. Similarly, you might need to map .NET objects back to the database structure for data storage. b. API Integration When communicating with external APIs, you may receive data in JSON or XML format that needs to be mapped to .NET objects. Conversely, you might need to serialize .NET objects into the required format for API requests. c. ViewModel Creation In web applications, it’s common to map domain models to view models for rendering in views. This mapping ensures that sensitive or unnecessary data is not exposed to the client. Popular .NET Mappers 1. AutoMapper When to Use AutoMapper AutoMapper is a widely adopted and feature-rich object mapping library for .NET. It simplifies complex mappings and provides a fluent configuration API. Here are some scenarios where AutoMapper is an excellent choice: Complex Mappings: Use AutoMapper when dealing with complex mappings between objects with different structures. Configuration Flexibility: It offers extensive configuration options for fine-grained control over mappings. Large-Scale Projects: In large projects with many mappings, AutoMapper helps maintain a clear and organized mapping setup. Example // Configuration var config = new MapperConfiguration(cfg => { cfg.CreateMap<SourceClass, DestinationClass>(); }); // Mapping var mapper = config.CreateMapper(); var destination = mapper.Map<SourceClass, DestinationClass>(source); 2. TinyMapper When to Use TinyMapper TinyMapper is a lightweight and high-performance object mapping library for .NET. It focuses on simplicity and speed. Consider using TinyMapper in the following situations: Performance-Critical Applications: When performance is crucial, TinyMapper’s lightweight nature shines. Simple Mappings: For straightforward one-to-one property mappings without complex configurations. Quick Setup: TinyMapper is easy to set up and use, making it suitable for small to medium projects. Example // Mapping TinyMapper.Bind<SourceClass, DestinationClass>(); var destination = TinyMapper.Map<DestinationClass>(source); 3. Mapster When to Use Mapster Mapster is another lightweight and easy-to-use object mapping library for .NET. It emphasizes simplicity and performance. Here are scenarios where Mapster is a good fit: Simple to Moderate Mappings: When you need a balance between simplicity and flexibility. Performance-Oriented Applications: Mapster’s performance is suitable for applications with high data transformation requirements. Minimal Setup: Mapster requires minimal setup and configuration. Example // Mapping var destination = source.Adapt<DestinationClass>(); 4. Inline Mapping (Manual Mapping) When to Use Inline Mapping Inline mapping, also known as manual mapping, involves manually writing code to perform the mapping. While it doesn’t rely on an external library, it requires more manual effort. Use inline mapping in these scenarios: Full Control: When you want complete control over the mapping process and need to handle custom or complex transformations. Simple Mappings: For cases where using a library might be overkill and the mapping is straightforward. Small-Scale Projects: In smaller projects where the overhead of a mapping library isn’t justified. Example // Inline Mapping var destination = new DestinationClass { Property1 = source.Property1, Property2 = source.Property2 // ... }; Comparison and Choosing the Right Mapper Choosing the right object mapping library for your .NET project depends on your specific requirements. Here’s a summarized comparison: AutoMapper: Ideal for complex mappings and scenarios where you need a high degree of configuration control. It’s feature-rich but may be overkill for simple mappings. TinyMapper: Best for scenarios where performance is crucial due to its lightweight nature. It’s simpler to set up and use but has fewer features than AutoMapper. Mapster: Similar to TinyMapper, it’s lightweight and easy to use. Choose Mapster for straightforward mappings and when performance is essential. Inline Mapping: Suitable for simple mappings or when you want full control over the mapping process. It’s the most manual option but offers complete flexibility. Conclusion Choosing the right object mapping library for your .NET project depends on your specific needs. Consider factors like complexity, performance, and your familiarity with the library. Whether you opt for AutoMapper, TinyMapper, Mapster, or inline mapping, these tools will help streamline your data transformation tasks, making your code more maintainable and efficient.

Understanding Numeric Data Types in C#: float, double, and decimal
Understanding Numeric Data Types in C#: float, double, and decimal. When working with numeric data in C#, developers have several data types to choose from, each with its own characteristics and best-use scenarios. In this post, I’ll explore the differences between three common numeric data types: float, double, and decimal. Understanding these differences is crucial for making informed decisions when designing your C# applications. float: When Memory Efficiency Matters Single-precision floating-point Precision: About 7 significant decimal digits. Range: Represents a more limited range of values compared to double. Memory: Consumes 4 bytes (32 bits). Usage: Used when memory efficiency is critical, and the precision requirements are lower. Not suitable for financial or scientific applications requiring high precision. double: The Versatile Choice Double-precision floating-point Precision: About 15-17 significant decimal digits. Range: Represents a wide range of values, both large and small. Memory: Consumes 8 bytes (64 bits). Usage: Suitable for most general-purpose numerical calculations where very high precision is not required. It is not recommended for financial calculations due to potential rounding errors. decimal: Precision for Critical Applications Arbitrary-precision decimal Precision: About 28-29 significant decimal digits. Range: Suitable for representing a wide range of values with high precision. Memory: Consumes 16 bytes (128 bits), making it less memory-efficient than double or float. Usage: Recommended for financial calculations, currency representations, and applications where exact decimal precision is essential. It eliminates rounding errors associated with binary floating-point types (double and float). Choosing the Right Data Type Now that we’ve examined these data types, how do you choose the right one for your application? Precision Requirements: If you need to represent values with a high level of precision (e.g., financial calculations), decimal is the most appropriate choice due to its decimal-based precision. Memory Efficiency: If memory efficiency is crucial, especially when dealing with large datasets or arrays of numbers, float and double consume less memory than decimal. However, they sacrifice some precision. Performance: float and double operations are generally faster than decimal. If performance is a top priority and precision requirements can be met, consider using float or double. Domain-Specific Needs: Consider the requirements of your specific domain or application. Some industries, like finance or scientific computing, have standards that dictate the use of specific numeric types. In conclusion, the choice of a numeric data type in C# should align with your application’s precision, range, memory, and performance requirements. Use decimal for financial and monetary calculations where precision is critical, and choose double or float when precision can be traded for improved memory efficiency or performance. Understanding these distinctions empowers developers to make informed decisions, resulting in more efficient and accurate C# applications. Remember, the right choice of data type can make a significant difference in the success of your project.