Technology
Boost your EF Core performance with bulk updates using ExecuteUpdate
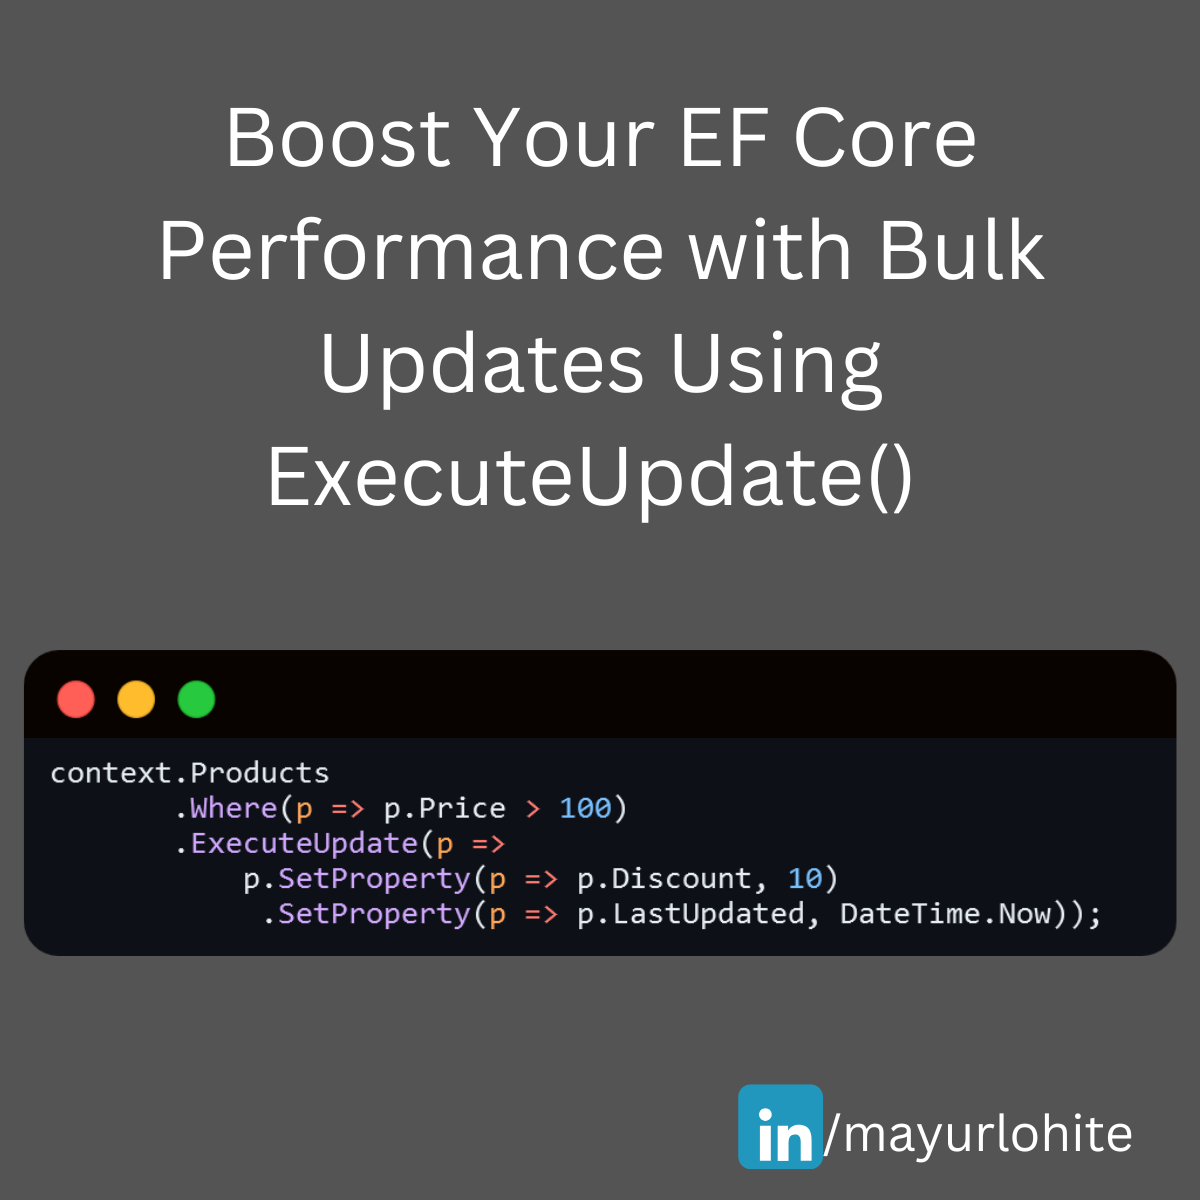
🚀 Exciting News for EF Core Users! 🚀 The latest version of Entity Framework Core (EF Core 7) introduces a powerful new feature: Bulk Update! This feature significantly enhances performance when updating multiple records in your database. Let's dive into how it works and see a sample in action. What is Bulk Update? Bulk Update allows you to perform update operations on multiple entities directly in the database without loading them into memory. This is achieved using the new ExecuteUpdate method, which can be a game-changer for applications dealing with large datasets. Why Use Bulk Update? Performance: Reduces the number of database round-trips. Efficiency: Updates multiple records in a single SQL statement. Simplicity: Cleaner and more readable code. Sample Code Here's a quick example to illustrate how you can use the Bulk Update feature: context.Products .Where(p => p.Price > 100) .ExecuteUpdate(p => p.SetProperty(p => p.Discount, 10) .SetProperty(p => p.LastUpdated, DateTime.Now)); Improved Performance: Executes a single SQL update statement. Reduced Memory Usage: No need to load entities into memory. Cleaner Code: More concise and easier to maintain. Conclusion The Bulk Update feature in EF Core 7 is a fantastic addition for developers looking to optimize their data operations. Give it a try and see the performance improvements in your applications!

Supercharge Your EF Core Performance with BulkInsertAsync
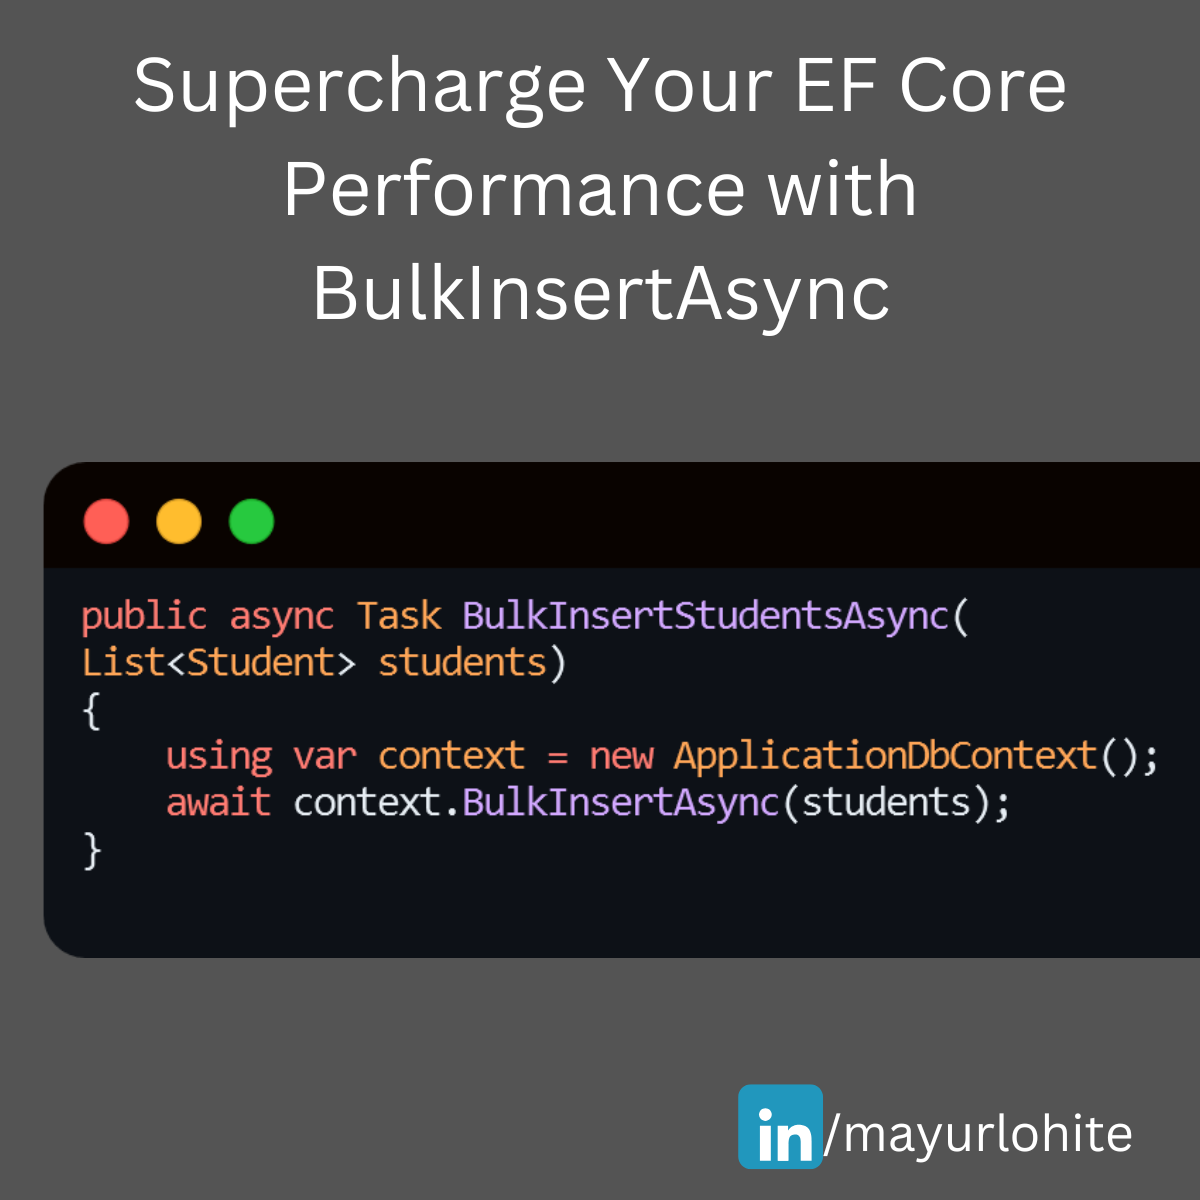
🚀 Supercharge Your EF Core Performance with BulkInsertAsync! 🚀 Struggling with large data insertions in your .NET applications? EF Core’s BulkInsertAsync can be a game-changer. Just install EFCore.BulkExtensions from nuget. Here’s a quick guide to help you get started: Why Use BulkInsertAsync? 1. Efficiency: Inserts multiple records in a single database round trip. 2. Performance: Significantly reduces the time taken for bulk operations. 3. Simplicity: Easy to implement with minimal code changes. Example Let’s say we have a Student entity and we want to insert a large list of students into the database. using EFCore.BulkExtensions; using Microsoft.EntityFrameworkCore; using System.Collections.Generic; using System.Threading.Tasks; public class Student { public int StudentId { get; set; } public string FirstName { get; set; } public string LastName { get; set; } public string Branch { get; set; } } public class ApplicationDbContext : DbContext { public DbSet<Student> Students { get; set; } } public async Task BulkInsertStudentsAsync(List<Student> students) { using var context = new ApplicationDbContext(); await context.BulkInsertAsync(students); } EF Core SaveChangesAsync: 1,000 records: 18 ms 10,000 records: 203 ms 100,000 records: 2,129 ms EF Core BulkInsertAsync: 1,000 records: 8 ms 10,000 records: 76 ms 100,000 records: 742 ms1 With BulkInsertAsync, you can handle large data operations efficiently and keep your application running smoothly. Give it a try and see the difference!
Simplify Your API Calls with Refit in C# .NET Core!
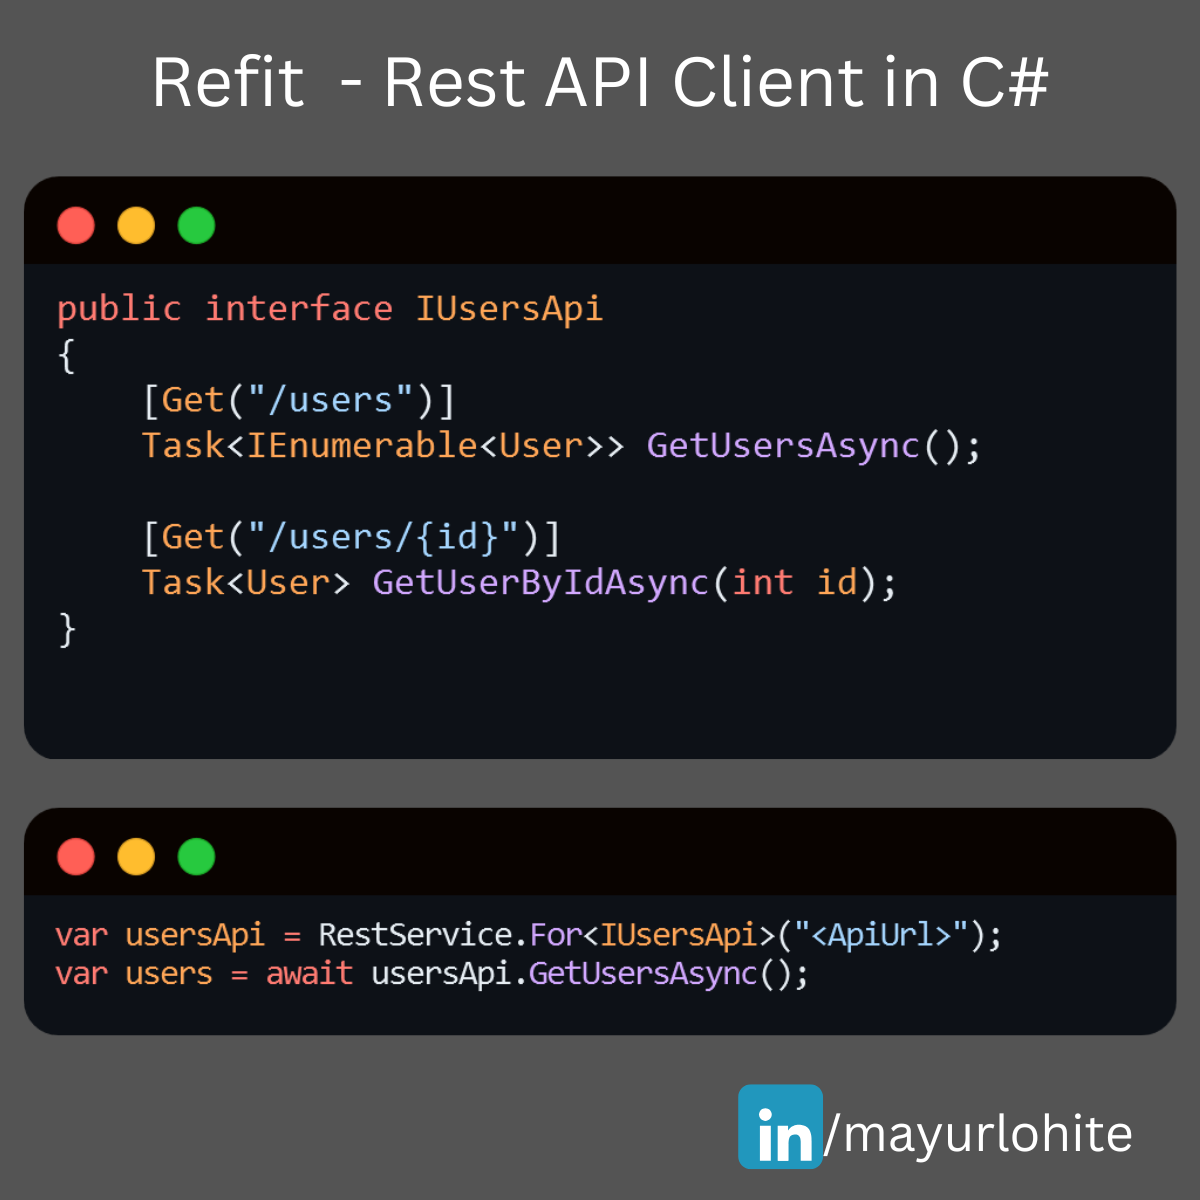
🚀 Simplify Your API Calls with Refit in C# .NET Core! 🚀 Are you tired of writing boilerplate code for HTTP clients in your .NET Core applications? Meet Refit – a type-safe REST library that turns your API into a live interface! 🎉 With Refit, you can define your API endpoints using interfaces and attributes, making your code cleaner and more maintainable. Here’s a quick example: public interface IUsersApi { [Get("/users")] Task<IEnumerable<User>> GetUsersAsync(); [Get("/users/{id}")] Task<User> GetUserByIdAsync(int id); } var usersApi = RestService.For<IUsersApi>("https://lnkd.in/dn7QrR5D"); var users = await usersApi.GetUsersAsync();
CSharp C# Clean Coding Practice
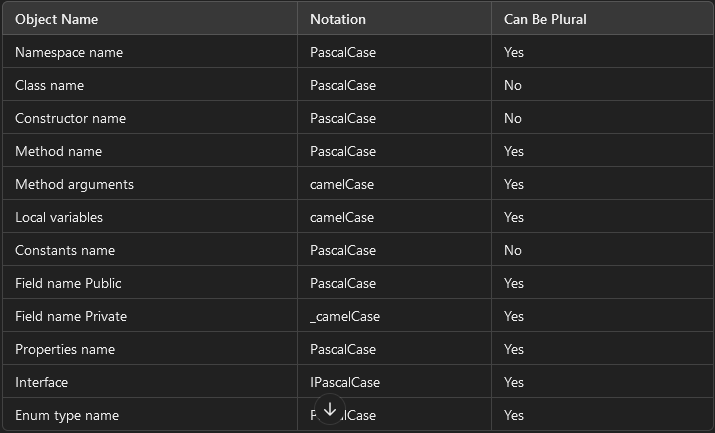
🚀 C# Clean Coding Practice 💡 🎯 Use Proper Naming Conventions Naming your variables, classes, and methods effectively is crucial for writing clean and maintainable code. Following coding conventions not only enhances readability but also serves several key purposes: ✔ Ensures consistency in code layout, allowing readers to focus on the content, not formatting. ✔ Helps others (and yourself!) understand the code more quickly based on familiar patterns. ✔ Simplifies the process of copying, modifying, and maintaining code. ✔ Promotes adherence to C# best practices. Check out the table below for standardized C# naming conventions to follow when writing code. Let's keep our code clean and efficient! 💻✨ Object Name Notation Can Be Plural Namespace name PascalCase Yes Class name PascalCase No Constructor name PascalCase No Method name PascalCase Yes Method arguments camelCase Yes Local variables camelCase Yes Constants name PascalCase No Field name Public PascalCase Yes Field name Private _camelCase Yes Properties name PascalCase Yes Interface IPascalCase Yes Enum type name PascalCase Yes
Building a Basic open source E-Commerce Website with ASP.NET Core 8
Building a Basic eCommerce Website with ASP.NET Core 8: A Complete Guide to MLCart The evolution of eCommerce has transformed the way businesses operate and interact with customers. As companies continue to move their operations online, the demand for dynamic, scalable, and secure web applications has increased. ASP.NET Core 8, Microsoft's open-source web framework, is designed to meet these needs, allowing developers to build high-performance and feature-rich applications that can power online businesses. In this blog, we’ll explore how to build a basic eCommerce website using ASP.NET Core 8. We will use MLCart, an open-source project available on GitHub, to demonstrate key features and how to get started with building your own eCommerce platform. Table of Contents Introduction to ASP.NET Core 8 Overview of MLCart: Features and Architecture Setting Up the Development Environment Cloning and Running the MLCart Application Key Components of an eCommerce Website Product Management Shopping Cart Functionality User Authentication Payment Integration Exploring the Codebase of MLCart Models, Views, and Controllers Entity Framework Integration Customizing MLCart for Your Business Needs Adding Custom Features Improving the UI/UX Performance Optimization Best Practices for eCommerce Websites in ASP.NET Core Conclusion and Next Steps 1. Introduction to ASP.NET Core 8 ASP.NET Core 8 is the latest iteration of Microsoft’s web development framework. It is cross-platform, allowing developers to build applications for Windows, macOS, and Linux. ASP.NET Core is known for its performance, scalability, and the flexibility to integrate various tools and libraries. Key features that make ASP.NET Core 8 a strong choice for eCommerce platforms include: High Performance: ASP.NET Core has built-in performance optimization, making it one of the fastest web frameworks. Cross-Platform Support: Applications built with ASP.NET Core can run on multiple platforms, allowing businesses to deploy their websites on various operating systems. Built-in Security Features: ASP.NET Core offers built-in tools for authentication, authorization, and data protection, ensuring secure eCommerce transactions. Integration with Modern Frontend Frameworks: ASP.NET Core allows seamless integration with frontend technologies like Angular, React, and Vue.js. Scalability: The framework is designed to handle high traffic and complex workloads, making it perfect for growing eCommerce businesses. 2. Overview of MLCart: Features and Architecture MLCart is an open-source eCommerce project built using ASP.NET Core 8 and made available by the developer Mayur Lohite on GitHub. MLCart provides a basic structure for an online store with essential features like product listing, shopping cart management, and user authentication. Key Features of MLCart: Product Catalog: Displays available products with detailed descriptions and images. User Authentication: Implements user registration, login, and account management functionalities. Shopping Cart: Enables users to add products to their cart and manage the cart’s content. Order Processing: Manages order placement and history. Admin Dashboard: Provides an interface for administrators to manage products, categories, and user orders. Architecture Overview: MLCart follows the traditional Model-View-Controller (MVC) architecture of ASP.NET Core: Models: Represent the business logic and data structure of the eCommerce platform. Views: Define the user interface for both customers and admins. Controllers: Handle user requests and interactions, connecting the Models and Views. This modular architecture allows developers to easily extend the functionality of MLCart by adding new features or modifying existing ones. 3. Setting Up the Development Environment Before diving into the MLCart project, you need to set up your development environment to run ASP.NET Core 8 applications. Prerequisites: Install .NET SDK (Version 8): Download and install the latest version of the .NET SDK from the official website. Install Visual Studio: You can download Visual Studio 2022 or later. Ensure you select the ".NET Core cross-platform development" workload during installation. Install SQL Server: Since MLCart uses SQL Server for database management, ensure you have SQL Server installed. Alternatively, you can use SQL Server Express for local development. Cloning the MLCart Repository: Once the environment is set up, you can clone the MLCart repository from GitHub: git clone https://github.com/mayurlohite/MLCart.git After cloning the repository, open the solution in Visual Studio and restore the NuGet packages. 4. Cloning and Running the MLCart Application Once you have the MLCart repository cloned, follow these steps to run the application: Build the Project: Open the MLCart solution file (.sln) in Visual Studio and click on the "Build" option from the top menu. Configure the Database: MLCart uses SQL Server for the database. You may need to configure the connection string found in the appsettings.json file to point to your local SQL Server instance. Here’s an example of the configuration: "ConnectionStrings": { "DefaultConnection": "Server=YOUR_SERVER_NAME;Database=MLCartDb;Trusted_Connection=True;MultipleActiveResultSets=true" } Run Database Migrations: In the Package Manager Console, run the following command to create the necessary tables in the database: Update-Database Run the Application: After the database setup is complete, you can run the project by pressing F5 or clicking "Start" in Visual Studio. Once the application is running, you can access it in your browser at http://localhost:5000 (or the configured port). 5. Key Components of an eCommerce Website An eCommerce website needs several core features to function effectively. Let’s explore these features within the context of MLCart and how they are implemented using ASP.NET Core 8. Product Management Products are the heart of any eCommerce store. MLCart allows admins to add, edit, and manage product listings. Products are displayed in the frontend for customers to browse. Models: The Product model in MLCart defines the product’s attributes such as Name, Description, Price, ImageUrl, and Category. Controllers: The ProductController handles the business logic for managing products, including fetching products from the database and serving them to the views. Views: Razor views display product listings and details to users in an attractive and responsive layout. Shopping Cart Functionality The shopping cart is crucial for managing customer orders. In MLCart, the cart functionality is built into the CartController, allowing users to add, remove, and update product quantities. Cart Sessions: MLCart uses session storage to keep track of the items a user has added to their cart until they proceed to checkout. Order Summary: Once a user is ready to checkout, the order summary is generated and displayed, showing the total price and product details. User Authentication MLCart supports user authentication out of the box, enabling users to create accounts, log in, and manage their profiles. ASP.NET Core Identity is used to handle registration, authentication, and authorization. Identity Models: ASP.NET Core Identity provides predefined models for users, roles, and claims. Authentication Middleware: MLCart uses middleware to handle user sessions, authentication cookies, and role-based access control. Payment Integration While MLCart doesn’t include payment integration by default, adding it is straightforward with ASP.NET Core 8. Common payment gateways like Stripe or PayPal can be integrated using third-party libraries or APIs. 6. Exploring the Codebase of MLCart Let’s dive deeper into the MLCart codebase to understand how it’s structured and how you can modify it to suit your needs. Models, Views, and Controllers (MVC Pattern) MLCart follows the MVC pattern, which separates the application logic into three interconnected components: Models: Represent the data and business logic. For example, the Product model defines the properties of a product. Views: Razor Views (.cshtml files) display data to the user and collect input. Controllers: Handle user requests and interact with models to serve data to views. For instance, the OrderController processes customer orders and saves them in the database. Entity Framework Integration MLCart uses Entity Framework Core (EF Core) for database management. EF Core is an Object-Relational Mapping (ORM) framework that simplifies data access by allowing developers to work with databases using .NET objects. DbContext: The ApplicationDbContext class is the bridge between the database and the application. It defines the data models and configures database behavior. Migrations: EF Core migrations are used to update the database schema over time. 7. Customizing MLCart for Your Business Needs One of the major advantages of using an open-source project like MLCart is
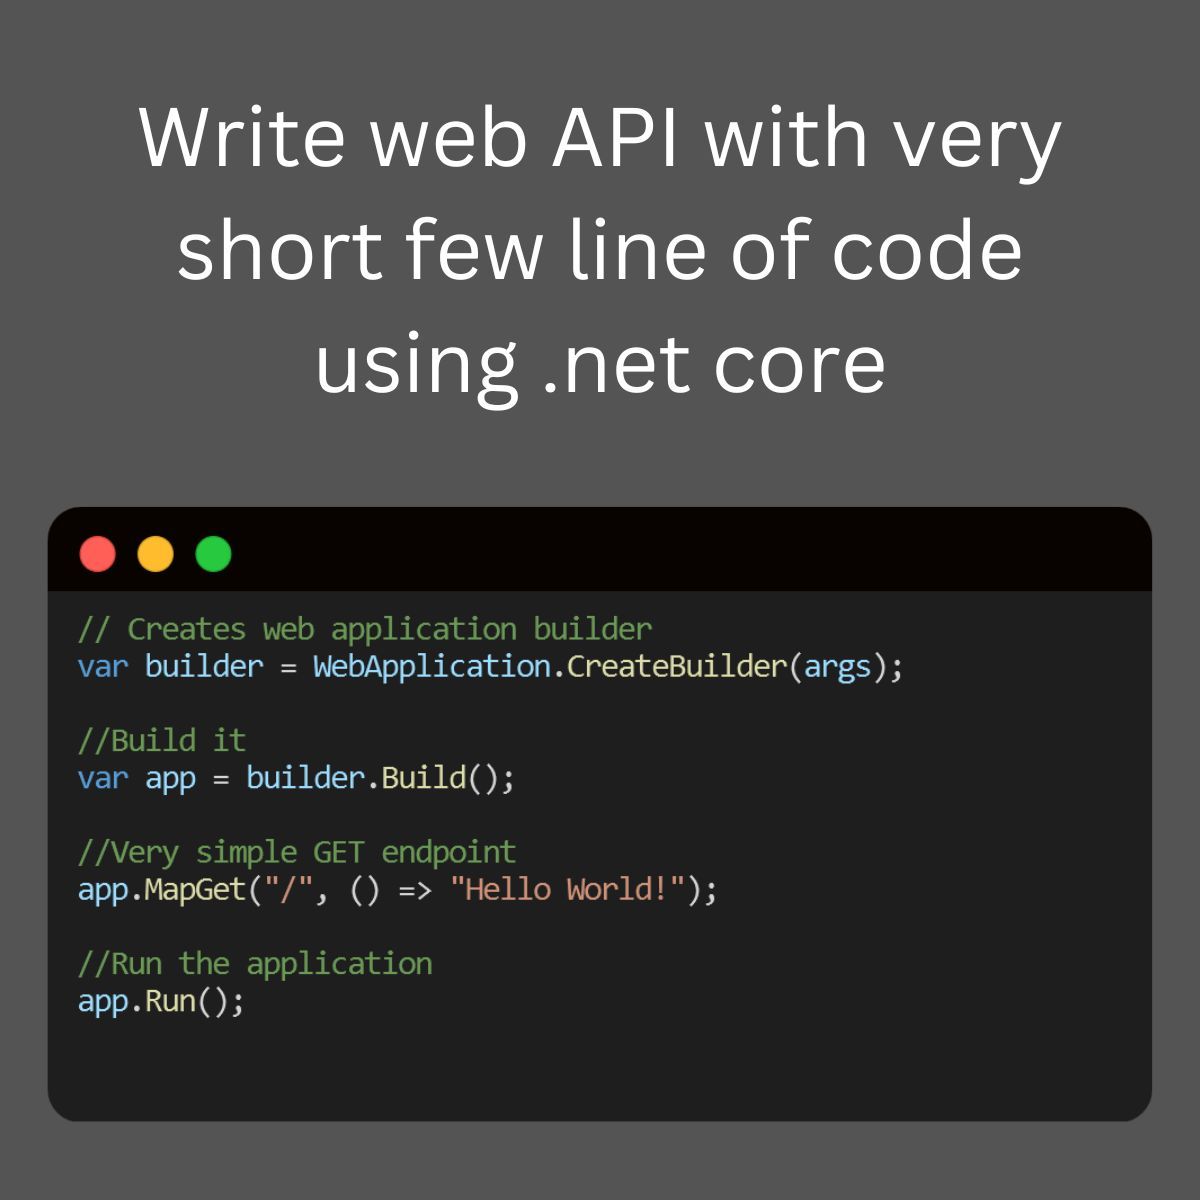
NET Core Minimal API, write a very short line of code
Write Web API with very short lines of code using .NET Core Minimal API. Github - https://github.com/mayurlohite/MinimalApiCore What if I tell you that you can build a full web API with just a few lines of code? Yes, you can do it with the new Minimal API feature of ASP. NET Core 6.0 and greater. From this minimal API, you can build a complete web API with all the features that you need. Just one file, you can build a full web API. Helpful for Micro-services. Find out working example of - ASP.NET Core 8.0 - Minimal API Example - Expenses API implementation using ASP.NET Core Minimal API, Entity Framework Core, SQL Server and Swagger UI. Github - https://github.com/mayurlohite/MinimalApiCore Would you like to implement this into your project? Feel free to share your thoughts!
Performance optimization and monitoring in ASP.NET Core: Best Practices with Examples
Introduction: Performance optimization and monitoring play a vital role in ensuring the efficiency, scalability, and reliability of ASP.NET Core applications. In this comprehensive guide, we’ll delve into various techniques, best practices, and tools for optimizing performance and monitoring the health of ASP.NET Core applications, accompanied by detailed examples for each concept. Optimizing Performance: 1. Efficient Database Querying with Entity Framework Core: Efficient database querying is crucial for improving application performance. With Entity Framework Core, we can optimize database access by minimizing the number of round-trips and optimizing query execution. Example: // Before Optimization var products = dbContext.Products.Where(p => p.CategoryId == categoryId).ToList(); // After Optimization var products = dbContext.Products.AsNoTracking().Where(p => p.CategoryId == categoryId).ToList(); In the optimized query, we use AsNoTracking() to disable change tracking for read-only operations, resulting in improved performance. 2. Caching Strategies for Improved Performance: Caching frequently accessed data can significantly reduce database round-trips and improve application response times. ASP.NET Core provides built-in caching mechanisms that we can leverage to implement caching strategies effectively. Example: public async Task<List<Product>> GetProductsAsync(int categoryId) { var cacheKey = $"products_{categoryId}"; if (!_cache.TryGetValue(cacheKey, out List<Product> products)) { products = await dbContext.Products.Where(p => p.CategoryId == categoryId).ToListAsync(); _cache.Set(cacheKey, products, TimeSpan.FromMinutes(10)); // Cache for 10 minutes } return products; } In this example, we cache the products retrieved based on the category ID for a specified duration, enhancing application performance. 3. Asynchronous Programming for Scalability: Asynchronous programming enables applications to handle multiple concurrent operations efficiently, leading to improved scalability and responsiveness. By utilizing async/await keywords in ASP.NET Core, we can execute asynchronous operations seamlessly. Example: public async Task<ActionResult> GetProductsAsync() { var products = await dbContext.Products.ToListAsync(); return Ok(products); } This example demonstrates retrieving products asynchronously from the database, enhancing the scalability of the application. 4. Compression for Network Efficiency: Compressing HTTP responses can significantly reduce bandwidth usage and improve network efficiency. ASP.NET Core supports response compression middleware, allowing us to compress HTTP responses before sending them to clients. Example: public void Configure(IApplicationBuilder app) { app.UseResponseCompression(); } By enabling response compression middleware, we can reduce data transfer sizes and improve overall network efficiency. 5. Lazy Loading for Improved Page Load Times: Lazy loading is a technique used to defer loading resources until they are needed, enhancing initial page load times and improving user experience. In ASP.NET Core applications, we can implement lazy loading for resources such as images and scripts. Example: <img src="placeholder.jpg" data-src="image.jpg" loading="lazy" alt="Lazy Loaded Image"> This example illustrates lazy loading of an image by specifying the actual image source in the data-src attribute, reducing initial page load times. Monitoring and Diagnostics: 1. Application Insights for Real-time Monitoring: Application Insights is a powerful tool provided by Azure for monitoring and diagnosing ASP.NET Core applications in real time. By integrating Application Insights into our application, we can gain valuable insights into application performance, availability, and usage. Example: public void ConfigureServices(IServiceCollection services) { services.AddApplicationInsightsTelemetry(Configuration["InstrumentationKey"]); } By adding Application Insights telemetry, we can monitor various metrics such as request rates, response times, and server resource utilization, enabling proactive performance monitoring and diagnostics. 2. Logging and Error Handling with Serilog: Logging is essential for capturing and analyzing application events, errors, and diagnostic information. Serilog is a popular logging library for ASP.NET Core applications, offering flexible configuration and various output sinks for logging data. Example: public void ConfigureLogger() { Log.Logger = new LoggerConfiguration() .WriteTo.File("log.txt") .CreateLogger(); } By configuring Serilog to log to a file, we can capture application events and errors for troubleshooting and analysis, enhancing the overall monitoring and diagnostics capabilities of the application. 3. Health Checks for Application Health Monitoring: Health checks are endpoints that provide information about the health of an application and its dependencies. By implementing health checks in ASP.NET Core applications, we can monitor the health and availability of critical components, such as databases, external services, and internal dependencies. Example: public void ConfigureServices(IServiceCollection services) { services.AddHealthChecks(); } This example demonstrates adding health checks to the ASP.NET Core application, enabling continuous monitoring of the application’s health and readiness. 4. Profiling and Performance Analysis with MiniProfiler: MiniProfiler is a lightweight profiling tool that helps identify performance bottlenecks in ASP.NET Core applications. By integrating MiniProfiler into our application, we can profile individual requests and identify areas for performance optimization. Example: public async Task<ActionResult> GetProductsAsync() { using (MiniProfiler.Current.Step("GetProductsAsync")) { var products = await dbContext.Products.ToListAsync(); return Ok(products); } } By wrapping the database query in a MiniProfiler step, we can measure the execution time and identify potential performance bottlenecks, enhancing the overall performance tuning and monitoring capabilities of the application. Conclusion: Optimizing performance and monitoring the health of ASP.NET Core applications are essential for delivering a seamless user experience and ensuring the reliability and scalability of the application. By implementing the techniques and best practices outlined in this guide, ASP.NET Core developers can optimize application performance, enhance scalability, and proactively monitor and diagnose issues, ensuring the smooth operation of their applications in production environments. Please find original article here.
Understanding LINQ and Lambda Expressions in C#
Introduction LINQ (Language-Integrated Query) and Lambda expressions are powerful features in C# that allow developers to query and manipulate data in a concise and expressive manner. While both are used for similar purposes, they have distinct syntaxes and use cases. This document aims to provide a comprehensive comparison between LINQ and Lambda expressions in C#, along with code examples to illustrate their usage. LINQ (Language-Integrated Query): Definition: LINQ is a set of features in C# that enables developers to query data from different data sources using a SQL-like syntax directly within the C# language. Syntax: LINQ syntax consists of keywords such as from, where, select, group by, order by, etc., which resemble SQL syntax. Use Cases: LINQ is commonly used for querying data from collections (such as arrays, lists, and dictionaries), databases (using Entity Framework or LINQ to SQL), XML files, and other data sources. Code Example: Querying a list of objects using LINQ. List<int> numbers = new List<int> { 1, 2, 3, 4, 5 }; var evenNumbers = from num in numbers where num % 2 == 0 select num; Lambda Expressions: Definition: Lambda expressions are anonymous functions that allow developers to write inline delegate functions without explicitly defining a method. Syntax: Lambda expressions consist of the => (arrow) operator, parameters, and an expression or statement block. Use Cases: Lambda expressions are commonly used for sorting, filtering, and transforming data within LINQ queries, as well as in LINQ extension methods and delegates. Code Example: Filtering a list of objects using Lambda expressions. List<int> numbers = new List<int> { 1, 2, 3, 4, 5 }; var evenNumbers = numbers.Where(num => num % 2 == 0); Key Differences: Syntax: LINQ uses a declarative query syntax resembling SQL, while Lambda expressions use a more concise and functional syntax. Readability: LINQ queries are often more readable and intuitive for complex queries involving multiple operations, while Lambda expressions are preferred for simple and single-purpose operations. Flexibility: Lambda expressions provide more flexibility and can be used in various contexts beyond LINQ queries, such as delegates, event handlers, and LINQ extension methods. Let’s expand on the previous examples and provide multiple scenarios to illustrate the usage of LINQ and Lambda expressions in C#. 1. Filtering a List of Objects: Using LINQ: List<int> numbers = new List<int> { 1, 2, 3, 4, 5 }; var evenNumbers = from num in numbers where num % 2 == 0 select num; Using Lambda Expression: var evenNumbers = numbers.Where(num => num % 2 == 0); 2. Sorting a List of Objects: Using LINQ: List<string> fruits = new List<string> { "Apple", "Banana", "Orange", "Grape" }; var sortedFruits = from fruit in fruits orderby fruit descending select fruit; Using Lambda Expression: var sortedFruits = fruits.OrderByDescending(fruit => fruit); 3. Selecting Specific Properties from a List of Objects: Using LINQ: List<Person> people = new List<Person> { new Person { Name = "Alice", Age = 25 }, new Person { Name = "Bob", Age = 30 }, new Person { Name = "Charlie", Age = 28 } }; var names = from person in people select person.Name; Using Lambda Expression: var names = people.Select(person => person.Name); 4. Filtering and Projecting Data from a List of Objects: Using LINQ: List<Person> people = new List<Person> { new Person { Name = "Alice", Age = 25 }, new Person { Name = "Bob", Age = 30 }, new Person { Name = "Charlie", Age = 28 } }; var adults = from person in people where person.Age >= 18 select new { person.Name, person.Age }; Using Lambda Expression: var adults = people.Where(person => person.Age >= 18) .Select(person => new { person.Name, person.Age }); 5. Grouping Data from a List of Objects: Using LINQ: List<Person> people = new List<Person> { new Person { Name = "Alice", Age = 25 }, new Person { Name = "Bob", Age = 30 }, new Person { Name = "Charlie", Age = 28 } }; var ageGroups = from person in people group person by person.Age < 30 into youngGroup select new { IsYoung = youngGroup.Key, People = youngGroup.ToList() }; Using Lambda Expression: var ageGroups = people.GroupBy(person => person.Age < 30) .Select(youngGroup => new { IsYoung = youngGroup.Key, People = youngGroup.ToList() }); These examples demonstrate various scenarios where LINQ and Lambda expressions are used to query, filter, project, sort, and group data in C#. By understanding and mastering these features, developers can write concise and expressive code for data manipulation tasks. Note: The Person class used in these examples is assumed to have properties Name and Age. Conclusion: Both LINQ and Lambda expressions are essential features of C# that offer different approaches to querying and manipulating data. While LINQ provides a declarative and SQL-like syntax for querying data from various sources, Lambda expressions offer a more concise and functional approach for inline delegate functions. Understanding the differences between these two features will help developers choose the appropriate approach based on the specific requirements of their projects Please find original article here.

Understanding Interfaces and Abstract Classes
In the world of programming, understanding interfaces and abstract classes in C# is essential for creating flexible and maintainable code. In this blog post, we’ll explore these foundational concepts, discussing their definitions, differences, benefits, and providing clear examples in C#. Let’s dive into the basics of interfaces and abstract classes in C# programming! Interfaces: Definition: Interfaces in C# serve as contracts that define a set of methods or properties that implementing classes must adhere to. They declare the “what” of a class without specifying the “how,” promoting loose coupling and allowing for polymorphism. Interfaces are declared using the interface keyword and can be implemented by multiple classes. Syntax: Interfaces are declared using the interface keyword. interface IAnimal { void MakeSound(); } Example: Let’s consider a scenario where we have different animals in a zoo. We want each animal class to implement a method to make a sound. We can define an interface IAnimal: interface IAnimal { void MakeSound(); } Each animal class can then implement this interface and provide its own implementation of the MakeSound method: class Dog : IAnimal { public void MakeSound() { Console.WriteLine("Woof"); } } class Cat : IAnimal { public void MakeSound() { Console.WriteLine("Meow"); } } Benefits: Flexibility: Enables loose coupling between classes, promoting “programming to interfaces” rather than concrete implementations. Multiple Inheritance: Supports multiple inheritance, allowing a class to implement multiple interfaces. API Design: Defines contracts for classes, facilitating the design of flexible and interoperable APIs. Abstract Classes: Definition: Abstract classes in C# are classes that cannot be instantiated on their own and may contain abstract methods (methods without implementation) as well as concrete methods (methods with implementation). They provide a blueprint for derived classes to follow, enabling code reuse and providing a common base for related classes. Syntax: Abstract classes are declared using the abstract keyword. abstract class Shape { public abstract double GetArea(); } Example: Let’s consider a drawing application where we have different shapes, each with its own area calculation logic. We can define an abstract class Shape: abstract class Shape { public abstract double GetArea(); } Each shape class can inherit from this abstract class and provide its own implementation of the GetArea method: class Rectangle : Shape { public double Length { get; set; } public double Width { get; set; } public override double GetArea() { return Length * Width; } } class Circle : Shape { public double Radius { get; set; } public override double GetArea() { return Math.PI * Radius * Radius; } } Benefits: Code Reuse: Enables the definition of common behavior for related classes without implementing all methods. Default Implementation: Allows for the creation of methods with a default implementation. Initialization: Can have constructors, facilitating initialization of fields in subclasses. GitHub Differences and Considerations: Instantiation: Interfaces cannot be instantiated directly, while abstract classes cannot be instantiated unless all their abstract members are implemented by a concrete subclass. Multiple Inheritance: C# supports multiple inheritance through interfaces, but not through abstract classes (a class can only inherit from one abstract class). Method Implementation: In interfaces, all members are by default abstract and must be implemented by the implementing class. Abstract classes can have both abstract and concrete members, and the concrete members can be directly used by the subclass. Fields: Interfaces cannot contain fields, only members’ signatures. Abstract classes can contain fields, constructors, and members with implementation. Here’s a tabular format highlighting the differences between interfaces and abstract classes in C#: Feature Interfaces Abstract Classes Instantiation Cannot be instantiated directly Cannot be instantiated directly Inheritance Supports multiple inheritance Does not support multiple inheritance Members Can only contain method signatures (no fields or implementation) Can contain both abstract and concrete members (including fields and methods with implementation) Implementation All members are abstract (no implementation) Can have both abstract and concrete members Purpose Defines a contract for classes to implement Provides a blueprint for derived classes Example Syntax csharp interface IExample { void Method(); } csharp abstract class Example { public abstract void Method(); } Differences between interfaces and abstract classes This tabular format clearly outlines the key differences between interfaces and abstract classes in C#, making it easier to understand their distinctions. In conclusion, interfaces and abstract classes are powerful tools in C# for designing flexible and maintainable code. Understanding their differences and benefits is crucial for effective software design and development. Please find original article here.
Implementing Dynamic Pagination with Filters in ASP.NET Core
In modern web applications, efficient data retrieval is crucial for providing a seamless user experience. Dynamic pagination with filters allows users to search and browse through large datasets effectively. In this guide, we’ll explore how to implement dynamic pagination with filters in an ASP.NET Core application step by step. In this guide, we’ll explore how to implement dynamic pagination with filters in an ASP.NET Core application step by step, enhancing usability and performance. Define Filter Model and Comparison Enum: Introduce the ExpressionFilter class and Comparison enum, which represent filter criteria and comparison operations, respectively. These components form the foundation for defining and applying filters in the ASP.NET Core application. Implement Expression Builder: Explore the ExpressionBuilder class, which provides methods for dynamically constructing LINQ expressions based on provided filters. The ConstructAndExpressionTree method generates an expression tree based on a list of filters, while the GetExpression method constructs a LINQ expression for a single filter criterion. Base Repository Interface and Implementation: Define the repository interface and implementation responsible for querying the database and applying filters for pagination. Discuss how filters are dynamically applied to the LINQ query, enabling efficient data retrieval based on user-defined criteria. Base Service Interface and Implementation: Explain the service interface and implementation for retrieving paginated data with filters. Highlight how the service interacts with the repository to fetch data and map it to view models, facilitating the creation of paginated data view models for presentation. Controller Setup: Detail the setup of the controller method to handle HTTP GET requests for retrieving paginated data with filters. Discuss how the controller accepts parameters for pagination, search criteria, and applies default values if not provided. Explore how filters are constructed based on the search criteria and applied to the ProductService to retrieve paginated data. 1. Define Filter Model and Comparison Enum public class ExpressionFilter { public string? PropertyName { get; set; } public object? Value { get; set; } public Comparison Comparison { get; set; } } public enum Comparison { [Display(Name = "==")] Equal, [Display(Name = "<")] LessThan, [Display(Name = "<=")] LessThanOrEqual, [Display(Name = ">")] GreaterThan, [Display(Name = ">=")] GreaterThanOrEqual, [Display(Name = "!=")] NotEqual, [Display(Name = "Contains")] Contains, //for strings [Display(Name = "StartsWith")] StartsWith, //for strings [Display(Name = "EndsWith")] EndsWith, //for strings } The ExpressionFilter class represents a filter criterion with properties like PropertyName, Value, and Comparison. The Comparison enum enumerates various comparison operations like equal, less than, greater than, etc. 2. Implement Expression Builder public static class ExpressionBuilder { public static Expression<Func<T, bool>> ConstructAndExpressionTree<T>(List<ExpressionFilter> filters) { if (filters.Count == 0) return null; ParameterExpression param = Expression.Parameter(typeof(T), "t"); Expression exp = null; if (filters.Count == 1) { exp = GetExpression<T>(param, filters[0]); } else { exp = GetExpression<T>(param, filters[0]); for (int i = 1; i < filters.Count; i++) { exp = Expression.Or(exp, GetExpression<T>(param, filters[i])); } } return Expression.Lambda<Func<T, bool>>(exp, param); } public static Expression GetExpression<T>(ParameterExpression param, ExpressionFilter filter) { MethodInfo containsMethod = typeof(string).GetMethod("Contains", new Type[] { typeof(string) }); MethodInfo startsWithMethod = typeof(string).GetMethod("StartsWith", new Type[] { typeof(string) }); MethodInfo endsWithMethod = typeof(string).GetMethod("EndsWith", new Type[] { typeof(string) }); MemberExpression member = Expression.Property(param, filter.PropertyName); ConstantExpression constant = Expression.Constant(filter.Value); switch (filter.Comparison) { case Comparison.Equal: return Expression.Equal(member, constant); case Comparison.GreaterThan: return Expression.GreaterThan(member, constant); case Comparison.GreaterThanOrEqual: return Expression.GreaterThanOrEqual(member, constant); case Comparison.LessThan: return Expression.LessThan(member, constant); case Comparison.LessThanOrEqual: return Expression.LessThanOrEqual(member, constant); case Comparison.NotEqual: return Expression.NotEqual(member, constant); case Comparison.Contains: return Expression.Call(member, containsMethod, constant); case Comparison.StartsWith: return Expression.Call(member, startsWithMethod, constant); case Comparison.EndsWith: return Expression.Call(member, endsWithMethod, constant); default: return null; } } } The ExpressionBuilder class provides methods for dynamically constructing LINQ expressions based on provided filters. The ConstructAndExpressionTree method constructs an expression tree based on a list of filters. The GetExpression method constructs a LINQ expression for a single filter criterion based on its comparison type. 3. Base Repository Interface and Implementation // Interface Task<PaginatedDataViewModel<T>> GetPaginatedDataWithFilter(int pageNumber, int pageSize, List<ExpressionFilter> filters, CancellationToken cancellationToken); // Implementation public async Task<PaginatedDataViewModel<T>> GetPaginatedDataWithFilter(int pageNumber, int pageSize, List<ExpressionFilter> filters, CancellationToken cancellationToken = default) { var query = _dbContext.Set<T>().AsNoTracking(); // Apply search criteria if provided if (filters != null && filters.Any()) { // Construct expression tree based on filters var expressionTree = ExpressionBuilder.ConstructAndExpressionTree<T>(filters); query = query.Where(expressionTree); } // Pagination var data = await query .Skip((pageNumber - 1) * pageSize) .Take(pageSize) .ToListAsync(cancellationToken); // Total count of data var totalCount = await query.CountAsync(cancellationToken); // Create and return paginated data view model return new PaginatedDataViewModel<T>(data, totalCount); } The repository interface defines a method GetPaginatedDataWithFilter to retrieve paginated data with filters. The repository implementation constructs a LINQ query dynamically based on the provided filters. Filters are applied to the query using the ExpressionBuilder class. Pagination is applied to the query to retrieve a specific subset of data. The total count of data is calculated. A paginated data view model containing the queried data and total count is created and returned. 4. Base Service Interface and Implementation // Interface Task<PaginatedDataViewModel<TViewModel>> GetPaginatedDataWithFilter(int pageNumber, int pageSize, List<ExpressionFilter> filters, CancellationToken cancellationToken); // Implementation public virtual async Task<PaginatedDataViewModel<TViewModel>> GetPaginatedDataWithFilter(int pageNumber, int pageSize, List<ExpressionFilter> filters, CancellationToken cancellationToken) { // Retrieve paginated data with filters from repository var paginatedData = await _repository.GetPaginatedDataWithFilter(pageNumber, pageSize, filters, cancellationToken); // Map data to view models var mappedData = _viewModelMapper.MapList(paginatedData.Data); // Create paginated data view model var paginatedDataViewModel = new PaginatedDataViewModel<TViewModel>(mappedData.ToList(), paginatedData.TotalCount); // Return paginated data view model return paginatedDataViewModel; } The service interface defines a method GetPaginatedDataWithFilter to retrieve paginated data with filters. The service implementation retrieves paginated data with filters from the repository. Retrieved data is mapped to view models using a view model mapper. A paginated data view model is created and returned. 5. Controller Setup [HttpGet("paginated-data-with-filter")] public async Task<IActionResult> Get(int? pageNumber, int? pageSize, string? search, CancellationToken cancellationToken) { try { // Setting default values for pagination int pageSizeValue = pageSize ?? 10; int pageNumberValue = pageNumber ?? 1; // List to hold filters var filters = new List<ExpressionFilter>(); // Check if search criteria is provided if (!string.IsNullOrWhiteSpace(search) && search != null) { // Add filters for relevant properties based on the search string filters.AddRange(new[] { new ExpressionFilter { PropertyName = "Code", Value = search, Comparison = Comparison.Contains }, new ExpressionFilter { PropertyName = "Name", Value = search, Comparison = Comparison.Contains }, new ExpressionFilter { PropertyName = "Description", Value = search, Comparison = Comparison.Contains } }); // Check if the search string represents a valid numeric value for the "Price" property if (double.TryParse(search, out double price)) { filters.Add(new ExpressionFilter { PropertyName = "Price", Value = price, Comparison = Comparison.Equal }); } } // Retrieve paginated data with filters from ProductService var products = await _productService.GetPaginatedDataWithFilter(pageNumberValue, pageSizeValue, filters, cancellationToken); // Create response containing paginated data var response = new ResponseViewModel<PaginatedDataViewModel<ProductViewModel>> { Success = true, Message = "Products retrieved successfully", Data = products }; // Return response return Ok(response); } catch (Exception ex) { // Log error _logger.LogError(ex, "An error occurred while retrieving products"); // Create error response var errorResponse = new ResponseViewModel<IEnumerable<ProductViewModel>> { Success = false, Message = "Error retrieving products", Error = new ErrorViewModel { Code = "ERROR_CODE", Message = ex.Message } }; // Return error response return StatusCode(StatusCodes.Status500InternalServerError, errorResponse); } } This controller method handles HTTP GET requests to retrieve paginated data with filters. It accepts parameters for pagination (pageNumber and pageSize) and a search string (search). Default values for pagination are set if not provided. Filters are constructed based on the search criteria, including properties like Code, Name, Description, and Price. The search string is checked to determine if it represents a valid numeric value for the Price property. Paginated data with filters is retrieved from the ProductService. A response containing paginated data is created and returned if successful. If an error occurs, it is logged, and an error response is returned. In conclusion, implementing dynamic pagination with filters in an ASP.NET Core application enhances the user experience by enabling efficient data retrieval and browsing capabilities. By following the steps outlined in this guide, developers can create web applications that provide seamless navigation through large datasets, improving usability and performance. Stay tuned for more in-depth tutorials and best practices in ASP.NET Core development! Please find original article here.