Technology
Mastering SOLID Design Principles: A Blueprint for Clean Code
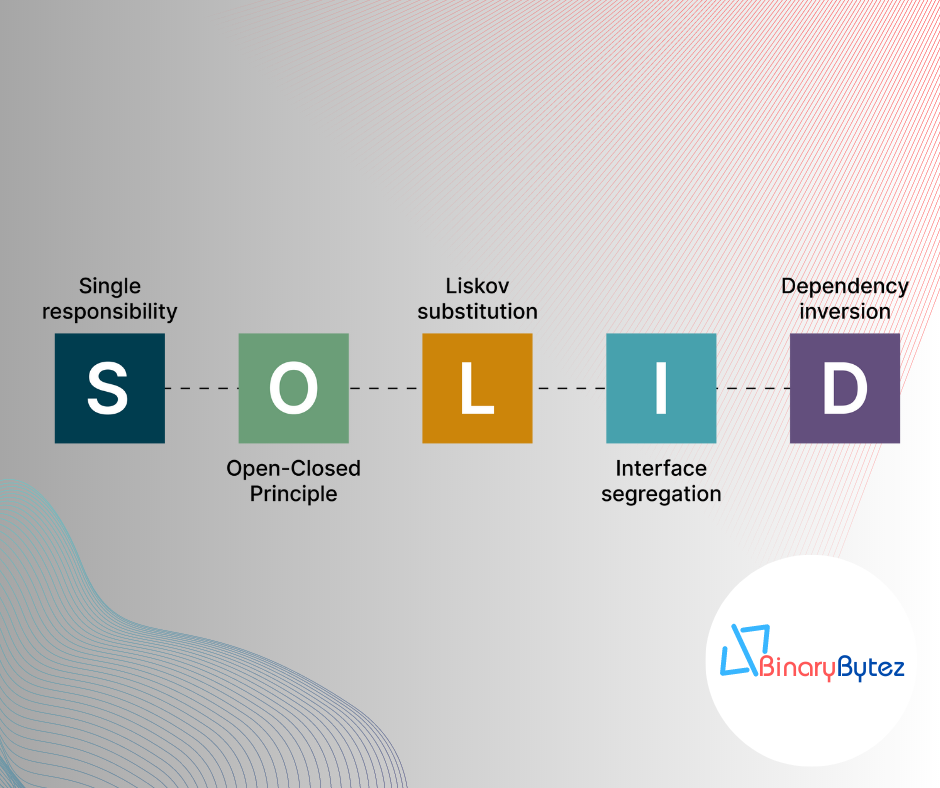
Introduction: In the dynamic world of software development, writing maintainable and scalable code is crucial to the success of any project. SOLID design principles provide a set of guidelines that can help developers achieve precisely that. Developed by Robert C. Martin (Uncle Bob), these principles have become a cornerstone of modern software architecture. In this blog post, we will dive deep into each SOLID principle, understand its significance, and learn how to apply them with practical coding examples. 1. Single Responsibility Principle (SRP): The Single Responsibility Principle states that a class should have only one reason to change. In other words, a class should have a single responsibility or task. Let’s see how we can apply this principle to a sample application. // Bad Practice - One class with multiple responsibilities class OrderProcessingService { public void ProcessOrder(Order order) { // ... Process the order ... } public void SendEmailConfirmation(Order order) { // ... Send email confirmation ... } public void GenerateInvoice(Order order) { // ... Generate the invoice ... } } // Good Practice - Separate classes with single responsibility class OrderProcessor { public void ProcessOrder(Order order) { // ... Process the order ... } } class EmailService { public void SendEmailConfirmation(Order order) { // ... Send email confirmation ... } } class InvoiceGenerator { public void GenerateInvoice(Order order) { // ... Generate the invoice ... } } By following SRP, we ensure that each class has a clear purpose, making the code more modular, maintainable, and easier to understand. 2. Open-Closed Principle (OCP): The Open-Closed Principle suggests that software entities should be open for extension but closed for modification. This means we should be able to extend the behavior of a class without modifying its existing code. Let’s explore how we can implement this principle. // Bad Practice - Modifying existing class class Shape { public virtual double Area() { // ... Calculate area ... } } class Circle : Shape { public override double Area() { // ... Calculate circle area ... } } class Square : Shape { public override double Area() { // ... Calculate square area ... } } // Good Practice - Extending behavior through interfaces interface IShape { double Area(); } class Circle : IShape { public double Area() { // ... Calculate circle area ... } } class Square : IShape { public double Area() { // ... Calculate square area ... } } By using interfaces, we adhere to OCP and create more flexible and adaptable systems that can be easily extended without altering existing code. 3. Liskov Substitution Principle (LSP): The Liskov Substitution Principle emphasizes that objects of derived classes should be substitutable for objects of the base class without affecting program correctness. Let’s see how we can maintain LSP. // Bad Practice - Violating LSP class Bird { public virtual void Fly() { // ... Fly like a bird ... } } class Penguin : Bird { public override void Fly() { throw new NotSupportedException("Penguins cannot fly."); } } // Good Practice - Upholding LSP interface IFlyable { void Fly(); } class Bird : IFlyable { public void Fly() { // ... Fly like a bird ... } } class Penguin : IFlyable { public void Fly() { // Penguins cannot fly, but still conform to the interface. } } By following LSP, we ensure that derived classes can seamlessly replace their base class counterparts, promoting code consistency and maintainability. 4. Interface Segregation Principle (ISP): The Interface Segregation Principle advises segregating interfaces into smaller, focused ones, rather than having large, monolithic interfaces. This promotes a more granular and concise design. Let’s see how to implement ISP. // Bad Practice - Large, monolithic interface interface IWorker { void Work(); void Eat(); void Sleep(); } class Robot : IWorker { // Implementing unnecessary methods for a robot. } class Human : IWorker { // Implementing unnecessary methods for a human. } // Good Practice - Segregated interfaces interface IWorkable { void Work(); } interface IEatable { void Eat(); } interface ISleepable { void Sleep(); } class Robot : IWorkable { public void Work() { // ... Robot work logic ... } } class Human : IWorkable, IEatable, ISleepable { public void Work() { // ... Human work logic ... } public void Eat() { // ... Human eat logic ... } public void Sleep() { // ... Human sleep logic ... } } By adhering to ISP, we create leaner and more focused interfaces, enabling better code maintainability and adaptability. 5. Dependency Inversion Principle (DIP): The Dependency Inversion Principle suggests relying on abstractions rather than concrete implementations. High-level modules should not depend on low-level modules; both should depend on abstractions. Let’s apply DIP. // Bad Practice - High-level module depends on low-level module class OrderProcessor { private readonly EmailService _emailService; public OrderProcessor() { _emailService = new EmailService(); } public void ProcessOrder(Order order) { // ... Process the order ... _emailService.SendEmailConfirmation(order); } } // Good Practice - High-level module depends on abstraction interface IEmailService { void SendEmailConfirmation(Order order); } class EmailService : IEmailService { public void SendEmailConfirmation(Order order) { // ... Send email confirmation ... } } class OrderProcessor { private readonly IEmailService _emailService; public OrderProcessor(IEmailService emailService) { _emailService = emailService; } public void ProcessOrder(Order order) { // ... Process the order ... _emailService.SendEmailConfirmation(order); } } By following DIP, we promote loose coupling and enable easier testing, extensibility, and a more modular design. Conclusion: Incorporating SOLID principles in your software development journey can be transformational. These principles empower developers to write cleaner, more maintainable, and extensible code, which results in robust and scalable software solutions. As you apply SRP, OCP, LSP, ISP, and DIP in your projects, you’ll witness the growth of your coding prowess and the emergence of truly clean code that stands the test of time. Embrace SOLID principles and elevate your coding skills to new heights! Note: This article has been written by Kawser Hamid and republished on MudMatter with Author’s Permission. Please find the original link here – Mastering SOLID Design Principles: A Blueprint for Clean Code.

Understanding Clean Architecture
Understanding Clean Architecture is crucial for building maintainable and scalable software. Let’s provide a concise explanation of Clean Architecture: Clean Architecture: A Brief Explanation Clean Architecture is a software architecture pattern that emphasizes the separation of concerns and the independence of the application’s business logic from external concerns like frameworks, databases, and user interfaces. It was popularized by Robert C. Martin (Uncle Bob) and aims to create a maintainable and flexible codebase that can withstand changes over time. Key Concepts: Separation of Concerns: Clean Architecture promotes dividing the application into distinct layers, each with its specific responsibilities. This separation enables changing one part of the system without affecting the other parts. Dependency Rule: The inner layers should not depend on the outer layers. Business logic and core functionality reside in the innermost layer, which should have no knowledge of external frameworks or technologies. Dependency Inversion Principle (DIP): High-level modules should not depend on low-level modules; both should depend on abstractions. This principle fosters a flexible and maintainable codebase by decoupling concrete implementations from abstractions. Entities: Core domain models representing business entities exist at the heart of the architecture. They are independent of the external layers and encapsulate core business rules. Use Cases (Interactors): Use cases represent application-specific operations or business workflows. They contain the application’s business logic and orchestrate interactions between entities and external layers. Interface Adapters: These adapters convert data between the use cases and external components, such as databases, web services, or user interfaces. They allow the use cases to remain independent of external technologies. Frameworks and Drivers: The outermost layer is responsible for interacting with external frameworks, databases, and user interfaces. It should not contain business logic but should adapt the data to and from the use cases. Benefits of Clean Architecture: Maintainability: The separation of concerns makes it easier to maintain and modify the application over time, as changes in one part don’t affect the others. Testability: Clean Architecture promotes testability by allowing isolated testing of use cases and business rules without involving external dependencies. Flexibility: The architecture’s decoupling allows for easy replacement of technologies or frameworks without significant changes to the core application. Scalability: The modular structure of Clean Architecture facilitates scaling the application by adding or modifying modules as needed. Focus on Business Logic: Clean Architecture helps developers focus on implementing core business rules rather than being bogged down by external concerns. Sample Structure of the Clean Architecture Project: ├── src │ ├── Core # Contains the core business logic and domain models, view models, etc. │ │ ├── Entities # Contains domain models/entities │ │ │ ├── Product.cs # Sample domain model (can have more entities) │ │ │ └── ... │ │ ├── Services # Contains business logic services │ │ │ ├── IProductService.cs # Sample service interface │ │ │ ├── ProductService.cs # Sample service implementation │ │ │ └── ... │ │ └── ... │ ├── Infrastructure # Contains infrastructure concerns such as data access, external services, etc. │ │ ├── Data # Contains data access related classes │ │ │ ├── ApplicationDbContext.cs # Sample DbContext class │ │ │ ├── ProductRepository.cs # Sample repository implementation │ │ │ └── ... │ │ ├── ExternalServices # Contains code for external services integration │ │ │ ├── EmailService.cs # Sample external service integration │ │ │ └── ... │ │ └── ... │ └── UI # Contains the user interface layer, including controllers, views, and extensions, etc. │ ├── Controllers # Contains controllers for handling HTTP requests and responses │ │ ├── ProductController.cs # Sample controller │ │ └── ... │ ├── Views # Contains views for rendering UI components │ │ ├── Product # Folder for Product-related views │ │ │ ├── Index.cshtml # Sample view for displaying products │ │ │ ├── Create.cshtml # Sample view for creating a new product │ │ │ ├── Edit.cshtml # Sample view for editing an existing product │ │ │ └── ... │ │ └── ... │ └── ... ├── UnitTest │ ├── Core.Tests # Contains unit tests for the core layer │ │ ├── ProductServiceTests.cs # Sample unit test for ProductService │ │ └── ... │ ├── Infrastructure.Tests # Contains unit tests for the infrastructure layer │ │ ├── ProductRepositoryTests.cs # Sample unit test for ProductRepository │ │ └── ... │ ├── UI.Tests # Contains unit tests for the UI layer │ │ ├── ProductControllerTests.cs # Sample unit test for ProductController │ │ └── ... │ └── ... └── README.md # Project documentation Please note that this is a simplified representation of the project structure, and in a real-world application, you may have more folders and files based on your specific requirements. The above structure adheres to the Clean Architecture principles, with a clear separation of concerns between the core domain logic, infrastructure concerns (data access and external services), and the user interface layer. The tests folder contains separate test projects for each layer, allowing you to write unit tests to ensure the functionality of each component. Core: Contains the core business logic, including domain models and services. This layer represents the heart of the application, encapsulating the essential business rules and entities. ├── Core │ ├── Entities # Domain entities representing business objects │ │ └── User.cs # Example entity class representing a user │ ├── Services # Business logic and services │ │ └── UserService.cs # Example service class for user-related operations │ └── .. Example Code: // Core/Entities/User.cs namespace Core.Entities { public class User { public int Id { get; set; } public string Name { get; set; } public string Email { get; set; } // Other properties and methods relevant to the user entity } } // Core/Services/UserService.cs using Core.Entities; using System.Threading.Tasks; namespace Core.Services { public class UserService { public async Task<User> GetUserByIdAsync(int userId) { // Logic to retrieve user from data source (e.g., database) } // Other methods for user-related operations } } Infrastructure: Contains infrastructure concerns such as data access and external services. Repository implementations and database context reside here. ├── Infrastructure │ ├── Data # Data access layer │ │ ├── Repositories # Repository implementations │ │ │ └── UserRepository.cs # Example repository for user entity │ │ └── AppDbContext.cs # Entity Framework Core database context │ └── ... Example Code: // Infrastructure/Data/Repositories/UserRepository.cs using Core.Entities; using Core.Interfaces; using Microsoft.EntityFrameworkCore; using System.Collections.Generic; using System.Threading.Tasks; namespace Infrastructure.Data.Repositories { public class UserRepository : IRepository<User> { private readonly AppDbContext _context; public UserRepository(AppDbContext context) { _context = context; } public async Task<IEnumerable<User>> GetAllUsersAsync() { return await _context.Users.ToListAsync(); } // Other CRUD methods for the user entity } } // Infrastructure/Data/AppDbContext.cs using Core.Entities; using Microsoft.EntityFrameworkCore; namespace Infrastructure.Data { public class AppDbContext : DbContext { public DbSet<User> Users { get; set; } public AppDbContext(DbContextOptions<AppDbContext> options) : base(options) { } } } API: Contains the API layer, including controllers and extensions. This layer exposes endpoints and handles HTTP requests. ├── API │ ├── Controllers # API controllers │ │ └── UserController.cs # Example controller for user-related actions │ ├── Extensions # Extension methods for configuring services │ └── ... Example Code: // API/Controllers/UserController.cs using Core.Entities; using Core.Services; using Microsoft.AspNetCore.Mvc; using System.Collections.Generic; using System.Threading.Tasks; namespace API.Controllers { [ApiController] [Route("api/[controller]")] public class UserController : ControllerBase { private readonly UserService _userService; public UserController(UserService userService) { _userService = userService; } [HttpGet] public async Task<ActionResult<IEnumerable<User>>> GetUsers() { var users = await _userService.GetAllUsersAsync(); return Ok(users); } // Other CRUD actions for user entity } } Unit Testing: Core.Tests Contains unit tests for the core layer. These tests ensure the correctness of core business logic and services. Infrastructure.Tests Contains unit tests for the infrastructure layer. These tests validate data access and repository implementations. API.Tests Contains unit tests for the API layer. These tests verify the functionality of API controllers and endpoints. Conclusion: Clean Architecture is a powerful pattern that promotes code organization, testability, and maintainability. By following its principles, developers can create robust and adaptable software that stands the test of time and can accommodate future changes and enhancements with ease. Note: This article has been written by Kawser Hamid and republished on MudMatter with Author’s Permission. Please find the original link here – Understanding Clean Architecture.
Clean Structured API Project – ASP.NET Core
This template is for a clean structured ASP.NET Core API project, following the RESTful principles, Clean Architecture principles, SOLID design principles, implementing the Dependency Injection, Repository, and Unit of Work design pattern, and utilizing Entity Framework Core for data access. It provides a standardized structure and organization for building robust and maintainable ASP.NET Core API applications with complete CRUD (Create, Read, Update, Delete) operations. Project Structure The project structure is designed to promote separation of concerns and modularity, making it easier to understand, test, and maintain the application. ├── src │ ├── Core # Contains the core business logic, domain models, view models, etc. │ ├── Infrastructure # Contains infrastructure concerns such as data access, external services, etc. │ └── API # Contains the API layer, including controllers, extensions, etc. ├── tests │ ├── Core.Tests # Contains unit tests for the core layer │ ├── Infrastructure.Tests # Contains unit tests for the infrastructure layer │ └── API.Tests # Contains unit tests for the API layer └── README.md # Project documentation (you are here!) REST API The API project contains the controllers responsible for handling HTTP requests and responses, adhering to RESTful principles. Here’s an overview of the key components involved in building RESTful APIs using ASP.NET Core: Controllers: The API project contains controllers that handle HTTP requests and responses. Each controller is responsible for a specific resource or entity. Controllers define HTTP methods (GET, POST, PUT, DELETE) that map to specific actions for CRUD operations on entities. Models/DTOs: The Core project may contain Data Transfer Objects (DTOs) that represent the data to be sent over the API. DTOs help in decoupling the client’s data format from the server’s data format. Routing: The routing mechanism in ASP.NET Core maps incoming HTTP requests to the appropriate controller and action method based on the URL. RESTful APIs typically use a resource-based URL pattern. HTTP Methods: RESTful APIs use standard HTTP methods (GET, POST, PUT, DELETE) to perform CRUD operations on resources. Each HTTP method corresponds to a specific action on the API. Status Codes: RESTful APIs use standard HTTP status codes to indicate the success or failure of an API request. For example, 200 (OK) for successful GET requests, 201 (Created) for successful POST requests, 204 (No Content) for successful DELETE requests, etc. Validation: RESTful APIs should include proper validation logic to ensure that incoming data is valid and adheres to the expected format. Getting Started To use this project template, follow the steps below: Ensure the .NET 7 SDK is installed on your machine. Clone or download this repository to your local machine. Open the solution in your preferred IDE (e.g., Visual Studio, Visual Studio Code). Build the solution to restore NuGet packages and compile the code. Configure the necessary database connection settings in the appsettings.json file of the Infrastructure project. Open the Package Manager Console, select Project.Infrastructure project, and run the Update-Database command to create the database. Run the application by starting the Project.API project. Project Features This project template includes the following features: Clean Architecture: The project is structured according to the principles of Clean Architecture, which promotes the separation of concerns and a clear division of responsibilities. SOLID Design Principles: The code adheres to SOLID principles (Single Responsibility, Open-Closed, Liskov Substitution, Interface Segregation, and Dependency Inversion), making it easier to maintain and extend. Repository Pattern: The repository pattern abstracts the data access layer and provides a consistent interface for working with data. Unit of Work Pattern: The unit of work pattern helps manage transactions and ensures consistency when working with multiple repositories. Entity Framework Core: The project utilizes Entity Framework Core as the ORM (Object-Relational Mapping) tool for data access. ASP.NET Core API: The project includes an ASP.NET Core API project that serves as the API layer, handling HTTP requests and responses. CRUD Operations: The project template provides a foundation for implementing complete CRUD (Create, Read, Update, Delete) operations on entities using Entity Framework Core. Dependency Injection: The project utilizes the built-in dependency injection container in ASP.NET Core, making it easy to manage and inject dependencies throughout the application. Unit Testing: The solution includes separate test projects for unit testing the core, infrastructure, and API layers. Usage The project template provides a starting point for building RESTful APIs using ASP.NET Core. You can modify and extend the existing code to suit your specific application requirements. Here’s an overview of the key components involved in building RESTful APIs: Models: The Core project contains the domain models representing the entities you want to perform CRUD operations on. Update the models or add new ones according to your domain. Repositories: The Infrastructure project contains repository implementations that handle data access operations using Entity Framework Core. Modify the repositories or create new ones to match your entity models and database structure. Services: The Core project contains services that encapsulate the business logic and orchestrate the operations on repositories. Update or create new services to handle CRUD operations on your entities. Controllers: The API project contains controllers that handle HTTP requests and responses. Update or create new controllers to expose the CRUD endpoints for your entities. Implement the appropriate HTTP methods (GET, POST, PUT, DELETE) and perform actions on the core services accordingly. Make sure to update the routes, validation, and error-handling logic to align with your application requirements and best practices. Note: This article has been written by Kawser Hamid and republished on MudMatter with Author’s Permission. Please find the original link here – Clean Structured API Project – ASP.NET Core.
Clean Structured Project – ASP.NET Core
This template is for a clean structured ASP.NET Core web project, follows the Clean Architecture principles, SOLID design principles, implements the Dependency Injection, Repository, and Unit of Work design pattern, and utilizes Entity Framework Core for data access. It provides a standardized structure and organization for building robust and maintainable ASP.NET Core web applications with complete CRUD (Create, Read, Update, Delete) operations. Project Structure The project structure is designed to promote separation of concerns and modularity, making it easier to understand, test, and maintain the application. ├── src │ ├── Core # Contains the core business logic and domain models, view models, etc. │ ├── Infrastructure # Contains infrastructure concerns such as data access, external services, etc. │ └── UI # Contains the user interface layer, including controllers, views, and extensions, etc. ├── tests │ ├── Core.Tests # Contains unit tests for the core layer │ ├── Infrastructure.Tests # Contains unit tests for the infrastructure layer │ └── UI.Tests # Contains unit tests for the UI layer └── README.md # Project documentation (you are here!) Getting Started To use this project template, follow the steps below: Ensure the .NET 7 SDK is installed on your machine. Clone or download this repository to your local machine. Open the solution in your preferred IDE (e.g., Visual Studio, Visual Studio Code). Build the solution to restore NuGet packages and compile the code. Configure the necessary database connection settings in the appsettings.json file of the Infrastructure project. Open the Package Manager Console, select Project.Infrastructure project and run the Update-Database command to create the database Run the application by starting the Project.UI project. Project Features This project template includes the following features: Clean Architecture: The project is structured according to the principles of Clean Architecture, which promotes the separation of concerns and a clear division of responsibilities. SOLID Design Principles: The code adheres to SOLID principles (Single Responsibility, Open-Closed, Liskov Substitution, Interface Segregation, and Dependency Inversion), making it easier to maintain and extend. Repository Pattern: The repository pattern abstracts the data access layer and provides a consistent interface for working with data. Unit of Work Pattern: The unit of work pattern helps manage transactions and ensures consistency when working with multiple repositories. Entity Framework Core: The project utilizes Entity Framework Core as the ORM (Object-Relational Mapping) tool for data access. ASP.NET Core Web: The project includes an ASP.NET Core web project that serves as the user interface layer, handling HTTP requests and responses. CRUD Operations: The project template provides a foundation for implementing complete CRUD (Create, Read, Update, Delete) operations on entities using Entity Framework Core. Dependency Injection: The project utilizes the built-in dependency injection container in ASP.NET Core, making it easy to manage and inject dependencies throughout the application. Unit Testing: The solution includes separate test projects for unit testing the core, infrastructure, and UI layers. Usage The project template provides a starting point for implementing CRUD operations on entities using Entity Framework Core. You can modify and extend the existing code to suit your specific application requirements. Here’s an overview of the key components involved in the CRUD operations: Models: The Core project contains the domain models representing the entities you want to perform CRUD operations on. Update the models or add new ones according to your domain. Repositories: The Infrastructure project contains repository implementations that handle data access operations using Entity Framework Core. Modify the repositories or create new ones to match your entity models and database structure. Services: The Core project contains services that encapsulate the business logic and orchestrate the operations on repositories. Update or create new services to handle CRUD operations on your entities. Controllers: The UI project contains controllers that handle HTTP requests and responses. Update or create new controllers to expose the CRUD endpoints for your entities. Make sure to update the routes, validation, and error-handling logic to align with your application requirements and best practices. Note: This article has been written by Kawser Hamid and republished on MudMatter with Author’s Permission. Please find the original link here – Clean Structured Project – ASP.NET Core.
Differences between IEnumerable and IQueryable in C#
In every .NET application we need to manipulate IEnumerable and IQueryable interfaces to hold collections. The basic use of IEnumerable and IQueryable is to hold the collection of data & perform Ordering, Grouping & Filtering of data based on project/application requirements. The first thing to keep in mind is that since the IQueryable interface is an inheritance of IEnumerable, it possesses all of IEnumerable's capabilities. Both are limited to process on C# collections. The important difference between IEnumerableand IQueryable is: IQueryable - The Filter is apply at server level/side and fetch only required results from source. So processing time is less. IEnumerable- It fetch all data from source first and later apply the filter at client level/side. Which can be result in fetching unnecessary data and it increase processing time. Lets understand this with an example. We have created Console application in .NET Core to fetch Books from SQL Server database and we are using Entity Framework Core to fetch the books (books table). We built it over Code-First approach. This is our Book.cs Entity [Table("Books")] public class Book { [Key] public int BookId { get; set; } [StringLength(255)] public string? Title { get; set; } public decimal Price { get; set; } } We have around 10 records added into database by using seed data method. Lets understand the differences by using below code. We have written both queries in LINQ. class Program { static void Main(string[] args) { using (var context = new BookDemoDbContext()) { var booksIEnumerable = (from book in context.Books select book) .AsEnumerable<Book>().Take(2).ToList(); var booksIQurable = (from book in context.Books select book) .AsQueryable<Book>().Take(2).ToList(); } Console.ReadKey(); } } In first query we are trying to fetch 2 books in IEnumerable interface. var booksIEnumerable = (from book in context.Books select book) .AsEnumerable<Book>().Take(2).ToList(); Lets see what above LINQ query has been executed in SQL Server with the help of SQL Server profiler (for IEnumerable). Below query is traced in profiler. The query is simple SELECT statement without any where clause or TOP statement. It means it selecting all rows from SQL server database and just pick 2 records on client side. SELECT [b].[BookId], [b].[Price], [b].[Title] FROM [Books] AS [b] The diagram shows graphical representation of how IEnumerableworks. In first query we are trying to fetch 2 books in IQueryableinterface. var booksIQurable = (from book in context.Books select book) .AsQueryable<Book>().Take(2).ToList(); Lets see what above LINQ query has been executed in SQL Server with the help of SQL Server profiler (for IQueryable). Below query is traced in profiler. The TOP filter has been applied with parameter and its value = 2, so it means it fetch only 2 records from Books table. So it avoids fetching unnecessary data from database. exec sp_executesql N'SELECT TOP(@__p_0) [b].[BookId], [b].[Price], [b].[Title] FROM [Books] AS [b]',N'@__p_0 int',@__p_0=2 The diagram shows graphical representation of how IQueryable works. Download Source Code https://github.com/mayurlohite/IEnumerableVsIQueryable See the difference in action, watch this video https://www.youtube.com/watch?v=1x7Pf5geDd4 Conclusion Hence, when working with in-memory collections—where data is kept locally in the memory of the application—select IEnumerable<T>. When working with huge data sets or querying external data sources, use IQueryable<T> as it enables effective server-side processing and query optimization. Your performance needs and the type of data source will determine which option is best. If you have any questions, Please connect me on LinkedIn. Explore more articles.
How to check if string is null or empty? or it does not contains anything in C#
In every project developed within the .NET framework, whether it's a web, console, Windows, or mobile application, it is crucial to validate whether a string is empty, null, or contains anything, including whitespace. Therefore, I'm sharing this C# tip to demonstrate the optimal approach for checking if a string is null, empty, or consists solely of blank space. Certainly! In C#, you can efficiently check if a string is null, empty, or contains only whitespace using the string.IsNullOrWhiteSpace method. This method returns true if the string is null, empty, or consists only of white-space characters; otherwise, it returns false. The term "white space" includes all characters that are not visible on screen. For example, space, line break, tab and empty string are white space characters. Lets take example. Create a new console application in Visual Studio. Try this code below. class Program { static void Main(string[] args) { string nullString = null; string emptyString = ""; string whitespaceString = " "; string nonEmptyString = "Mudmatter"; Console.WriteLine("Result by using checking double quotes method - Wrong Method"); Console.WriteLine("{{nullstring}} is null or empty? {0}", nullString == ""); Console.WriteLine("{{emptyString}} is null or empty? {0}", emptyString == ""); Console.WriteLine("{{whitespaceString}} is null or empty? {0}", whitespaceString == ""); Console.WriteLine("{{nonEmptyString}} is null or empty? {0}", nonEmptyString == ""); Console.WriteLine(""); Console.WriteLine("---------------------------------------"); Console.WriteLine(""); Console.WriteLine("Result by using IsNullOrEmpty method - OK but not good"); Console.WriteLine("{{nullstring}} is null or empty? {0}", string.IsNullOrEmpty(nullString)); Console.WriteLine("{{emptyString}} is null or empty? {0}", string.IsNullOrEmpty(emptyString)); Console.WriteLine("{{whitespaceString}} is null or empty? {0}", string.IsNullOrEmpty(whitespaceString)); Console.WriteLine("{{nonEmptyString}} is null or empty? {0}", string.IsNullOrEmpty(nonEmptyString)); Console.WriteLine(""); Console.WriteLine("----------------------------------------"); Console.WriteLine(""); Console.WriteLine("Result by using IsNullOrWhiteSpace method - Best method"); Console.WriteLine("{{nullstring}} is null or empty? {0}", string.IsNullOrWhiteSpace(nullString)); Console.WriteLine("{{emptyString}} is null or empty? {0}", string.IsNullOrWhiteSpace(emptyString)); Console.WriteLine("{{whitespaceString}} is null or empty? {0}", string.IsNullOrWhiteSpace(whitespaceString)); Console.WriteLine("{{nonEmptyString}} is null or empty? {0}", string.IsNullOrWhiteSpace(nonEmptyString)); Console.ReadKey(); } } Output: Short Video https://www.youtube.com/watch?v=t-yumUzLIoY Conclusion There are various methods to check if string is empty or not but the best method is using the string.IsNullOrWhiteSpace method. This method can check empty, null & any white space characters which are not visible on screen. So I recommend to use the string.IsNullOrWhiteSpace method.

Check Session Timeout by Using ActionFilters in MVC
In a dynamic web application, the session is crucial to hold the information of current logged in user identity/data. So someone without authentication cannot have access to some Page or any ActionResult, to implement this kind of functionality, we need to check session exists (is not null) in every action which required authentication. So, the general method is as follows: [HttpGet] public ActionResult Home() { if(Session["ID"] == null) return RedirectToAction("Login","Home"); } We have to check the above 2 statements each time and in each ActionResult, but it may cause 2 problems. Repeat Things: As per the good programming stranded, we don't have to repeat the things. Create a module of common code and access it multiple times/repeatedly Code missing: We have to write code multiple times so it might happen some time we forget to write code in some method or we missed it. How To Avoid? The ASP.NET MVC provides a very great mechanism i.e., Action Filters. An action filter is an attribute. You can apply most action filters to either an individual controller action or an entire controller. If you want to know more about action filter, please click here. So we will create a custom Action Filter that handles session expiration and if session is null, redirect to Login Action. Create a new class in your project and copy the following code: namespace Mayur.Web.Attributes { public class SessionTimeoutAttribute : ActionFilterAttribute { public override void OnActionExecuting(ActionExecutingContext filterContext) { HttpContext ctx = HttpContext.Current; if (HttpContext.Current.Session["ID"] == null) { filterContext.Result = new RedirectResult("~/Home/Login"); return; } base.OnActionExecuting(filterContext); } } } Now our Action Filter is created and we are ready to use it. The following code will show you how we can apply attribute to Action or to complete controller. 1. Apply to Action [HttpGet] [SessionTimeout] public ActionResult MyProfile() { return View(); } 2. Apply to Controller [SessionTimeout] public class HomeController : Controller { [HttpGet] public async ActionResult MyProfile() { return View(); } [HttpGet] public async ActionResult MyQuestions() { return View(); } [HttpGet] public async ActionResult MyArticles() { return View(); } } Now all actions of Home Controller will check for session when hit with the help of Action Filter. So we have reduced the code and repetitive things. This is the benefits of Action Filters. Happy coding !!!

Helper to validate image in MVC
In almost 90% of projects, we need to upload images to server and store them. In most cases, hackers try to exploit an image upload system and try to upload exploitable materials like web-shells, some harmful scripts, table deletions scripts, etc. To prevent this, I have written one helper function which validates file in many conditions and makes sure the file is in correct image format. The code is not fully written by me, I researched many articles and filtered the conditions which helps us to validate the required output. /// <summary> /// Verifies that a uploading file is in valid Image format /// </summary> /// <param name="postedFile">File which is selected for upload</param> /// <param name="imageMinBytes">Minimum file size in byte</param> /// <param name="imageMaxBytes">Maximum file size in byte</param> /// <returns>true if the file is a valid image format and false if it's not</returns> public static bool IsValidImageFormat(HttpPostedFileBase postedFile, int imageMinBytes, long imageMaxBytes) { //------------------------------------------- // Check the image extension //------------------------------------------- if (Path.GetExtension(postedFile.FileName).ToLower() != ".jpg" && Path.GetExtension(postedFile.FileName).ToLower() != ".png" && Path.GetExtension(postedFile.FileName).ToLower() != ".gif" && Path.GetExtension(postedFile.FileName).ToLower() != ".jpeg") { return false; } //------------------------------------------- // Check the image MIME types //------------------------------------------- if (postedFile.ContentType.ToLower() != "image/jpg" && postedFile.ContentType.ToLower() != "image/jpeg" && postedFile.ContentType.ToLower() != "image/pjpeg" && postedFile.ContentType.ToLower() != "image/gif" && postedFile.ContentType.ToLower() != "image/x-png" && postedFile.ContentType.ToLower() != "image/png") { return false; } //------------------------------------------- // Attempt to read the file and check the first bytes //------------------------------------------- try { if (!postedFile.InputStream.CanRead) { return false; } if (postedFile.ContentLength < imageMinBytes) { return false; } byte[] buffer = new byte[512]; postedFile.InputStream.Read(buffer, 0, 512); string content = System.Text.Encoding.UTF8.GetString(buffer); if (Regex.IsMatch(content, @"<script|<html|<head|<title|<body| <pre|<table|<a\s+href|<img|<plaintext|<cross\-domain\-policy", RegexOptions.IgnoreCase | RegexOptions.CultureInvariant | RegexOptions.Multiline)) { return false; } } catch (Exception) { return false; } //------------------------------------------- // Try to instantiate new Bitmap, if .NET will throw exception // we can assume that it's not a valid image //------------------------------------------- try { using (var bitmap = new System.Drawing.Bitmap(postedFile.InputStream)) { } } catch (Exception) { return false; } return true; } Hope it will help you. Let me know your thoughts!

A cookie wrapper class in MVC
A Simple Cookie Wrapper Class for MVC: Easily Manage Cookies in Your Web Application In web development, managing cookies efficiently is a crucial part of building user-friendly applications. In this post, I will show you how to create a simple and reusable cookie helper class in MVC, which allows you to easily create, read, update, and delete cookies. This approach simplifies cookie management and ensures your code is clean and easy to maintain. Introduction to Cookie Management in MVC Cookies are small pieces of data stored in the user's browser. They are typically used for sessions, preferences, and other user-specific data. In MVC applications, handling cookies manually can be cumbersome. That's where a helper class comes in handy. Let’s build a CookieHelper.cs class to abstract the common operations like creating, reading, updating, and deleting cookies. CookieHelper Class Code Create a new file named CookieHelper.cs and paste the following code into it. This class defines the basic functionality you need for working with cookies in your MVC application. using System; using System.Web; public class CookieHelper { #region Constants // The name of the cookie to be used public const string CookieName = "UserName"; #endregion #region Enums public enum CookieInterval { SECOND = 0, MINUTE = 1, HOUR = 2, DAY = 3, MONTH = 4, YEAR = 5 }; #endregion #region Utility Methods // Calculates the expiration date for the cookie based on the given duration and unit private static DateTime CalculateCookieExpiry(int duration, CookieInterval durationUnit) { DateTime cookieExpire = DateTime.Now; switch (durationUnit) { case CookieInterval.SECOND: cookieExpire = DateTime.Now.AddSeconds(duration); break; case CookieInterval.MINUTE: cookieExpire = DateTime.Now.AddMinutes(duration); break; case CookieInterval.HOUR: cookieExpire = DateTime.Now.AddHours(duration); break; case CookieInterval.DAY: cookieExpire = DateTime.Now.AddDays(duration); break; case CookieInterval.MONTH: cookieExpire = DateTime.Now.AddMonths(duration); break; case CookieInterval.YEAR: cookieExpire = DateTime.Now.AddYears(duration); break; default: cookieExpire = DateTime.Now.AddDays(duration); break; } return cookieExpire; } #endregion #region Public Methods // Creates a cookie with a specific name, value, and expiration time public static string CreateCookie(string cookieName, string cookieValue, CookieInterval durationUnit, int duration) { HttpCookie cookie = new HttpCookie(cookieName) { Value = cookieValue, Expires = CalculateCookieExpiry(duration, durationUnit) }; HttpContext.Current.Response.Cookies.Add(cookie); return cookieValue; } // Reads the value of an existing cookie by its name public static string ReadCookie(string cookieName) { HttpCookie cookie = HttpContext.Current.Request.Cookies[cookieName]; return cookie?.Value ?? string.Empty; } // Updates the value and expiration of an existing cookie public static string UpdateCookie(string cookieName, string newCookieValue, CookieInterval durationUnit, int duration) { HttpCookie cookie = HttpContext.Current.Request.Cookies[cookieName]; if (cookie != null) { cookie.Value = newCookieValue; cookie.Expires = CalculateCookieExpiry(duration, durationUnit); HttpContext.Current.Response.Cookies.Add(cookie); } return newCookieValue; } // Deletes a cookie by setting its expiration date to the past public static void DeleteCookie(string cookieName) { HttpCookie cookie = new HttpCookie(cookieName) { Expires = DateTime.Now.AddDays(-1) }; HttpContext.Current.Response.Cookies.Add(cookie); } #endregion } How to Use the CookieHelper Class Now that you have the CookieHelper class, let's walk through some common scenarios: creating, reading, updating, and deleting cookies. 1. Create a Cookie To create a cookie, you simply call the CreateCookie method with the cookie's name, value, duration unit (such as days or months), and duration: string cookieValue = CookieHelper.CreateCookie(CookieHelper.CookieName, "This is a test cookie", CookieHelper.CookieInterval.DAY, 7); This will create a cookie that expires in 7 days. 2. Read a Cookie To read the value of an existing cookie, use the ReadCookie method: string cookieValue = CookieHelper.ReadCookie(CookieHelper.CookieName); If the cookie exists, this will return its value. If it doesn't, it will return an empty string. 3. Update a Cookie To update the value of an existing cookie, call the UpdateCookie method: string updatedCookieValue = CookieHelper.UpdateCookie(CookieHelper.CookieName, "Updated cookie value", CookieHelper.CookieInterval.DAY, 14); This will update the cookie's value and reset its expiration date to 14 days from now. 4. Delete a Cookie To delete a cookie, use the DeleteCookie method: CookieHelper.DeleteCookie(CookieHelper.CookieName); This will remove the cookie by setting its expiration date to a past date, effectively deleting it from the user's browser. Conclusion With this simple CookieHelper class, you can easily manage cookies in your MVC applications. Whether you're creating, reading, updating, or deleting cookies, the code is clean and easy to use. Feel free to use this class in your project, and let me know your thoughts or any improvements you might suggest!