
Suggested for you
Sachin Tendulkar
@sachin_rt
Sachin Tendulkar
@sachin_rt
Sachin Tendulkar
@sachin_rt
Sachin Tendulkar
@sachin_rt

Filled with heaps of shredded zucchini and extra-sharp cheddar, this zucchini frittata is good for brunch, dinner, or anytime in between.
I always love the idea of a frittata. You can throw one together in 30 minutes, and they’re great for using up any leftover veggies, meat, or hunks of cheese you might have languishing in the fridge. Problem is, they’re usually dry, rubbery, and just not that good. For same calories, I’d rather have quiche! This zucchini frittata, however, is delicate and creamy, almost like a crustless quiche. There are three secrets to success: 1) squeeze as much water as possible out of the zucchini; 2) add some heavy cream and lots of cheese to the egg mixture; and 3) bake the frittata in a low-temperature oven, instead of the traditional stovetop-to-broiler method, so the eggs cook gently into a custard without scrambling.
Ingredients For zucchini frittata
Step-by-Step Instructions
Begin by grating the zucchini by hand or in a food processor. It’s best to use small zucchini, as they contain less water.
Once grated, place the zucchini on several layers of paper towels and squeeze out as much water as possible. Depending on how much water is in the zucchini, you may need to repeat this step.
Next, melt a few tablespoons of butter in a 10-inch cast iron or oven-proof nonstick pan.
Add the shallots, zucchini, and 1/2 teaspoon salt.
Cook for 7 to 8 minutes, until the zucchini is tender and cooked down.
Meanwhile, combine the eggs, remaining salt, pepper and heavy cream in a large bowl.
Whisk to combine.
Add the cooked zucchini and grated cheese to the egg mixture and stir.
Pour the frittata mixture back into the pan.
Bake for about 25 to 30 minutes, or until just set.
Serve the frittata warm or room temperature.
Note: This recipe has been written by Jenn Segal and republished on MudMatter with Author’s Permission. Please find the original link here – Zucchini and Cheddar Frittata.
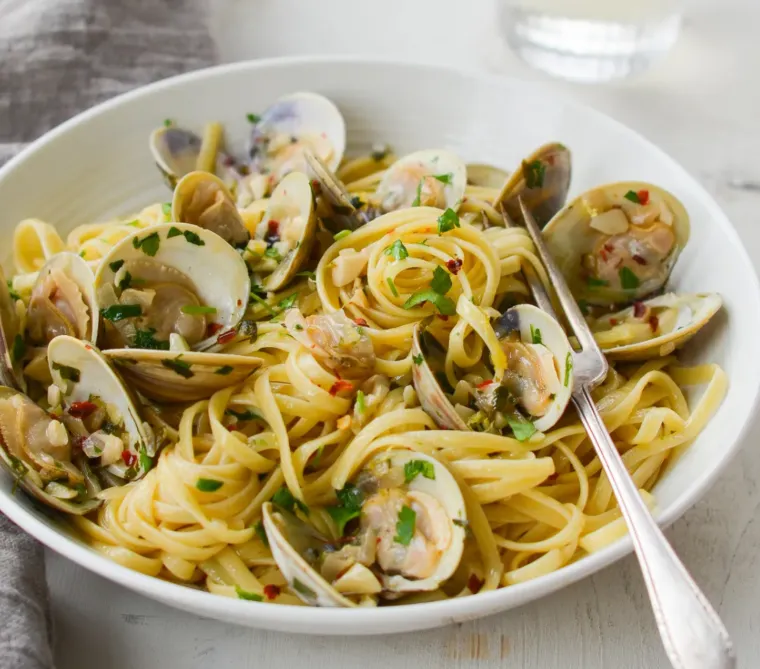
Linguine with clams in a garlicky white wine sauce makes an easy and elegant Italian pasta dinner.
Linguine with clams is a classic Italian restaurant dish, and it’s also one of the simplest, most affordable pasta dishes you can make at home. I know cooking shellfish, like clams and mussels, can be intimidating to the uninitiated, but I promise they are the easiest thing in the world to cook — and once you try it, you’ll wonder what took you so long! For this dish, you can do all of the prep and make the clam sauce in the time it takes to boil the pasta, so dinner is done in 30 minutes. To complete the meal, toss a salad, warm some crusty bread, and pour a few glasses of the same white wine used to make the sauce.
Looking for more classic Italian restaurant pasta dishes? Try my penne all vodka, fettuccine bolognese, and lasagna.
What you’ll need to make Linguine with clams
HOW TO PREPARE THE CLAMS
The recipe calls for Littleneck clams, which are readily available at most supermarkets. They are usually sold in a mesh bag because they are alive and need to breathe. If your fishmonger places them in a plastic bag, remove them from the bag immediately when you get home from the supermarket and place them in a bowl (uncovered) in the refrigerator.
To prepare the clams, first, check that they are alive by making sure all of the shells are tightly closed. If any clams are open, gently tap them against the countertop; if they are alive, they will close their shells. Discard any clams that do not close their shells or that have cracked or chipped shells.
Next, place all of the clams in a bowl and cover them with cool tap water. Let the clams sit for 20 minutes to an hour. During this time, the clams will expel sand from inside their shells. When you’re ready to cook, lift each clam from the water and rinse it, scrubbing if necessary, to get rid of any grit from the surface. (Note that most supermarkets sell farm-raised clams, which are already quite clean, so you may not find a lot of grit or sand.)
How To Make Linguine with Clams
In a large pot over high heat, bring 4 quarts of water and 2 tablespoons of kosher salt to a boil. Add the linguine and cook according to package directions until just shy of al dente. (The pasta should still be firm to the bite since it will cook another minute or two in the sauce).
Meanwhile, prep all of the ingredients for the sauce.
In a very large sauté pan over medium-high heat, heat the olive oil until hot but not smoking. Add the shallots and garlic and sauté until just golden, about 30 seconds.
Add the wine, red pepper flakes, 3/4 teaspoon kosher salt, and 1/4 cup of the parsley.
Toss in the clams, then bring to a simmer.
Cook, covered, until the clams open, 6 to 8 minutes. Discard any unopened clams.
Reserving 1/2 cup of the cooking water, drain the linguine in a colander (do not rinse).
Add the pasta to the sauté pan with the clams. (If you don’t have room for everything in one pan, transfer the clams to a plate and cover to keep warm. When ready to serve, add them back to the pasta on a serving platter).
Increase the heat to medium and cook the linguine with the clams, tossing occasionally, until the pasta absorbs most of the sauce and is just tender, 1 to 2 minutes. If necessary, add some of reserved cooking water to keep moist.
Remove the pan from the heat. Add the butter, lemon zest, lemon juice, and the remaining 2 tablespoons of parsley; toss to coat.
Taste and adjust the seasoning with more salt, lemon zest and/or lemon juice, if necessary. Transfer the linguini with clams to a serving dish or bowls and serve.
Note: This recipe has been written by Jenn Segal and republished on MudMatter with Author’s Permission. Please find the original link here – Linguine with Clams.
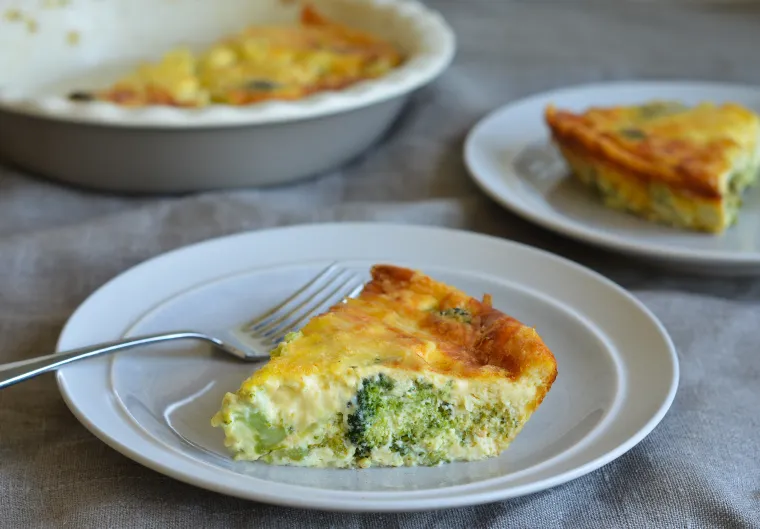
Omitting the crust in this crustless broccoli quiche cuts down on prep time, cook time, and carbs — and the cheesy custard is the best part anyway.
There really is no other way to put it: this crustless broccoli quiche is insanely delicious. Whether you serve it for brunch, dinner, or any time in between, it’s worth every single calorie. Doing away with the crust cuts down on prep time, cook time, and carbs — and everyone knows the cheesy custard is the best part anyway. To hold the quiche together, I spread the broccoli out on the bottom of the quiche to create a crust-like layer, making the quiche sturdy and easy to serve.
If you’d like to substitute other vegetables, like asparagus or mushrooms, feel free but keep the ratio of veggies to custard the same – and, of course, always cook and season the vegetables before adding them. As with any quiche, the oven temperature is key. Quiche should be cooked at 325°F (not 350°F as most recipes direct) for the creamiest, silkiest custard. Eggs like to be cooked gently, and those 25 degrees really do make a difference. Finally, this quiche reheats beautifully so don’t hesitate to make it ahead of time and warm up as needed.
What you’ll need To Make Crustless Broccoli Quiche
How To Make Crustless Broccoli Quiche
To begin, melt the butter in a large sauté pan over medium-low heat. Add the shallots and cook until soft and translucent, about 4 minutes. Do not brown.
Add the broccoli, 1/4 teaspoon of the salt, and 1/3 cup water.
Increase the heat to medium and cook, stirring occasionally, until the broccoli is al dente and the water has evaporated, 3-4 minutes more. Set aside.
In a large bowl, whisk the eggs with the cream, nutmeg, remaining 3/4 teaspoon salt, and cayenne pepper.
Spread the broccoli and shallots evenly over the bottom of the prepared pie plate.
Sprinkle the cheese over top. I think Gruyère is perfect here — it melts nicely and has a nutty, earthy flavor — but Comté, Beaufort or Cheddar would also work well.
Then pour the egg mixture over the cheese.
Bake for about an hour, or until the custard is set and the top is golden brown.
Let cool for about 10 minutes, then slice into wedges and serve. For more quiche recipes, check out my spinach quiche and my leek and parmesan quiche. Enjoy!
Note: This recipe has been written by Jenn Segal and republished on MudMatter with Author’s Permission. Please find the original link here – Crustless Broccoli Quiche.
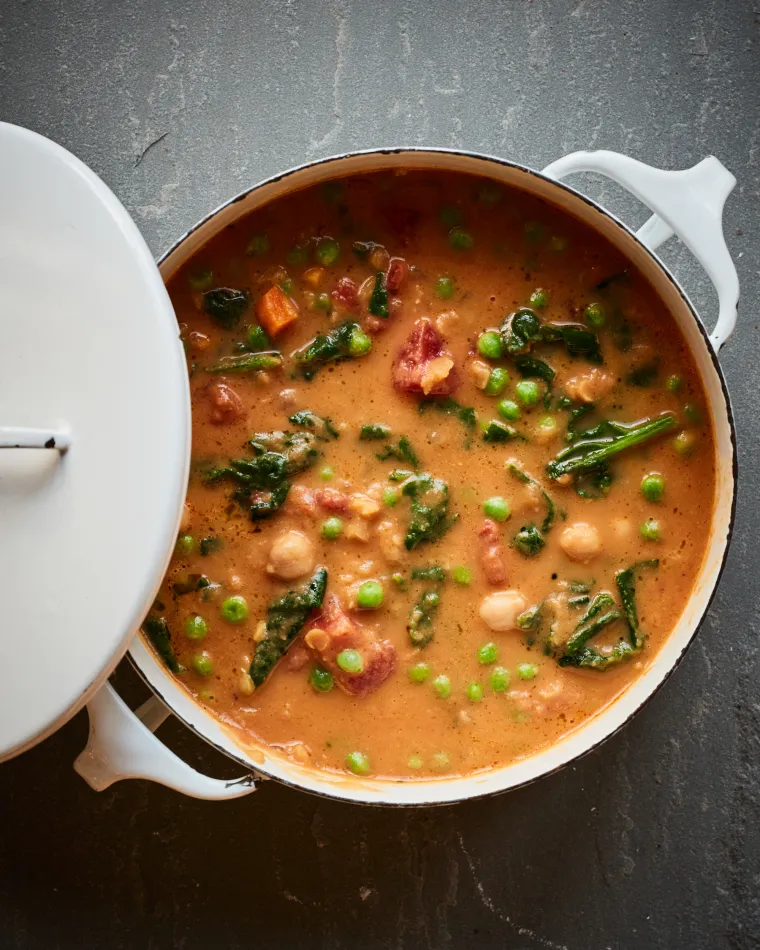
This warming, satisfying lentil and vegetable soup comes together in just 30 minutes.
For a vegetarian recipe made almost entirely from pantry staples (and I mean true staples, not staples from some well-stocked dream kitchen), this vegetable soup is surprisingly delicious. It’s thickened by pureeing a portion of the soup and then stirring it back into the pot. The soup takes just 30 minutes to come together, start to finish, yet tastes like you spent all day in the kitchen, and it’s good for you, too. For the cooked vegetables, feel free to use any quick-cooking, frozen, or leftover vegetables you have on hand. The recipe is extremely flexible and very hearty!
What you’ll need to make Chickpea, lentil and vegetable soup
Before we get started, a few words about the ingredients. It’s important to use red lentils, as opposed to another variety: they cook quickly, add wonderful flavor and thicken the soup nicely. The recipe only calls for a third of a cup; don’t be tempted to add more or your soup will turn to sludge.
As for the green vegetables, I like to use frozen peas and green beans but you can use any quick cooking, frozen or leftover vegetables you have on hand. The recipe is very flexible!
Step-by-Step Instructions
Begin by cooking the onions in olive oil until soft. Add the carrots, garlic, smoked paprika and cumin and cook until fragrant, a few minutes.
Add the broth, tomatoes, lentils, thyme, bay leaves, salt, and pepper.
Bring to a boil, then reduce the heat and simmer for 10 minutes. Add the chickpeas and continue cooking 10 minutes more.
Remove a few cups of the soup and place in a blender or food processor.
Purée until smooth.
Pour the puréed soup back into the pot. Stir and taste; if you want the soup to be thicker, purée a bit more. Add the vegetables.
Bring the soup back to a simmer and serve.
Note: This recipe has been written by Jenn Segal and republished on MudMatter with Author’s Permission. Please find the original link here – Smoky Chickpea, Red Lentil & Vegetable Soup.
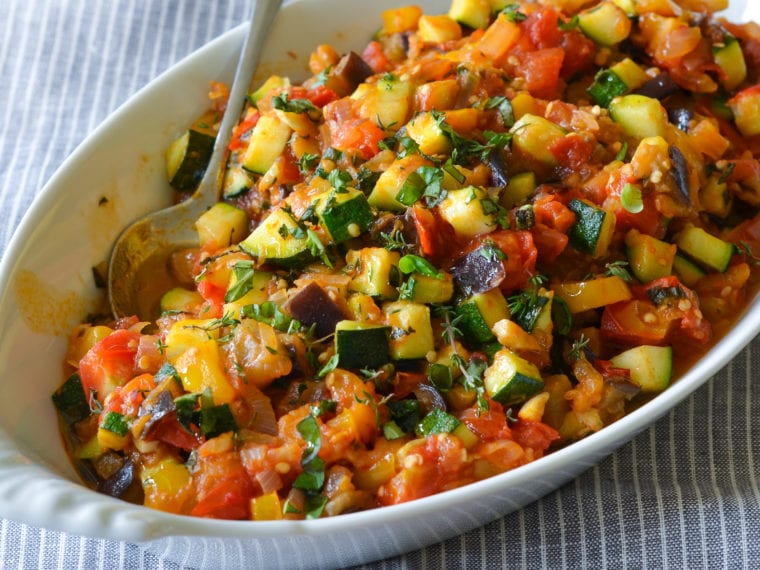
Ratatouille is a bright and chunky summer vegetable stew, rich with olive oil and fragrant with garlic and herbs.
Hailing from Provence, a region in the south of France near the Mediterranean Sea, ratatouille is a bright and chunky summer vegetable stew made with eggplant, zucchini, bell peppers, and tomatoes. It is rich with the flavor of olive oil, garlic, and fresh herbs. Making it properly takes a bit of time, so I suggest cooking a big batch over the weekend. That way, you’ll have a tasty and colorful base for meals throughout the week. With a little imagination, there are endless ways to use ratatouille, such as:
As a vegetarian main course over grains or polenta
Alongside roasted or grilled meats and fish
Shakshuka-style with poached eggs
Tossed with pasta
Folded into omelets or frittatas
Dolloped over crostini with goat cheese
Straight from the fridge as a snack (it’s delicious cold)
What You’ll Need To Make Ratatouille
Step-by-Step Instructions
Begin by heating 3 tablespoons of oil in a large nonstick pan over medium heat. Add the eggplant and season with 1/4 teaspoon salt.
Cook, stirring frequently, until soft and starting to brown, 10 to 12 minutes. Transfer to a plate and set aside.
Add another tablespoon of oil to the pan (no need to clean it). Add the zucchini and cook, stirring frequently, until tender-crisp, 3 to 4 minutes.
Season with 1/4 teaspoon salt and transfer to a plate; set aside.
Add two more tablespoons of oil to the pan and add the onion and bell pepper.
Cook, stirring frequently, for about 5 minutes.
Add the garlic and continue cooking for about 3 minutes more. Do not brown. Next, add the tomatoes, tomato paste, thyme, sugar, crushed red pepper flakes (if using) and 3/4 teaspoon salt.
Cook, stirring occasionally, until the tomatoes are broken down into a sauce, 8 to 10 minutes.
Add the cooked eggplant to the pan; bring to a gentle boil, then reduce the heat to low, and simmer, uncovered, for about 10 minutes or until the eggplant is soft.
Add the zucchini and cook for 1 to 2 minutes more, or until just warmed through. Taste and adjust seasoning, if necessary.
Sprinkle with fresh basil and thyme, drizzle with a little olive oil if desired, and serve warm or chilled.
How To Make Ahead & Freeze Ratatouille
If possible, you should make ratatouille at least a day ahead of time — like most stews, the taste improves after the flavors have a chance to mingle in the refrigerator. Leftovers can be stored in the refrigerator in an airtight container for up to 5 days or frozen for up to 3 months for a taste of summer once the cooler weather arrives. Enjoy!
Note: This recipe has been written by Jenn Segal and republished on MudMatter with Author’s Permission. Please find the original link here – Ratatouille.
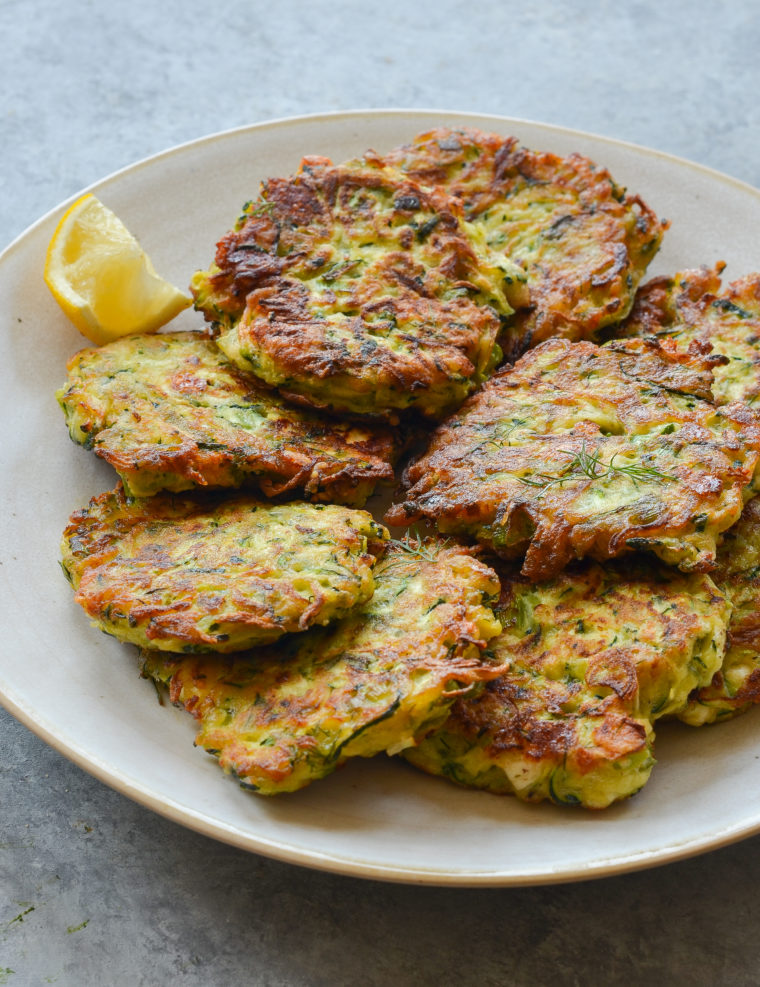
These crispy zucchini fritters make a wonderful starter or side dish, and they’re a delicious way to use up your summer zucchini.
The word fritter usually conjures up something heavy and deep-fried, but these zucchini fritters are as light as can be. Serve them as a light vegetarian meal or mezze (small plate) with tzatziki and a Greek salad, or as a side dish to my chicken kabobs, grilled chicken or or Greek-style lamb burgers.
What you’ll need to make Zucchini Fritters
How to make Zucchini Fritters
Begin by shredding the zucchini on a box grater or in a food processor.
Transfer the zucchini to a fine mesh strainer, then toss with the salt to draw out the liquid.
Let the shredded zucchini sit for about ten minutes, and then use your hands to squeeze out as much liquid as possible. As you can see, there will be a lot of liquid.
Whisk the eggs in a medium mixing bowl.
Add the zucchini, scallions, dill, feta, garlic, and pepper.
Mix well.
Sprinkle the flour (or corn starch) and baking powder over top.
Stir again until evenly mixed.
Heat the olive oil in a large non-stick skillet, and then drop the batter into the pan. Pan-fry until golden brown on both sides.
Drain the zucchini fritters on paper towels.
Serve warm or room temperature with lemon wedges.
Note: This recipe has been written by Jenn Segal and republished on MudMatter with Author’s Permission. Please find the original link here – Zucchini Fritters with Feta and Dill.
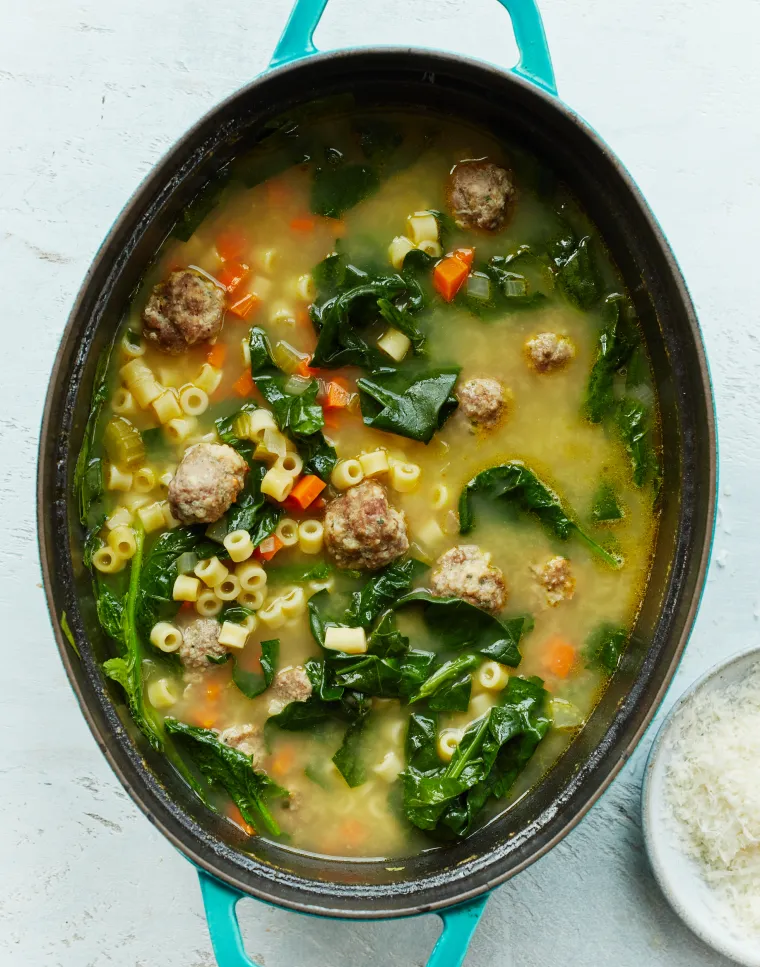
Tender meatballs, veggies, and pasta in a rich and flavorful broth, Italian wedding soup is a meal unto itself.
My kids love anything with meatballs in it (especially mini meatballs), so there’s always excitement at our house when Italian wedding soup is on the menu. The name “wedding soup” comes from the Italian phrase minestra maritata – or “married soup” – which is a reference to the way the flavors combine, like a happy marriage. Wedding soup is traditionally made from a rich, long-cooked homemade chicken stock. To save time and mimic the same rich flavor, I use a combination of high-quality store-bought broth fortified with wine and lots of veggies. For the meatballs, my secret is to add ground sausage to the beef mixture, which adds tons of flavor without the need for lots of other seasonings. The most tedious part of the recipe is rolling the little meatballs – the recipe makes 50 – but I usually get one of the kids to help.
Similar to another classic Italian soup chockfull of veggies and pasta, pasta e fagioli, Italian wedding soup can be a meal unto itself. Serve it with focaccia and a salad and dinner is done.
What you’ll need to make Italian Wedding Soup
Note that the recipe calls for regular (not low-sodium) chicken and beef broth. I find the soup to be a bit bland with the low-sodium varieties, but if you special dietary considerations, go ahead and use low-sodium and season to taste before serving.
Step-by-Step Instructions
Begin by making the meatballs.
In a large bowl, beat the egg with the chives, sage and garlic.
Add the ground beef, sausage, cheese, breadcrumbs, and salt.
Mash with your hands until evenly combined.
Roll the mixture into tablespoon-size balls (about 1 inch in diameter) and place on a greased oven-safe rack. (If you don’t have an oven-safe rack, it’s fine to cook the meatballs directly on the baking sheet; it’ll just be a little harder to get rid of the fat as it tends to collect around the meatballs.)
Bake for 15 to 18 minutes, or until lightly browned and cooked through. Set aside.
To make the soup, heat the olive oil in a large pot or Dutch oven over medium heat. Add the onions, carrots, and celery.
Cook, stirring frequently, until the vegetables are softened, about 8 minutes.
Add the chicken broth, beef broth, water, wine, bay leaf, salt, and pepper and bring to a boil.
Add the pasta and cook, uncovered, at a gentle boil until the pasta is al dente, 8 to 10 minutes (or according to package directions).
Taste the soup and adjust the seasoning, if necessary. Reduce the heat to low and add the spinach and meatballs.
Simmer for a few minutes, until the spinach is wilted and the meatballs are warmed through. Ladle into bowls and serve with grated Parmigiano Reggiano.
Make It Ahead
If you’d like to make this soup part of your rotation and want to shave off a little time for the next time around, double the recipe for the meatballs and freeze half. That way, all you’ll have to do is make the soup and add the meatballs to it as directed in the recipe. (They may take a few extra minutes to warm through if you’re adding them directly from the freezer.)
Note: This recipe has been written by Jenn Segal and republished on MudMatter with Author’s Permission. Please find the original link here – Italian Wedding Soup.
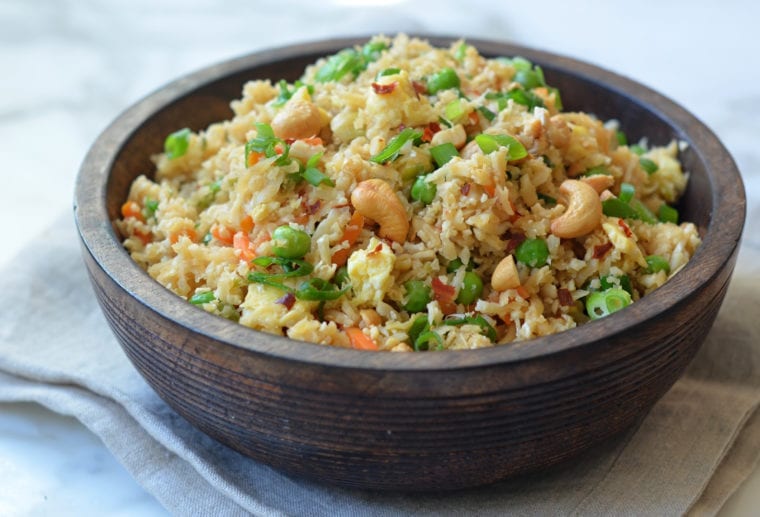
This Chinese-style cauliflower fried rice is a healthy, low-carb dish that’s hearty enough to serve as a main course.
Cauliflower rice — which is just cauliflower grated into rice-like bits — really does taste similar to rice, or at least it behaves similarly by soaking up all the flavor of its seasonings. In this quick and easy cauliflower fried rice recipe, I sauté grated cauliflower with aromatics, vegetables, soy sauce, and eggs, much like Chinese fried rice. It’s a healthy, low-carb dish that’s hearty enough to serve as a main course.
Cauliflower has a mild flavor that makes it an excellent blank canvas for other flavors. In addition to rice, it makes a great substitute for mashed potatoes in my cauliflower purée with thyme recipe. It’s also excellent roasted in my roasted cauliflower recipe.
What You’ll Need To Make Cauliflower Fried Rice
You’ll likely be able to find grated cauliflower in the produce or frozen vegetable section of your supermarket. But if not, it’s simple to make using a food processor (use the grating disc) or hand grater.
How To Make Cauliflower Fried Rice
As with any quick stir-fry, it’s important to have all of your ingredients prepped before you start cooking.
Begin by heating a few teaspoons of oil in a large nonstick skillet over medium heat. Add the eggs and a pinch of salt and cook over medium heat until scrambled.
Set the eggs aside, then sauté the scallions, ginger, and garlic in oil until softened.
Add the grated cauliflower, soy sauce, red pepper flakes, sugar, and salt. Cook, stirring often, for about 3 minutes.
Add the peas and carrots and continue cooking until the cauliflower “rice” is tender-crisp and the vegetables are warmed through, a few minutes.
Stir in the rice vinegar, sesame oil, dark green scallions, nuts (if using), and scrambled eggs.
Taste and adjust seasoning if necessary. Serve hot and enjoy!
Note: This recipe has been written by Jenn Segal and republished on MudMatter with Author’s Permission. Please find the original link here – Cauliflower Fried Rice.
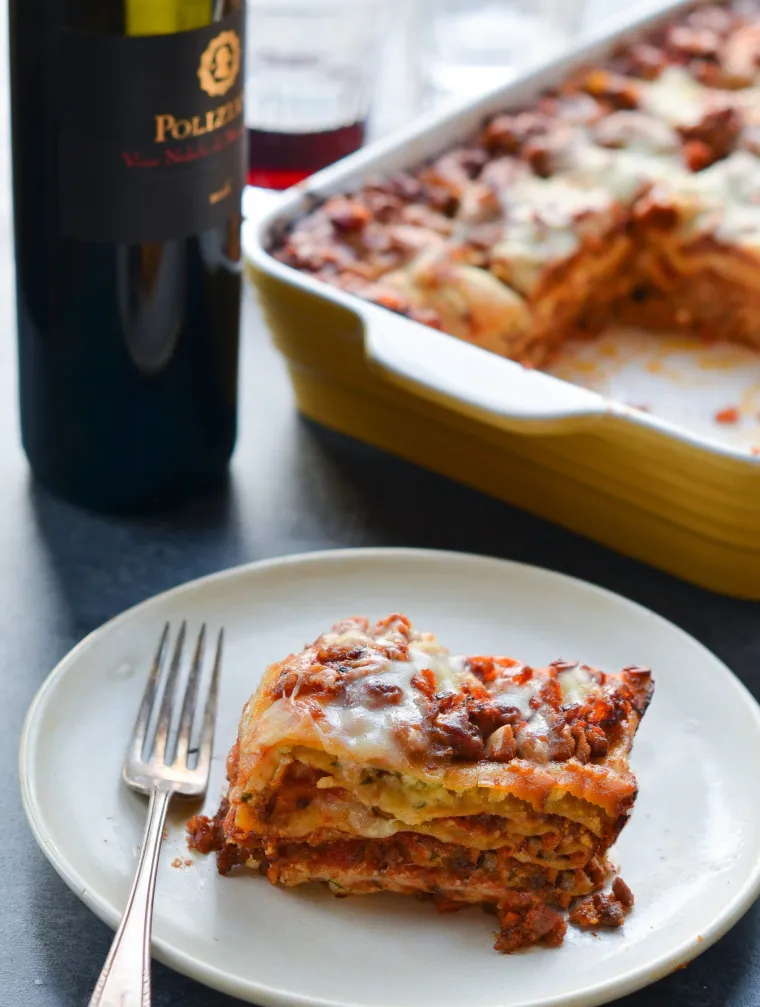
The recipe by Jenn Segal
I love this lasagna recipe because it combines the comforting flavors I grew up with and the elegance of a restaurant-style dish. It's easy to make thanks to oven-ready (no-boil) noodles, which save time and taste almost like fresh pasta. The layers feature a rich meat sauce with Italian sausage, vegetables, crushed tomatoes, and cream, along with creamy ricotta, gooey mozzarella, and Parmesan cheese. Baked until golden and bubbly, it’s the perfect dish for a crowd and holds up well when reheated or frozen. This is my go-to lasagna recipe!
What you’ll need to make lasagna
No-boil lasagna noodles are a convenient option found in the pasta section of most grocery stores. I personally recommend the Barilla brand. These noodles don't require boiling, making them easier to use without the hassle of sticking together, which is common with traditional lasagna noodles.
Step-by-Step Instructions
1. Make the Sauce
Begin by placing the onions, garlic, carrots, and celery in a food processor. You need to give them a rough chop first, otherwise, they won’t chop evenly.
Pulse until minced but not puréed, so that they melt into the sauce.
Heat 2 tablespoons of the olive oil in a large pot over medium-high heat, and add the sausage.
Cook, stirring occasionally and breaking the sausage into small pieces, until slightly browned but not cooked all the way through, about 5 minutes. Using a slotted spoon, transfer the partially cooked sausage to a plate. Set aside.
Add the remaining tablespoon of olive oil to the pan, reduce the heat to medium, and add the minced vegetables.
Cook, stirring frequently, until the vegetables are very soft, 6 to 8 minutes. Do not brown; reduce the heat if necessary.
Add the wine and continue cooking, stirring to scrape any brown bits from the bottom of the pan, until the wine is mostly absorbed by the vegetables, a few minutes.
Add the tomatoes, cream, salt, pepper, sugar, thyme and bay leaves.
Stir and bring to a boil.
Reduce the heat and simmer until the sauce is thickened, about 20 minutes.
Add the sausage back to the pot.
Continue simmering until the sausage is fully cooked and the flavors all meld together, about 10 minutes. Taste and adjust seasoning if necessary. Fish out the bay leaves and discard.
2. Make the Ricotta Filling
Combine the ricotta, cream cheese, egg, garlic, Parmigiano-Reggiano, salt and pepper in the bowl of a food processor fitted with a metal blade.
Process until evenly combined, then add the basil.
Pulse until the basil is finely chopped.
3. Assemble the Lasagna
Spread about 1-1/2 cups of sauce in the bottom of the baking dish.
Arrange 3 noodles over the sauce, and dollop a third of the ricotta filling over the noodles.
Spread the ricotta mixture evenly over the noodles.
Sprinkle with 3/4 cup mozzarella cheese.
Repeat layering of sauce, noodles, ricotta filling and mozzarella 2 more times. Top with the remaining 3 noodles. Spoon the remaining sauce over the noodles, then sprinkle with the remaining mozzarella and 1/4 cup Parmigiano-Regg
Spray a large piece of foil with nonstick cooking spray. Cover the lasagna tightly with the foil, sprayed side down. Bake for 40 minutes in a 375°F oven. Carefully uncover and increase the oven temperature to 400°F. Bake, uncovered, until the noodles are tender, the sauce is bubbling, and the edges are golden and puffed, about 20 minutes.
Remove from the oven and let stand for 15 to 20 minutes before serving.
Note: This recipe has been written by Jenn Segal and republished on MudMatter with Author’s Permission. Please find the original link here – Classic Lasagna.
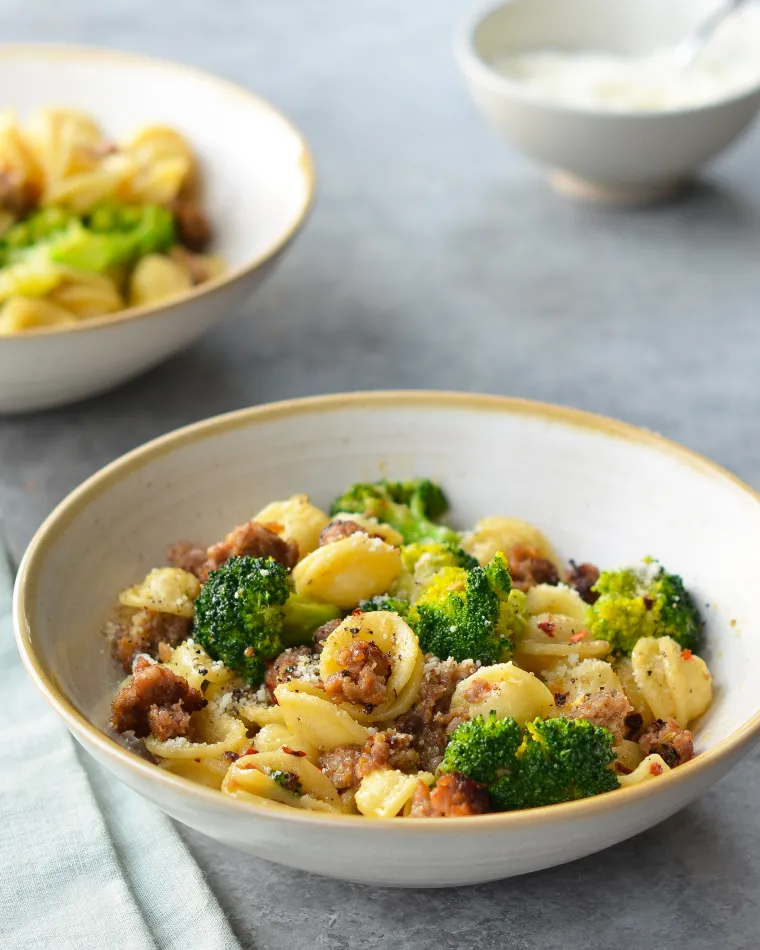
This orecchiette pasta dish is packed with flavor and quick to make — and the whole family gobbles it up, broccoli and all.
Sometimes it seems impossible to make a meal that pleases the whole family. What one child happily eats, the other one is “not in the mood for.” But every once in a while, I come upon a recipe that everyone lvoes, like this orecchiette pasta dish adapted from Lidia’s Italian Table by Lidia Bastianich. Not only is it quick and easy to make — 25 minutes tops — but the whole family devours it, broccoli and all.
What you’ll need to make orecchiette with Sausage & Broccoli
Orecchiette is named for its shape, which resembles a small ear (the Italian word orecchiette means small ear). If you can’t find it, it’s fine to substitute another pasta, like farfalle or fusilli.
talian sausage is a great ingredient to have on hand for weeknight dinners. Not only is it quick and easy to cook, but it’s also flavored with a variety of aromatics, herbs and spices, such as garlic and fennel, which add depth and complexity to pasta dishes without the need for a lot of additional seasoning. This makes it an easy and convenient way to add flavor to pasta dishes, such as baked ziti and lasagna. Buy bulk sausage, or sausage meat without the casing, if possible (it’s often easy to find around holiday season as it’s used in stuffing recipes). Otherwise, just squeeze the sausage meat out of the casing.
Pecorino Romano is a hard, salty, and pungent Italian cheese made from sheep’s milk. It’s readily available in grated form in the cheese section of most large supermarkets but if you can’t find it, it’s fine to substitute Parmigiano Reggiano.
How to make orecchiette with Sausage & Broccoli
Begin by cooking the pasta.
Meanwhile, heat 1 tablespoon of the olive oil in a large skillet and add the sausage.
Cook, breaking the meat up with a spoon, until the sausage starts to brown, 5 to 6 minutes.
Add the garlic and cook a minute more.
Add the remaining 4 tablespoons of olive oil, broccoli, chicken broth, salt and red pepper flakes. Cook, stirring frequently, until the broccoli is tender-crisp, 3 to 4 minutes.
Stir in the butter until melted and simmer for a few minutes to reduce and concentrate the sauce.
Add the sausage and broccoli mixture to the drained pasta and toss well, along with half of the grated cheese.
Transfer the pasta to a serving bowl or individual bowls and top with the remaining grated cheese.
Note: This recipe has been written by Jenn Segal and republished on MudMatter with Author’s Permission. Please find the original link here – Orecchiette with Sausage and Broccoli.