
Suggested for you
Sachin Tendulkar
@sachin_rt
Sachin Tendulkar
@sachin_rt
Sachin Tendulkar
@sachin_rt
Sachin Tendulkar
@sachin_rt
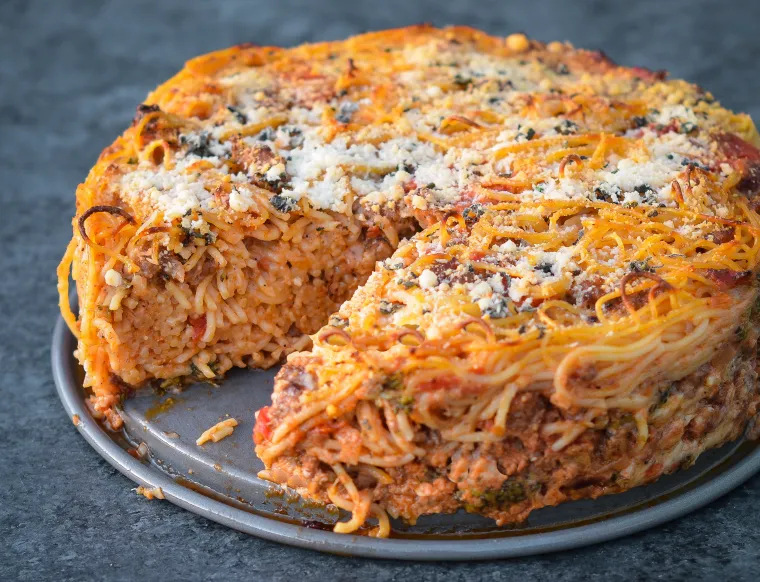
Spaghetti pie is a big affair, impressive in both stature and ingredients — perfect for a hungry crowd.
Featured on the cover of her beautiful new cookbook, Bringing It Home: Favorite Recipes From A Life of Adventurous Eating, Gail Simmons’ Spaghetti Pie made with broccoli and Italian sausage is, according to my husband, one of the best things I have ever made. EVER. I suppose I could take offense since it’s not even one of my own recipes but I totally agree with him. It’s similar to sausage lasagna or baked ziti with sausage, only way more impressive to serve. Fair warning: the recipe calls for a jaw-dropping amount of cheese. All I can tell you is that it’s worth it.
Gail writes, “Spaghetti pie is a big affair, impressive in both stature and ingredients, and meant to serve a hungry crowd. You don’t have to wait for your next party to make it, though. If you don’t have enough eaters to tackle it, there’s a bonus: Slices of the savory pie make the best leftovers of all time.” The recipe requires a springform pan, which is a good investment if you don’t have one, but you could easily use a large baking dish and serve the “pie” lasagna-style if need be.
What you’ll need to make spaghetti pie
How to make spaghetti pie
To begin, heat the oil in a large skillet over medium-high heat. Add the onion and garlic and cook for 1 minute.
Add the broccoli and 1 tablespoon of water and cook until the broccoli is crisp-tender, 2 to 3 minutes.
Add the sausage.
Cook, breaking the meat into small bits, until cooked through, about 6 minutes.
Stir in the tomato paste and cook for 1 minute.
Then add the crushed drained tomatoes and 1/4 teaspoon salt. (Note that it’s best to use canned whole tomatoes and crush them yourself over diced tomatoes, since diced canned tomatoes contain a firming agent, calcium chloride, that makes them slow to break down.)
Cook, stirring occasionally and scraping any bits from the pan, until the liquid is mostly evaporated, about 5 minutes. Remove from the heat and set aside.
Meanwhile, cook the spaghetti just until very al dente, 7 to 8 minutes (look for a white spot in the center when you bite into a strand). Drain the pasta (do not rinse) and reserve the pot.
In a medium bowl, whisk together the milk, eggs, pepper, and 3/4 teaspoon salt.
Combine the spaghetti and milk mixture in the pot; add in the sausage-broccoli mixture, cheddar, fontina, and 1 cup of the Parmesan.
Stir until well combined.
Transfer the pasta mixture to a springform pan wrapped in aluminum foil (wrapping the pan in foil protects against leakage). Using a spatula, smooth the top.
Set the pan on a rimmed baking sheet and bake until the edges are golden and bubbling, about 35 minutes.
Remove the pan from the oven. Turn on the broiler. Sprinkle the pie with the sage and remaining 1/2 cup Parmesan.
Broil 4 to 5 inches from the heat until the cheese is golden, 2 to 3 minutes.
Remove from the oven and run a knife around the inside of the pan. Let the pie rest for about 10 minutes, then release and remove the sides of the pan. Cut the pie into slices and serve warm.
Enjoy!
Please find original recipe link here.

This quick ragout of white beans and sweet tomatoes might just be my favorite recipe of the summer.
This quick ragout of white beans and sweet summer tomatoes in a robustly flavored broth might just be my favorite recipe of the summer. The tomatoes — just barely cooked — burst in your mouth when you bite into them, and fresh herbs and a splash of balsamic vinegar liven the dish up. Serve it as a meatless main course, ideally with toasted garlic bread for sopping up the broth, or as a side dish to grilled meat.
What you’ll need to make White bean ragout
I suggest using dried beans if you can — it’s hardly any more work than putting them on the stove and forgetting about them — but canned will work fine in a pinch. Just be sure to use a brand you’re familiar with. I’ve had good results with Goya, but others (particularly the organic brands) can be downright mushy because they don’t contain any firming agents. If you want beans with a nice bite to them and wish to avoid the additives, the only way is to soak and cook the beans yourself.
How to make white bean ragout
Begin by cooking the onions in olive oil until soft and translucent. Add the garlic (I always use my garlic press) and cook for a minute more.
Stir in the cherry tomatoes.
Then add the beans, chicken broth, tomato paste, and balsamic vinegar.
Simmer for a few minutes to warm the beans and tomatoes, then season to taste with salt and pepper. Stir in the fresh herbs right before serving so they keep their pretty green color.
Enjoy!
Find original recipe link here.
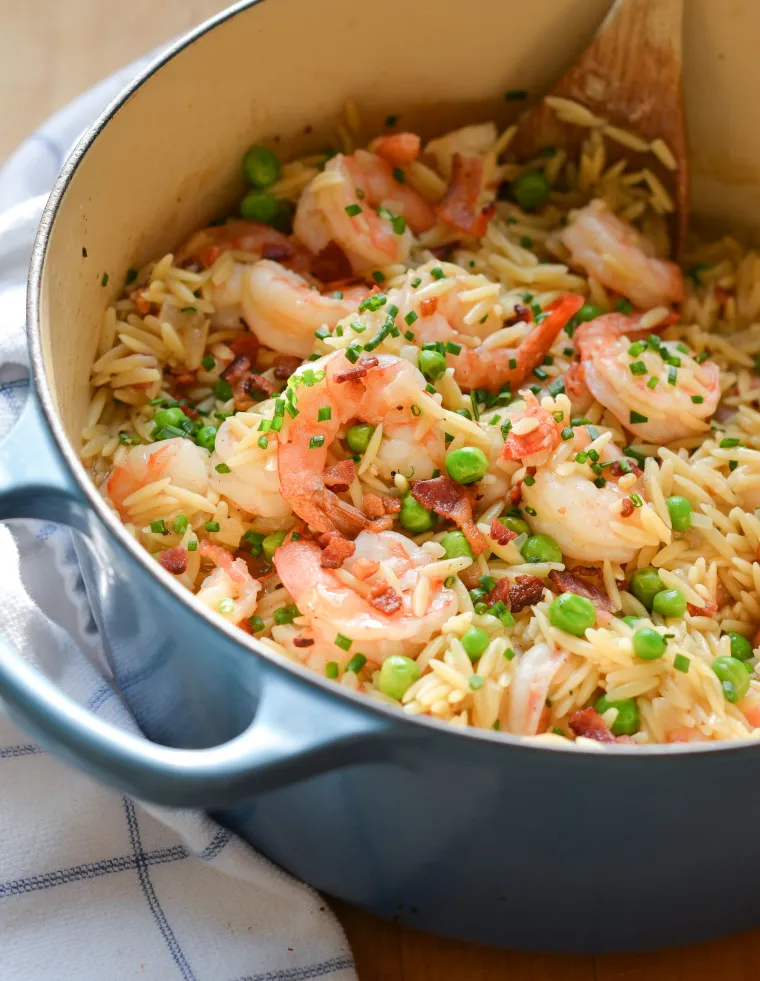
Rice-shaped orzo is cooked like risotto in this easy, one-pot pasta dish.
In this easy one-pot recipe, rice-shaped orzo pasta is cooked like risotto, an Italian dish of rice slowly cooked in broth with other ingredients like meat, seafood, and vegetables. However, unlike traditional risotto, orzo “risotto” doesn’t require constant tending to and stirring – all of the broth is added at once and the pasta cooks almost unattended. My starting point for the recipe was a simple shrimp and orzo risotto from The Ultimate Meal Prep Cookbook by America’s Test Kitchen, but I added crispy bacon, peas, and Creole seasoning to amp up the flavor and give the dish a little Southern flair.
What You’ll Need To Make Orzo Risotto with Shrimp, Peas & Bacon
Step-by-Step Instructions
Melt one tablespoon of the butter in a Dutch oven or large pot over medium-high heat and add the bacon.
Cook, stirring frequently, until crisp, 6 to 8 minutes. Using a slotted spoon, transfer the bacon to a paper towel-lined plate and set aside.
Reduce the heat to medium and add the onion.
Cook, stirring frequently, until softened, about 3 minutes. Add the garlic and cook 1 minute more. Do not brown.
Stir in the orzo and cook, stirring frequently, until lightly toasted, 2 to 3 minutes.
Stir in the broth, salt, pepper, and Cajun/Creole seasoning and bring to a boil.
Reduce the heat to low, cover, and simmer, stirring once midway through, until the orzo is creamy and nearly tender, about 10 minutes.
Stir the shrimp and peas into the orzo.
Cover and cook over low heat until the shrimp are opaque throughout and the orzo is tender, about 5 minutes. Off the heat, stir in the remaining tablespoon of butter, the lemon juice, and chives. Right before serving, stir in the crispy bacon.
Taste and adjust seasoning, if necessary, then spoon into bowls and serve.
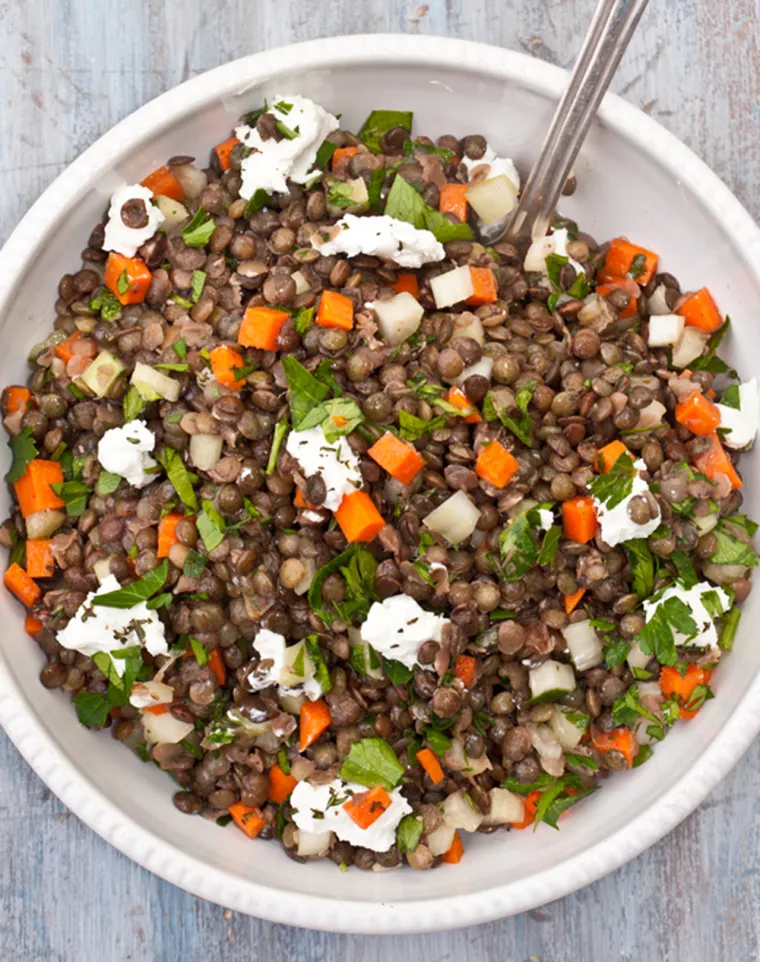
This hearty lentil salad is perfect for a light dinner or a wholesome on-the-go lunch.
I make this lentil salad when I get tired of hasty on-the-go lunches and am craving something wholesome. It’s made with French green lentils, which are ideal for salads (and some soups) because they hold their shape when cooked. These lentils are grown in the rich volcanic soil near Le Puy en Velay in the Auvergne region of France and have a wonderful earthy flavor. You can find them in the bulk section at Whole Foods or other specialty food shops. Unlike dried beans, lentils don’t require pre-soaking prior to being cooked. You simply pick over the little legumes, remove any that look broken or damaged, and cook for 20-30 minutes. So easy!
Ingredients
1 cup French green lentils (or common brown or green lentils)
3 cups chicken broth
1 bay leaf
1 large carrot, finely diced
2 ribs celery, finely diced
1 teaspoon finely chopped fresh thyme (or ½ teaspoon dried)
3 tablespoons chopped fresh parsley
1 garlic clove, minced
1 teaspoon Dijon mustard
1 teaspoon honey
½ teaspoon salt
¼ teaspoon ground black pepper
2 tablespoons freshly squeezed lemon juice, from one lemon
¼ cup extra virgin olive oil, best quality such as Lucini or Colavita
3 ounces goat cheese
Instructions
Before cooking the lentils, make sure you rinse them well and pick over them to remove any small rocks or debris. Combine lentils, chicken broth and bay leaf in a medium saucepan. Bring to a boil, then turn heat down and simmer until lentils are tender, 25-30 minutes for French green lentils or 20-25 minutes for common brown or green lentils. Remove bay leaf, strain and let cool.
In a large bowl, combine all remaining ingredients except goat cheese. Add cooled lentils and toss to combine. Taste and adjust seasoning if necessary. Transfer salad to serving dish, crumble goat cheese over top and serve.
Note: When preparing this recipe, be sure to build in at least 10 minutes to cool the lentils after they have cooked.
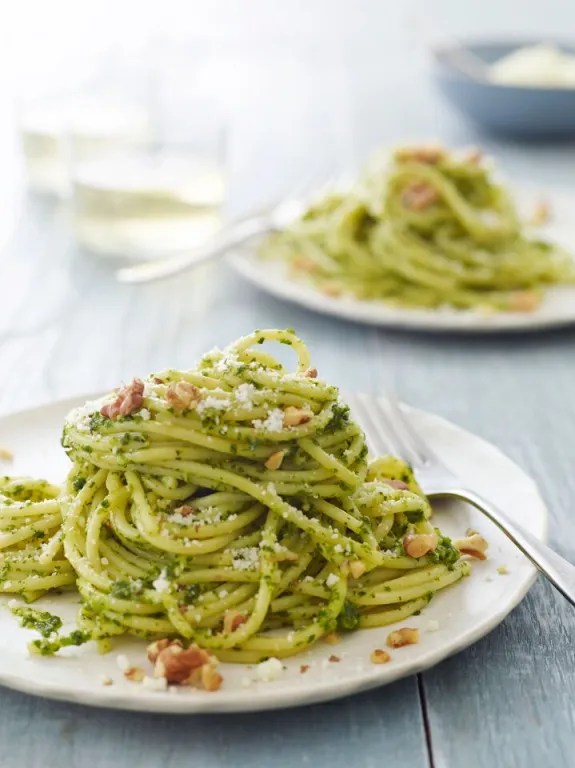
From my cookbook, this winter-friendly twist on pesto pasta is one of my go-to weeknight dinner recipes. I can get it on the table in 25 minutes max, and it’s a great way to sneak in some healthy greens (green-phobic kids: you know who you are!).
Note that you’ll need some of the cooking water from the pasta for the sauce, so be sure to reserve some before you drain the pasta. It’s easy to forget when you’re multitasking, so I always place a liquid measuring cup right next to the colander as a visual reminder. Also, the kale and walnut pesto freezes beautifully so do yourself a favor and make a double batch.
What you’ll need for spaghetti with kale and walnut pesto
How to make spaghetti with kale and walnut pesto
Begin by toasting the walnuts in a 350°F-oven until lightly toasted and fragrant, 6 to 10 minutes. Transfer to a plate and set aside.
Bring a large pot of salted water to a boil. Add the spaghetti and boil until al dente, about 10 minutes, or according to package instructions.
Meanwhile, make the pesto: In the bowl of a food processor fitted with the steel blade, combine the kale and basil.
Process until finely chopped.
Add the remaining ingredients.
Pulse until smooth and set aside.
Reserve 1 cup of the cooking water, then drain the spaghetti in a colander. Add the spaghetti back to the pot and toss with the pesto and ½ cup of the cooking water. If the pasta seems dry, add more of the water.
Taste and adjust seasoning, if necessary, then serve topped with the grated pecorino Romano and chopped walnuts.
How to Freeze Kale and Walnut Pesto
The pesto can be frozen for up to 3 months. Store in a tightly sealed jar or airtight plastic container, covered with a thin layer of olive oil (the oil seals out the air and prevents the pesto from oxidizing, which would turn it an unappetizing brown color).
[caption id="attachment_6106" align="aligncenter" width="719"] Photo by Alexandra Grablewski (Chronicle Books, 2018)[/caption]
I am Jenn Segal. Please find original post here, Spaghetti with Kale & Walnut Pesto.
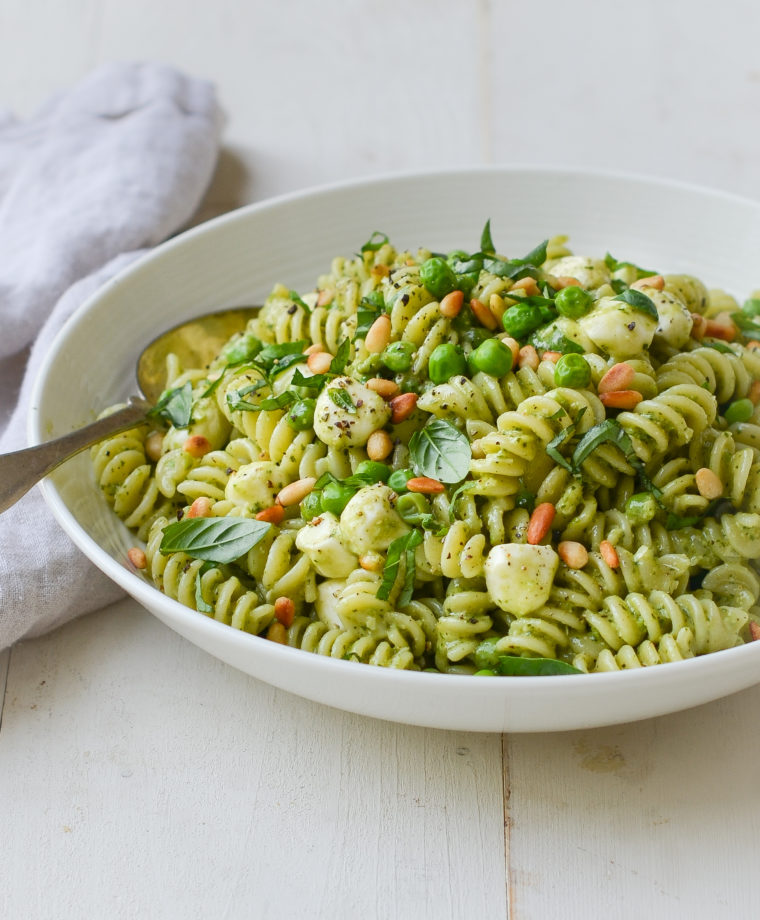
Zesty pesto, peas, pine nuts, and mozzarella pearls make a flavorful and pretty pasta salad.
Though pasta salad is a staple at every summer cookout, most of them are (forgive me) pretty bad. The usual formula – cold cooked pasta, raw vegetables, and an oil-and-vinegar salad dressing – just doesn’t work well. The key to making a delicious pasta salad is to replace the sharp vinaigrette with a rich and flavorful sauce. In this pesto pasta salad recipe, zesty pesto mellowed and thickened with a little mayonnaise makes a lovely sauce. Peas and pesto go well together, so I add peas to both the sauce and the pasta. Crunchy toasted pine nuts and creamy mozzarella pearls fill the salad out. Go ahead and make all of the components of the salad a day ahead of time; just keep everything separate and toss together right before serving.
What You’ll Need To Make Pesto pasta Salad with Peas, Pine Nuts & Mozzarella Pearls
The best pasta to use for this salad is corkscrew-shaped fusilli, which has plenty of surface area and groves for capturing the pesto sauce. Rotini is another good option.
For the pesto, I use my go-to pesto recipe, which is in my fridge practically all summer long, but store-bought will work, too.
For the cheese, use imported Parmigiano-Reggiano from Italy; domestic Parmesan pales in comparison. You can always tell if it’s authentic by looking at the rind, which is embossed with the name over and over. If the cheese is already grated, it should be labeled “Parmigiano-Reggiano,” not “Parmesan.”
Step-by-Step Instructions
Begin by boiling the pasta in salted water. Be sure it is fully cooked, as pasta firms up at room temperature (you don’t want al dente-cooked pasta for pasta salad). Set aside to cool.
Next, toast the pine nuts in a skillet over medium heat until golden. Keep a close eye on them, as they burn quickly, and then transfer them to a plate as soon as they are cooked. If you leave them in the hot pan, they will continue to cook.
Next, make the pesto sauce. In the bowl of a food processor fitted with a steel blade, combine the pesto, lemon juice, and 1/2 cup of the peas.
Purée until smooth, then add the mayonnaise.
Process again until the sauce is smooth.
Toss the cooled pasta with the olive oil.
Add the pesto-pea mixture to the pasta, along with the Parmesan, 3/4 cup of the peas, 3 tablespoons of the pine nuts, the mozzarella, 1/2 teaspoon salt, and 1/2 teaspoon pepper.
Mix well, then taste and adjust seasoning, if necessary. (I usually add 1/4 teaspoon each more salt and pepper, but it will depend on the saltiness of the pesto you’re using and how heavily the pasta water was salted.) Transfer to a serving bowl and sprinkle the remaining peas, pine nuts, and basil over top. Serve at room temperature.
This dish would pair nicely with my grilled chicken breasts or grilled flank steak with garlic and rosemary.
I am Jenn Segal. Please find the original article here, Pesto Pasta Salad with Peas, Pine Nuts & Mozzarella Pearls.
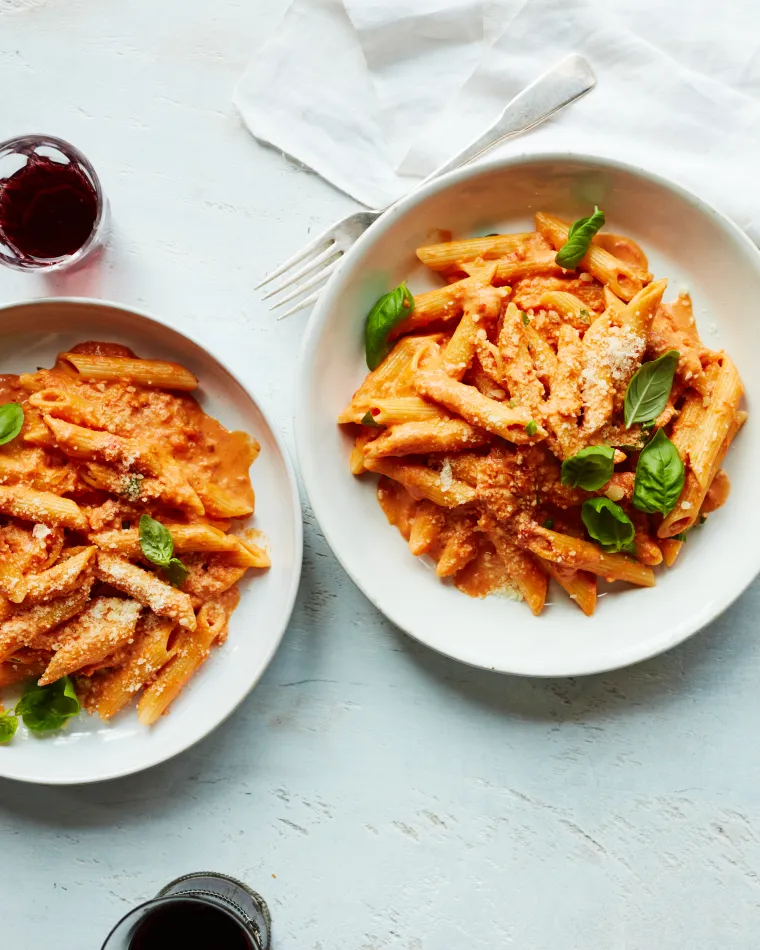
Penne alla vodka, or penne with a bright tomato sauce enriched with heavy cream, makes a quick, family-friendly dinner.
From my cookbook Weeknight/Weekend, this penne alla vodka, or penne with vodka sauce, is one of those no-food-in-the-house dinners that I make over and over again. Aside from the fresh basil – and even that grows abundantly on my patio during the summer – every ingredient for this dish is always on hand in my kitchen. The vodka sauce, a bright tomato sauce enriched with heavy cream, comes together in the time it takes to boil the pasta. You won’t really taste the vodka; it’s simply there to cut the richness of the dish without adding a distinct flavor of its own. (Some people believe the dish was created by vodka manufacturers to sell more vodka!)
What You’ll Need To Make Penne Alla Vodka
Step-by-Step Instructions
Before getting starting, crush the tomatoes. You can either use kitchen shears to cut them directly in the can or pour the entire contents of the can into a resealable freezer bag, press out any excess air, seal tightly, and then squish by hand. (Diced canned tomatoes are treated with a chemical that prevents them from breaking down when cooking, so when I want a smooth tomato sauce, I prefer to use canned whole tomatoes and chop them myself.)
Bring a large pot of salted water to a boil.
Heat the butter in a 3-quart saucepan over medium heat until shimmering.
Add the onion.
Cook, stirring frequently, until softened and translucent, 3 to 4 minutes.
Add the garlic and red pepper flakes and cook, stirring constantly, for 30 seconds more. Do not brown.
Add the tomatoes and their juices, tomato paste, salt, sugar, and vodka.
Bring to a boil, then reduce the heat to medium-low and cook at a lively simmer, uncovered, stirring occasionally, for 10 minutes.
While the sauce simmers, boil the pasta according to the package instructions until just shy of al dente.
Before draining, ladle out about 1 cup of the pasta cooking water and set it aside. Drain the pasta, then return it to the pot.
Stir the cream into the sauce.
Simmer, uncovered, for about 3 minutes more. Using an immersion blender, purée the sauce until mostly smooth, leaving some small chunks. (Alternatively, ladle some of the sauce into a blender and purée until smooth. Be sure to remove the center knob on the blender and cover with a dish towel to avoid splatters, then add back to the pan.)
Pour the sauce over the penne. It may seem a little soupy; that’s okay. Bring the sauce and pasta to a gentle boil over medium-high heat, stirring frequently; cook until the sauce is reduced and thickened enough to cling to the pasta, a few minutes. Add a little of the reserved pasta water if the pasta seems dry.
When combining a sauce with cooked pasta, always cook them together in the pot for a minute or two before serving. This marries the flavors and helps the sauce cling to the pasta.
Stir in the basil, then taste and adjust seasoning if necessary.
Spoon the pasta into serving bowls and pass the grated Parmigiano-Reggiano at the table.
Posted by Jenn Segal. Please find original article here, Penne alla Vodka.

Loaded with basil pesto, fresh tomatoes and mozzarella, pesto pizza is the ultimate summer pizza.
To me, a good pesto pizza should have bold pesto flavor. I don’t want it to taste faintly of basil, garlic, Parmesan and olive oil—I want those flavors to bowl me over. The key is to spread a generous layer of pesto over the pizzas before baking, and then top them with more pesto when they come out of the oven. Not only do these pizzas taste very “pesto-y,” they also look gorgeous and feel a little more special than your typical pizza pie.
I’ve given instructions for homemade pizza dough below but don’t feel obligated to make it; store-bought pizza dough works beautifully and makes this recipe totally doable on a weeknight. Same goes for the pesto — if you want to make it from scratch, use this recipe, but store-bought works well, too (I like Mama’s pesto from Whole Foods).
What you’ll need To Make Pesto Pizza With Fresh Tomatoes & Mozzarella
For The Pizza Dough
For the Toppings
How to make Pesto Pizza with Fresh Tomatoes & Mozzarella
Step 1: Make the Dough
In a mixer fitted with the dough hook (or a large bowl if you’d like to make it by hand), combine the flour, yeast, salt, olive oil, and water.
Mix until the dough comes together.
Increase the speed and knead for about 5 minutes, until the dough is smooth and elastic.
Flour your hands if necessary, and transfer the dough to a lightly oiled large bowl.
Cover with plastic wrap and let rise in a warm place until doubled in size, 1 to 1-1/2 hours.
When the dough has risen, punch it down.
Place the dough on a lightly floured surface.
Cut it in half and roll each part into a ball.
Cover the dough balls with a damp kitchen towel and let rest for 15 to 20 minutes — the dough will rise a bit.
Lightly dust a work surface with flour, and then pat and stretch the rested dough into two 12×8-inch rectangles. If the dough is sticky, dust it lightly with flour.
Place the two pizza doughs side-by-side on the prepared baking sheet. Then press the dough out again so that it almost touches the edges of the pan.
Step 2: Assemble and Bake the Pizzas
Cut the tomatoes crosswise into 1/8-inch-thick slices and place on a paper towel-lined plate or cutting board to drain the juices.
Spread 1/3 cup of the pesto evenly over the pizzas, leaving a 1-inch border.
Bake the pizzas on the bottom rack for 4 minutes. (I do this so the crust has time to crisp up; if you add the cheese from the get-go, it gets too brown before the crust is fully cooked.)
Remove the pan from the oven; and then top the pizzas with the mozzarella cheese, followed by the tomato slices, Parmigiano-Reggiano, salt and pepper.
Place the pizzas back in the oven and bake until the crust is crisp and golden, 6 to 8 minutes more.
Transfer the pizzas to a cutting board and drizzle with the with remaining pesto.
Sprinkle with fresh basil, then cut into slices and serve. Enjoy!
Note: This recipe has been written by Jenn Segal and republished on MudMatter with Author’s Permission. Please find the original link here – Pesto Pizza with Fresh Tomatoes & Mozzarella.
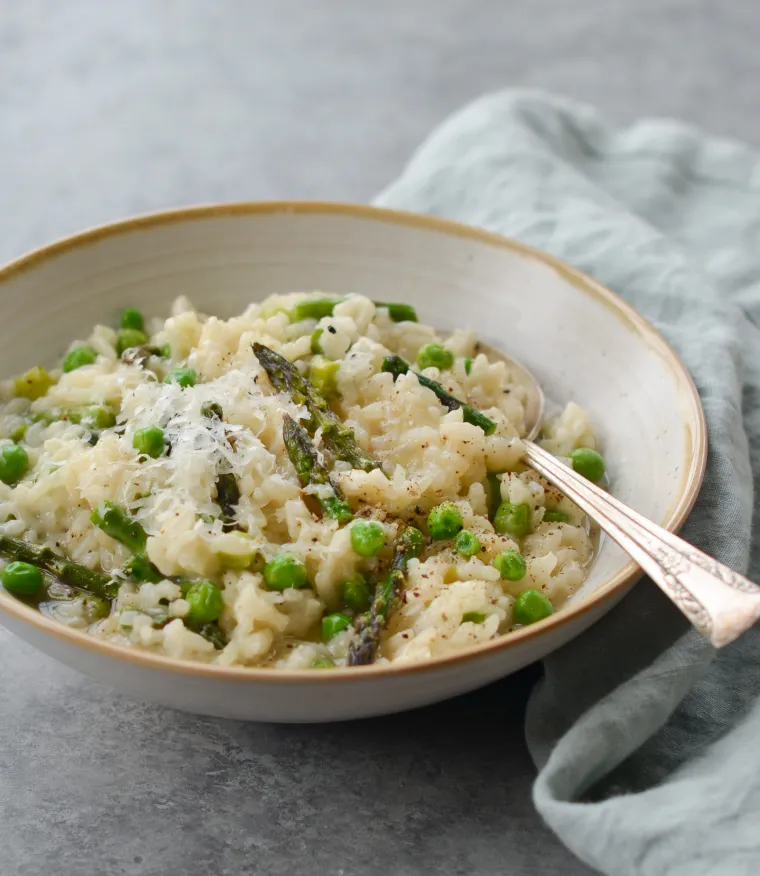
This creamy risotto with asparagus and peas makes a lovely starter, side dish, or vegetarian main course for spring.
Comforting to eat — and comforting to make, in a mindless, repetitive sort of way — risotto is a northern Italian rice dish cooked gently until it reaches a creamy consistency. Most people think of it as a restaurant-style dish, but it’s actually quite simple to make with just a few ingredients. The only thing to keep in mind is that it requires frequent stirring, so you need to stay close to the stove for 25 minutes while it cooks.
This spring risotto calls for seasonal vegetables but there’s lots of room for creativity and improvisation. Don’t feel like asparagus? Substitute zucchini or mushrooms. Going vegetarian? Replace the chicken broth with vegetable broth. Want to fancy it up? Stir in some fresh herbs at the end. You really can’t go wrong as long as you stick to the basic formula. Serve this spring risotto as a meatless main course or as a side to a simply cooked main dish, like pan-seared salmon or perfectly grilled chicken breasts.
How To Make Spring Risotto with Asparagus & Peas
Before we get to the step-by-step instructions, a few words about the ingredients:
All risotto recipes begin with Arborio rice, a short-grained, high-starch Italian rice that becomes creamy and slightly chewy when cooked. You can find it in the rice section of most supermarkets.
White wine is a key ingredient in risotto, as it adds nice depth of flavor. However, if you’d prefer not use it, replace it with more broth and add a squeeze of lemon at the end.
It’s important to use low-sodium broth when making risotto. The broth reduces while it cooks, intensifying the saltiness.
Step-by Step Instructions
The first step to cooking risotto is to bring your broth to a simmer. It’s important that the broth is hot before you add it to the rice, as cold broth will cool the pan down and slow the cooking process.
While the broth heats up, melt the butter in a large pot or Dutch oven (it’s important to use a large cooking vessel, as the rice will increase in volume when cooked). Add the asparagus and cook until tender-crisp, a few minutes.
Add the peas and cook for 1 minute more, until they are defrosted.
Transfer the vegetables to a plate and set aside. You’ll add them back to the risotto at the very end. Cooking the vegetables first ensures that they don’t overcook.
In the same pot over medium-low heat, melt 2 tablespoons of the butter and add the onions.
Cook, stirring frequently, until translucent, 2 to 3 minutes. Then, add the garlic and cook for 1 minute more. Do not brown.
Add the Arborio rice to the onions and garlic.
Cook, stirring constantly, until glossy and translucent around the edges, about 3 minutes. This step of toasting the rice in fat adds depth of flavor and also prevents the grains from becoming mushy during the cooking process.
Add the wine and cook until completely absorbed, about 1 minute.
Ladle about 1 cup of the simmering broth into the rice.
Cook, stirring occasionally, until absorbed. Continue adding the broth, 1 cup at a time and stirring until it is absorbed, until the rice is tender, about 25 minutes. You don’t need to stir constantly; just check on it every few minutes to stir and prevent sticking. You’ll know it’s done when the rice al dente — just cooked, still with a little bite to it.
Add the reserved vegetables, Parmigiano-Reggiano, and remaining tablespoon of butter to the risotto.
Stir, then taste and adjust seasoning with salt and pepper, if necessary. If the risotto is too thick, thin it with a bit of milk. Spoon into bowls and serve with more cheese.
If you have leftover risotto, I highly recommend making risotto cakes. They are quite possibly even better than the actual risotto! You don’t need a recipe: simply mix the leftover cold risotto with a generous handful of shredded cheese. Use a cheese that melts well, such as fontina, Cheddar, Gruyère, or mozzarella. Scoop up about 1/3 cup of the risotto at a time and shape into patties about 3/4 inch thick and 3 inches wide. Coat the risotto cakes in panko, then fry in olive oil over medium heat until golden and crisp, about 3 minutes per side.
Note: This recipe has been written by Jenn Segal and republished on MudMatter with Author’s Permission. Please find the original link here – Spring Risotto with Asparagus & Peas.
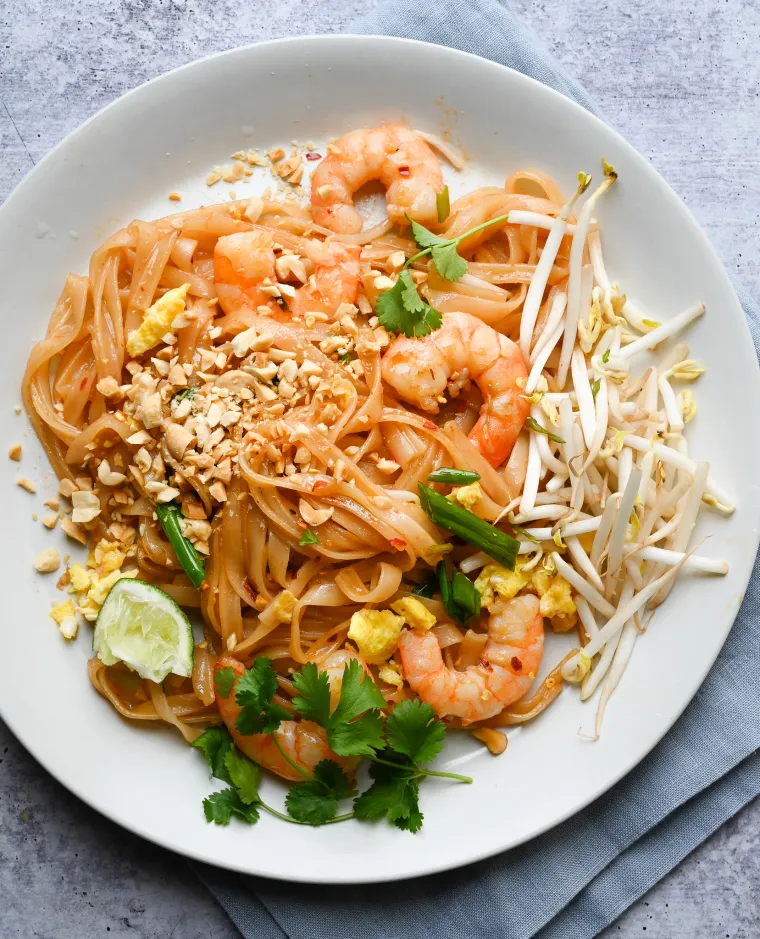
Craving restaurant-quality pad Thai? Using easy-to-find ingredients and this simple recipe, you can make it at home!
Pad Thai is a popular stir-fried noodle dish that originated in Thailand, where it’s commonly enjoyed as a quick and easy street food. Today, it’s a popular Thai restaurant dish in many parts of the world. If you love this noodle dish as much as I do, you’ll be pleased to know that it’s surprisingly easy to make in your own kitchen. While traditional pad Thai calls for a daunting list of hard-to-find ingredients, from tamarind liquid and dried shrimp to pickled white radishes and garlic chives, a simplified “Westernized” version can be just as delicious with a few ingredient substitutions (yes, that’s why the recipe strangely calls for ketchup!).
Pad Thai is made with rice noodles, which can usually be found in the Asian or Thai food section of most large supermarkets. It’s important to note that the process of cooking rice noodles is different from cooking other types of pasta. To start, fill a pot with water and bring it to a boil. Once boiling, remove the pot from the heat and add the rice noodles. Allow them to soak in the hot water for 5 to 10 minutes, or until they become tender yet still chewy. Once done, drain the noodles in a colander and rinse them briefly under cold water to remove any excess starch. From there, it’s just a matter of stir-frying the noodles with the other pad Thai ingredients.
What you’ll need to make pad thai
Step-by-Step Instructions
Step 1: Soak the Rice Noodles
Bring a large pot or wide skillet of water to a boil.
Off the heat, add the noodles. Briefly swish them around to separate them, then let sit, stirring occasionally to prevent sticking, until the noodles are soft and pliable but still not tender, 5 to 10 minutes.
Drain and rinse well with cold water. Set aside.
Step 2: Cook the Pad Thai
In a small bowl, beat the eggs with a pinch of salt. Set aside.
Make the sauce: In a medium bowl, whisk together the water, fish sauce, soy sauce, vinegar, ketchup, sugar, and red pepper flakes. Set aside.
Heat 2 tablespoons of the oil in a large nonstick pan or wok over medium-high heat. Add the shrimp and season with ⅛ teaspoon salt. Cook, stirring often, for two minutes. Add the garlic and light green scallions and cook, stirring constantly, until softened and the shrimp are cooked through, about 1 minute more.
Transfer the shrimp, garlic, and scallions to a large plate, using a rubber spatula to scrape the pan clean.
To the pan, add 1 teaspoon of oil to the hot pan. Add the eggs and scramble until cooked through, 1 to 2 minutes. Transfer the eggs to the plate with the shrimp.
Add 2 tablespoons of oil to the hot pan. Place the drained noodles in the pan, along with the sauce mixture. Cook, tossing the noodles gently so as not to break them, until the liquid is absorbed by the noodles and the noodles are cooked through, a few minutes. If the noodles are still firm to the bite when the sauce is absorbed, add a few tablespoons of water and continue cooking.
Add the contents of the plate and the dark green scallions to the noodles and toss gently to combine, until everything is warmed through.
Taste and adjust seasoning if necessary. Transfer to a serving platter and top with peanuts, bean sprouts, and cilantro (if using). Serve with lime wedges, if desired.
Note: This recipe has been written by Jenn Segal and republished on MudMatter with Author’s Permission. Please find the original link here – Pad Thai.