Articles contributed by the community, curated for your enjoyment and reading.
Filters
Reset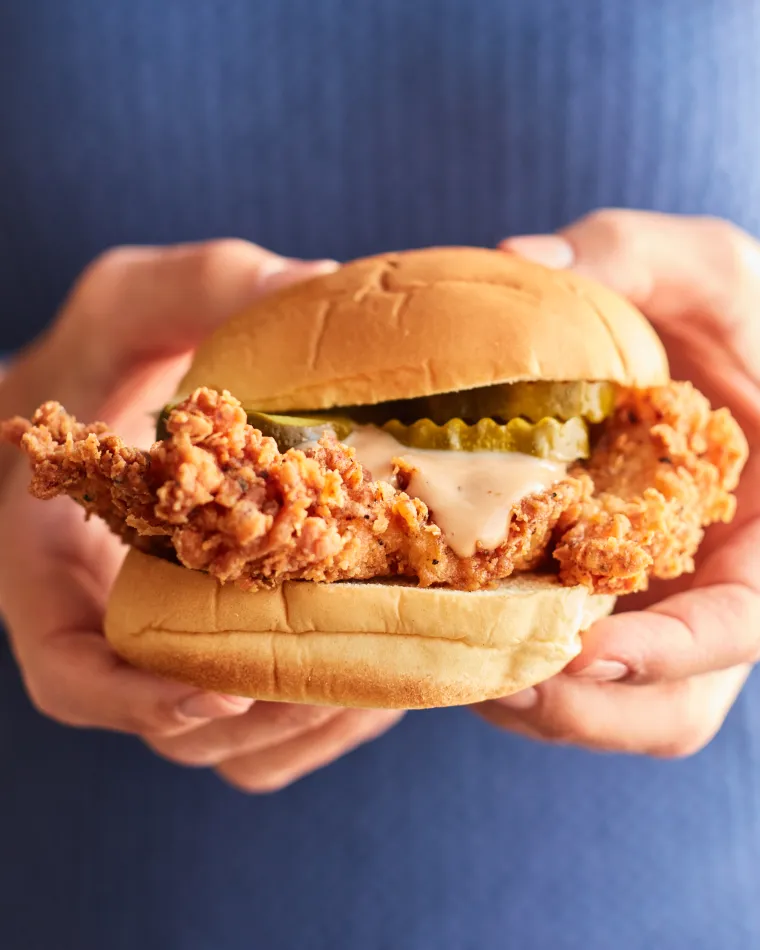
Fried Chicken Sandwiches
Crispy and juicy beyond compare, these fried chicken sandwiches are a mash-up of your favorite fast food versions. While I was writing my second cookbook, my daughter, who occasionally grows weary of being my guinea pig taste tester, challenged me to come up with a mash-up version of her favorite fast-food crispy chicken sandwiches (yes, I’m talking about Chick-fil-A and Popeyes). This mission involved several trips to the drive-through, four quarts of oil, a mountain of fried chicken sandwiches, and exhaustive critiques from my kids and their friends (aka the experts). It took me a while, but I finally cracked the code. All I can say is, get ready to be showered with praise — your family will be talking about these for days. What You’ll Need To Make Fried Chicken Sandwiches Step-by-Step Instructions Step 1: Prep and Brine the Chicken One at a time, place the chicken breasts in a resealable freezer bag. Using a meat mallet or rolling pin, pound them to an even ¼-inch. Cut each pounded breast in half. (If the pieces seem too large to fit in a bun, trim off the pointy ends; you can cook those as chicken nuggets at the same time you’re cooking the breasts.) Pour the water into a medium bowl; add the 2 tablespoons of the salt and the sugar and whisk until dissolved. Place the chicken breasts in the brine. Cover the bowl and refrigerate for at least 4 hours or overnight (the longer you brine, the saltier the chicken will be). Step 2: Bread and Fry the Chicken Line a plate with a few layers of paper towels and set it next to the stove. Pour the oil into a large, high-sided pot or Dutch oven until it reaches a depth of about1 inch. Heat the oil over medium-high heat until shimmering (about 350°F). In a medium bowl, whisk the egg and milk until evenly combined. In another medium bowl, whisk the flour, cornstarch, baking powder, garlic powder, pepper, Accent, paprika, and the remaining ¾ teaspoon salt. Drizzle 4 tablespoons of the egg mixture into the flour mixture. Mix with a fork until the flour mixture is evenly clumpy. Line a baking sheet with aluminum foil for easy cleanup. Remove the chicken from the brine and pat dry with paper towels. One at a time, dip each breast into the egg mixture, letting any excess drip off, and then into the flour mixture, turning a few times and pressing firmly so that the clumps adhere. Set the breaded chicken on the lined baking sheet and repeat with the remaining breasts. Carefully place a few pieces of breaded chicken into the hot oil without crowding the pot. Cook, turning a few times, until golden brown and crispy on both sides, 4 to 5 minutes total. Place the cooked chicken on the paper towel-lined plate to drain. Fry the remaining breasts in the same manner, adjusting the heat as necessary to maintain the temperature of the oil. Step 3: Make the Sauce In a small bowl, whisk the mayonnaise, barbecue sauce, and mustard. Step 4: Assemble the Sandwiches Spread some of the sauce on the top and bottom of each bun. Top each bottom bun with a piece of crispy chicken and a few pickles. Close the sandwiches and serve immediately. Note: This recipe has been written by Jenn Segal and republished on MudMatter with Author’s Permission. Please find the original link here – Fried Chicken Sandwiches.

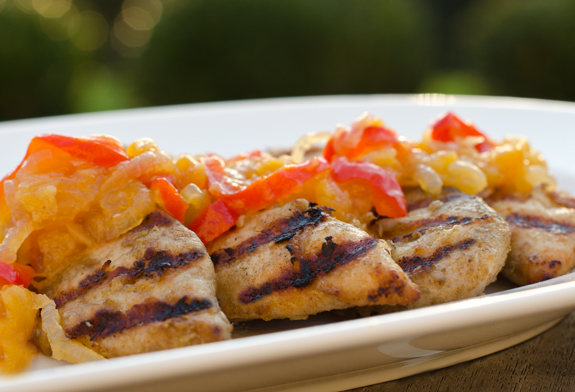
Grilled Ginger Chicken with Apricot Chutney
Southeast Asian spices and lots of fresh ginger flavor this delicious grilled chicken. This recipe is a variation on my Grilled Moroccan Chicken (one of the most popular recipes on my site) but instead of North African spices, I use Southeast Asian spices and lots of fresh ginger to flavor the chicken. This is actually delicious on its own — in fact, my kids prefer it that way — but it’s even better paired with a sweet and sour apricot chutney. As you’ll see below, making homemade chutney is easy, but if you’ve got a store-bought brand that you like, by all means, save time and use it. What you’ll need to make Grilled Ginger Chicken How to make it Begin by pounding the breasts to an even 1/2-inch thickness. This ensures they stay extra tender. Next, combine the chicken and marinade ingredients in a Ziplock freezer bag. Mix well, then marinate in the refrigerator for at least 5 hours or overnight. Meanwhile, make the apricot chutney. Cook the onions in vegetable oil until they are soft and translucent, then add the minced garlic and ginger and cook a minute more. Add the apricots, red bell peppers, vinegar, honey, water, and cayenne pepper and bring to a boil. Turn the heat down and simmer for about an hour. The chutney is done when most of the liquid is dissolved, the apricots are tender, and the mixture looks “jammy.” Refrigerate the chutney until ready to serve. When you’re ready to eat, preheat the grill to high heat, then grill the breasts a few minutes per side. It’s important that the grill is very hot — you want nice char marks in the short amount of time it takes to cook the chicken. Be sure not to overcook it! Top the breasts with the chutney, or serve it alongside. If you’ve got any chutney left over, try it on salty crackers with cream cheese — it’s delicious. Enjoy! Note: This recipe has been written by Jenn Segal and republished on MudMatter with Author’s Permission. Please find the original link here – Grilled Ginger Chicken with Apricot Chutney.
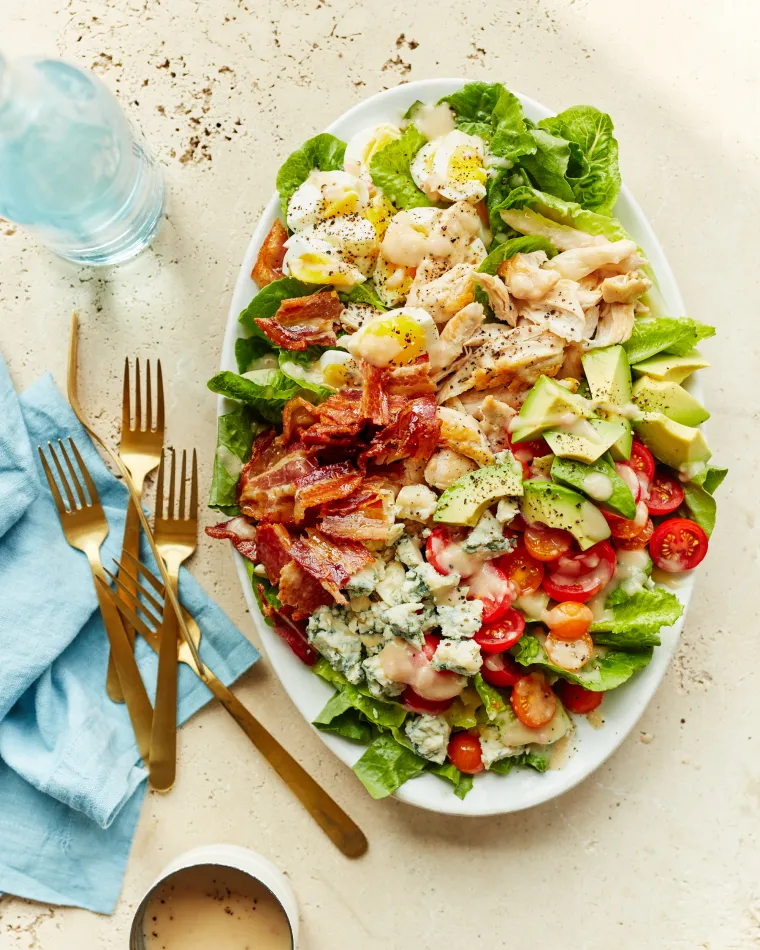
Cobb Salad
his cobb salad is not just a classic, it’s a satisfying meal packed to the brim with chicken, bacon, avocado, blue cheese, and a whole lot more. I love salads that have a lot of “stuff” in them, and this classic cobb salad fits the bill. It has everything you could want—lettuce, chicken, bacon, avocados, tomatoes, hard-boiled eggs, and blue cheese, all tossed in tangy red wine vinaigrette. The origin of the salad has different accounts, but the most popular story dates back to 1937 when Robert Cobb, the owner of the Brown Derby restaurant in Hollywood, CA, found himself hungry after closing time. He scavenged the fridge and stumbled upon a mix of leftovers—lettuce, tomatoes, avocado, cheese, and hard-boiled eggs. Adding some bacon, he tossed it all together with dressing, creating the iconic Cobb salad, which quickly became a signature dish of the restaurant. What makes it really special is that, instead of using plain poached or grilled chicken, which can be a bit boring, the chicken is cooked in the rendered fat from the bacon – a technique I borrowed from a New York Times recipe by Alison Roman. Not only does it add a surprising amount of flavor to the salad, but it also makes full use of all of the ingredients. Go ahead and cook some extra bacon; it’s impossible to resist the temptation to sneak a few bites while you put the rest of the salad together. What You’ll Need To Make Cobb Salad A traditional Cobb salad is made with lettuce, chicken, bacon, avocados, tomatoes, hard-boiled eggs, blue cheese, and red wine vinaigrette. There are various accounts of how the salad came to be, but according to most, the story goes that one night in 1937, Robert Cobb, the owner of the Brown Derby restaurant in Hollywood, CA was hungry after all the restaurant patrons had left. He went digging in the fridge late-night and pulled out a variety of leftovers – lettuce, tomatoes, avocado, cheese, and hard-boiled eggs. He also grabbed some bacon to add to the mix, tossed everything together with some dressing, and created what we now know to be a Cobb salad. Supposedly, it became the one of the restaurant’s signature dishes. Step-by-Step Instructions Step 1: Make the Dressing Combine the shallot, vinegar, oil, mustard, salt, pepper, and sugar in a medium jar with a tight-fitting lid. Screw on the lid and shake vigorously to emulsify. (Alternatively, whisk the ingredients together in a bowl.) Step 2: Cook the Bacon & Chicken In a medium nonstick skillet over medium heat, cook the bacon. Stir occasionally until crisp, 6 to 8 minutes. Use a slotted spoon to transfer the bacon to a paper towel-lined plate to drain, leaving the fat in the pan. Season the chicken with the salt and add to the bacon fat in a single layer. Cook over medium heat, stirring frequently, until cooked through, 3 to 5 minutes. Using the slotted spoon, remove the chicken to a plate and set aside to cool. Step 3: Assemble the Salad Put the romaine, chicken, and the tomatoes in a large mixing bowl. Give the dressing a shake to re-emulsify, then add three-quarters of it to the bowl; toss gently to combine. Add more dressing, little by little, until the greens are dressed to your liking. Taste and adjust seasoning, if necessary. Arrange the salad mixture on a serving platter or plates. Sprinkle the hard-boiled eggs, avocado, blue cheese (if using), and reserved bacon over the salad. Pass the pepper mill at the table. Note: This recipe has been written by Jenn Segal and republished on MudMatter with Author’s Permission. Please find the original link here – Cobb Salad.
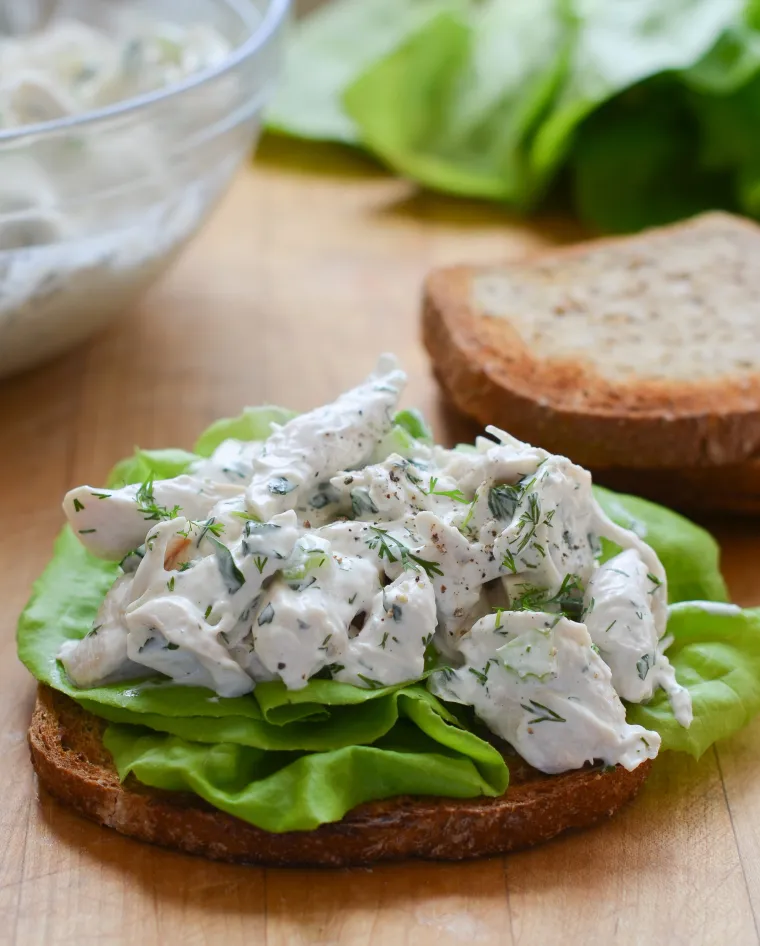
Classic Chicken Salad
A great basic recipe, this classic chicken salad is similar to the version served at many delis. I have shared several of my favorite chicken salad recipes over the years, from Curried Chicken Salad to Chicken Salad with Grapes & Almonds, but this is this classic version is the one I make most often for my family. It is simple, creamy, and flavorful — similar to the chicken salad served at many delis, with “no weird stuff in it,” as my kids would say. The key to success is starting with tender chicken. I use my simple 15-minute poached chicken recipe, but oven-roasted chicken breasts or a rotisserie chicken work well too. Serve the salad over greens or in a wrap or sandwich. What You’ll Need Yo Make Classic Chicken Salad As mentioned above, I use poached chicken for this recipe — it’s easy. If you’d prefer to use roasted chicken, you’ll need 3 pounds bone-in, skin-on chicken breasts. Preheat the oven to 425°F and line a baking sheet with aluminum foil. Arrange the chicken breasts skin-side up on the prepared baking sheet, and coat them with 1 tablespoon of olive oil and sprinkle with salt and pepper. Roast for 30 to 35 minutes, or until done, and then let cool. Step-by-Step Instructions Make the dressing: In a large bowl, combine the mayonnaise, sour cream, lemon juice, mustard, salt, sugar, and pepper. Whisk well to combine. To the dressing, add the chicken, scallions, celery, dill, and parsley. Toss until evenly combined. (If using a rotisserie chicken, be careful when mixing so that it doesn’t fall apart too much.) Taste and adjust seasoning, if necessary. Cover and refrigerate until ready to serve. Note: This recipe has been written by Jenn Segal and republished on MudMatter with Author’s Permission. Please find the original link here – Classic Chicken Salad.

Bourbon Chicken
Cook up a family favorite with Bourbon chicken, an easy-to-make dish that brings the flavors of New Orleans right to your kitchen. Picture a dinner that whisks you away to the lively, music-filled Bourbon Street in New Orleans, all from the comfort of your own kitchen. That’s the magic of Bourbon chicken, a predominantly Asian dish that gets a unique Cajun twist from the unmistakable oaky flavor of bourbon whiskey. This easy-to-make dish is a culinary chameleon of sorts; it can be found on menus at Cajun joints, American Chinese restaurants, and even mall food courts. The main ingredients are simple — soy sauce, brown sugar, orange juice, ginger, garlic, rice vinegar, and, of course, bourbon. When combined, they create a delicious blend of savory, sweet, and tangy flavors. Bourbon chicken is a family favorite in our house, and I bet it will be in yours too. Serve with fluffy white rice to soak up every last drop of that delicious sauce. What You’ll Need To Make Bourbon Chicken Step-by-Step Instructions Make the sauce: In a medium bowl, whisk the soy sauce, sugar, water, orange juice, bourbon, sesame oil, and pepper until well combined. Prep the chicken: In another medium bowl, toss the chicken with the 2 tablespoons of cornstarch and 2 tablespoons of the sauce mixture until thoroughly combined. To cook: Heat the vegetable oil in a 12-inch nonstick skillet over medium-high heat until shimmering. Add the chicken all at once (the skillet will be very full; do your best to spread the chicken into a single layer). Cook, stirring every few minutes, until deeply golden brown and cooked through, about 10 minutes. Stir in the garlic, ginger, and light green scallions and cook, stirring constantly, for about one minute; do not let burn. Add the remaining sauce mixture. Bring to a boil, then reduce the heat to medium and cook at a gentle boil until the sauce is slightly reduced, about 5 minutes. Stir in the cornstarch/water mixture and cook until the sauce is thickened, about 2 minutes. Off the heat, stir in the vinegar and sprinkle with dark green scallions. Serve over rice. Note: This recipe has been written by Jenn Segal and republished on MudMatter with Author’s Permission. Please find the original link here – Bourbon Chicken.

Clean Structured Project – ASP.NET Core
This template is for a clean structured ASP.NET Core web project, follows the Clean Architecture principles, SOLID design principles, implements the Dependency Injection, Repository, and Unit of Work design pattern, and utilizes Entity Framework Core for data access. It provides a standardized structure and organization for building robust and maintainable ASP.NET Core web applications with complete CRUD (Create, Read, Update, Delete) operations. Project Structure The project structure is designed to promote separation of concerns and modularity, making it easier to understand, test, and maintain the application. ├── src │ ├── Core # Contains the core business logic and domain models, view models, etc. │ ├── Infrastructure # Contains infrastructure concerns such as data access, external services, etc. │ └── UI # Contains the user interface layer, including controllers, views, and extensions, etc. ├── tests │ ├── Core.Tests # Contains unit tests for the core layer │ ├── Infrastructure.Tests # Contains unit tests for the infrastructure layer │ └── UI.Tests # Contains unit tests for the UI layer └── README.md # Project documentation (you are here!) Getting Started To use this project template, follow the steps below: Ensure the .NET 7 SDK is installed on your machine. Clone or download this repository to your local machine. Open the solution in your preferred IDE (e.g., Visual Studio, Visual Studio Code). Build the solution to restore NuGet packages and compile the code. Configure the necessary database connection settings in the appsettings.json file of the Infrastructure project. Open the Package Manager Console, select Project.Infrastructure project and run the Update-Database command to create the database Run the application by starting the Project.UI project. Project Features This project template includes the following features: Clean Architecture: The project is structured according to the principles of Clean Architecture, which promotes the separation of concerns and a clear division of responsibilities. SOLID Design Principles: The code adheres to SOLID principles (Single Responsibility, Open-Closed, Liskov Substitution, Interface Segregation, and Dependency Inversion), making it easier to maintain and extend. Repository Pattern: The repository pattern abstracts the data access layer and provides a consistent interface for working with data. Unit of Work Pattern: The unit of work pattern helps manage transactions and ensures consistency when working with multiple repositories. Entity Framework Core: The project utilizes Entity Framework Core as the ORM (Object-Relational Mapping) tool for data access. ASP.NET Core Web: The project includes an ASP.NET Core web project that serves as the user interface layer, handling HTTP requests and responses. CRUD Operations: The project template provides a foundation for implementing complete CRUD (Create, Read, Update, Delete) operations on entities using Entity Framework Core. Dependency Injection: The project utilizes the built-in dependency injection container in ASP.NET Core, making it easy to manage and inject dependencies throughout the application. Unit Testing: The solution includes separate test projects for unit testing the core, infrastructure, and UI layers. Usage The project template provides a starting point for implementing CRUD operations on entities using Entity Framework Core. You can modify and extend the existing code to suit your specific application requirements. Here’s an overview of the key components involved in the CRUD operations: Models: The Core project contains the domain models representing the entities you want to perform CRUD operations on. Update the models or add new ones according to your domain. Repositories: The Infrastructure project contains repository implementations that handle data access operations using Entity Framework Core. Modify the repositories or create new ones to match your entity models and database structure. Services: The Core project contains services that encapsulate the business logic and orchestrate the operations on repositories. Update or create new services to handle CRUD operations on your entities. Controllers: The UI project contains controllers that handle HTTP requests and responses. Update or create new controllers to expose the CRUD endpoints for your entities. Make sure to update the routes, validation, and error-handling logic to align with your application requirements and best practices. Note: This article has been written by Kawser Hamid and republished on MudMatter with Author’s Permission. Please find the original link here – Clean Structured Project – ASP.NET Core.
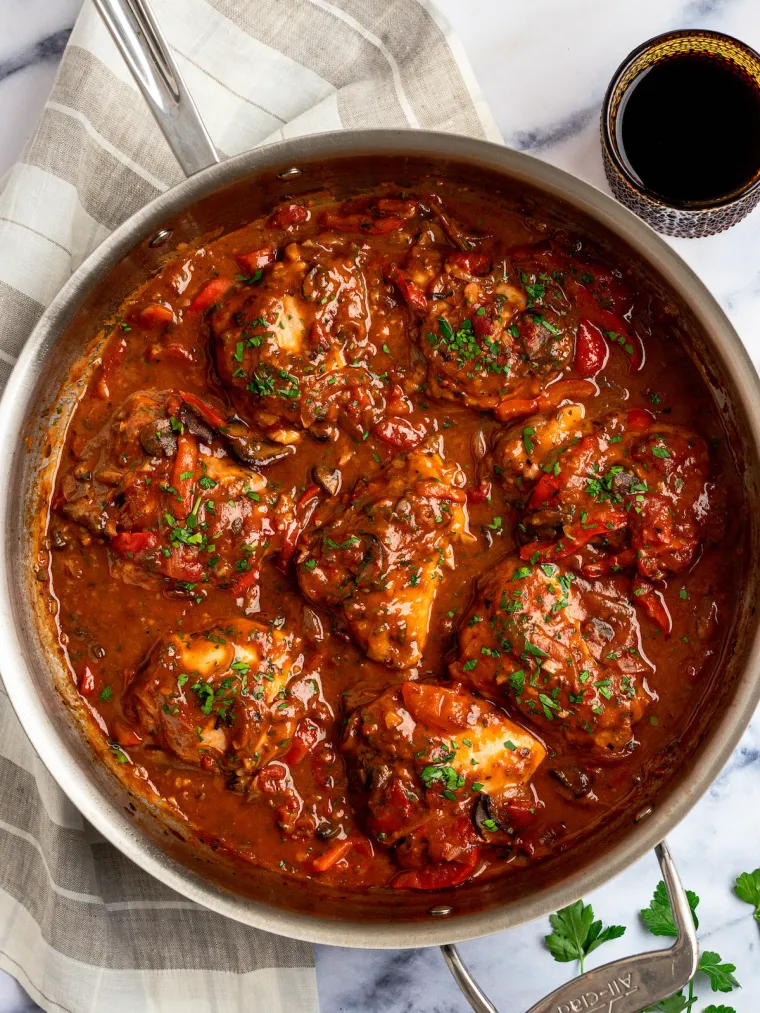
Chicken Cacciatore
A rustic, slow-cooked dish of tender chicken and vegetables in a hearty sauce, chicken cacciatore makes a soul-satisfying meal. Chicken Cacciatore, also known as Hunter’s Chicken, is a classic Italian dish that’s packed with rich, bold flavors. The name “cacciatore” comes from the Italian word for hunter, and it is said to have originated with Italian hunters who would prepare it over an open fire using ingredients they had on hand, such as tomatoes, onions, garlic, and peppers. This recipe calls for chicken thighs to be slow-cooked with these veggies, along with fragrant herbs, red wine, and broth to create a hearty sauce that’s perfect for spooning over creamy polenta or mashed potatoes. Chicken cacciatore takes about 2 hours to cook, so make it on a leisurely day when you’ve got some time to putter around the kitchen. It’s also a wonderful dish to make ahead of time, as the flavors develop and deepen as it sits. What You’ll Need To Make Chicken Cacciatore Step-by-Step Instructions Blot the chicken with a paper towel to remove any excess moisture. Season the chicken all over with 1½ teaspoons salt and ½ teaspoon pepper. Place the flour on a large plate. Dredge the chicken pieces in the flour, coating all over. Heat the oil in a large (5 or 6-qt) Dutch oven or heavy-bottomed, high-sided large skillet over medium-high heat. Brown half the chicken in a single layer, skin side down, until golden and crispy, 5 to 7 minutes. Flip and brown on the other side for 1 to 2 minutes more. Using tongs, transfer the chicken to a large plate; set aside. Repeat with the remaining chicken. Pour off all but about 2 tablespoons of the fat. Return the pot to the stove and reduce the heat to medium-low. Add the onions to the pot and cook, stirring occasionally, until they are softened and just starting to brown, about 5 minutes. Add the garlic and cook, stirring constantly, until fragrant, about 1 minute. Do not brown. Add the mushrooms and peppers and increase the heat to medium. Cook for 5 minutes, stirring occasionally until the veggies just begin to soften. Add the wine and bring to a boil over high heat. Cook, stirring to scrape the brown bits from the bottom of the pan, until the wine has mostly evaporated, 5 to 6 minutes. Add the chicken broth, diced tomatoes, tomato paste, sage, rosemary, oregano, honey, and the remaining 1 teaspoon salt. Bring to a boil, then reduce the heat to medium-low and gently simmer, uncovered, for 10 minutes. Add the chicken and any accumulated juices from the plate back to the pot and spoon some of the sauce over it. Bring to a simmer, then cover and cook over medium-low heat for about 35 minutes, until the chicken is cooked through or registers 165°F – 170°F on a meat thermometer. Using a slotted spoon, transfer the cooked chicken to a plate. Using a fork and knife, pull the skin off of the chicken and discard. Gently simmer the sauce for a few minutes, or until it is thickened to your liking. Taste and adjust seasoning, if necessary. Add the chicken and any accumulated juices back to the pot and simmer, uncovered, for a few minutes, spooning the thickened sauce over the chicken. Garnish with parsley, if using, and serve. How To Make Chicken Cacciatore Ahead of Time Let the chicken cool to room temperature and then store it in the refrigerator for up to 3 days, or freeze in an airtight container for up to 3 months. Before serving, defrost in the refrigerator for 24 hours if necessary, and then reheat on the stovetop over medium-low heat until hot. Enjoy! Note: This recipe has been written by Jenn Segal and republished on MudMatter with Author’s Permission. Please find the original link here – Chicken Cacciatore.
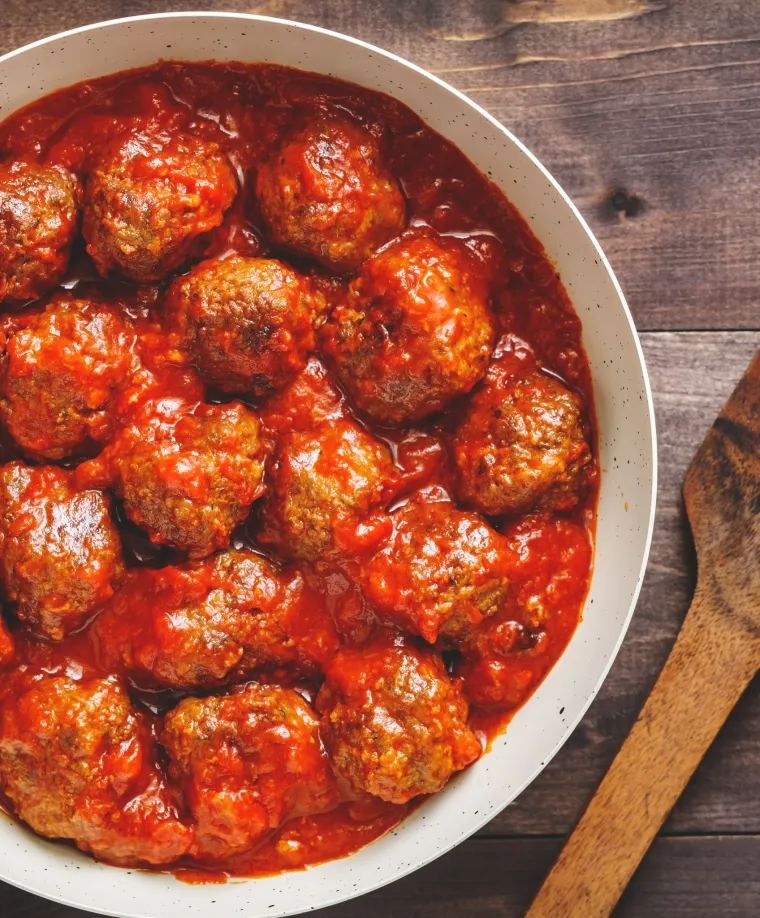
Turkey Meatballs in Marinara Sauce
A weeknight dinner winner, these turkey meatballs are tender and full of flavor – and cleanup is a snap! These turkey meatballs are a lighter alternative to my classic Italian meatballs made with beef, pork, and veal. They are tender and flavorful despite the lean turkey, thanks to the addition of garlic, onions, basil, and grated pecorino Romano cheese. Pan-frying the meatballs in a bit of olive oil also adds flavor – and since you only need one skillet for the meatballs and sauce, cleanup is a breeze. If you have a good homemade sauce on hand, go ahead and use it, but for those busy weeknights, a good quality jar of marinara sauce, such as Rao’s, gets the job done deliciously. Serve the meatballs over spaghetti or polenta, beside a roasted vegetable, or stuffed into a hoagie roll for a meatball sandwich. They hit the spot no matter how you eat them! What You’ll Need To Make Turkey Meatballs Step-by-Step Instructions In a medium bowl, combine the egg, basil, salt, pepper, oregano, garlic, and water. Mix together until well-combined. Add the onion, turkey, bread crumbs, and cheese. Mix with your hands until the mixture is uniform. Lightly wet your hands with water and form the mixture into balls just slightly larger than golf balls. In a large nonstick skillet, heat the oil over medium heat until shimmering. Add the meatballs in a single layer. Brown on all sides, 7 to 8 minutes total. Pour the marinara sauce over the meatballs and bring to a boil. Reduce the heat to low, cover tightly with a lid, and simmer until the meatballs are cooked through, about 15 minutes. Sprinkle with more basil, if desired, and serve. Note: This recipe has been written by Jenn Segal and republished on MudMatter with Author’s Permission. Please find the original link here – Turkey Meatballs in Marinara Sauce.

Grilled BBQ Chicken
This easy BBQ chicken is absolutely loaded with smoky barbecue flavor. We have a running joke about chicken in my family. Whenever I say we’re having chicken for dinner, my husband says, “Chicken again?” and then rattles off a seemingly endless list of chicken dinners his mother used to make: “Chicken Parm, chicken cutlets, chicken stir-fry, chicken casserole, chicken pot pie” and so on. The kids jump right on the bandwagon, groaning about all my chicken dinners. What they don’t realize is that this only makes me even more determined to change their minds about chicken. You could almost say I’m on a Chicken Crusade! Luckily, these BBQ chicken breasts always win everybody over. They are absolutely loaded with smoky barbecue flavor. I guarantee clean plates all around. Winner, winner chicken dinner! What You’ll Need To Make BBQ Chicken For this recipe, you can use chicken tenderloins or boneless skinless chicken breasts. If using chicken breasts, it’s important to pound them to an even 1/2-inch thickness before marinating. This both tenderizes the breasts and ensures they cook evenly. (Pounding is not necessary if using tenderloins, as tenderloins are naturally very tender.) Step-by-Step Instructions In a large bowl, combine the oil, garlic, salt, brown sugar, smoked paprika, cumin, chili powder, and cayenne pepper. Whisk to combine. Add the chicken to the bowl and toss with tongs until evenly coated. Cover the bowl and place in the refrigerator to marinate for at least 6 hours or up to 24 hours. Preheat the grill to high and oil the grates. Grill the chicken, covered, for 2 to 3 minutes. Flip the chicken, and then brush with some of the barbecue sauce. Cook for 2 to 3 minutes more. Transfer the chicken to a serving platter and serve with remaining barbecue sauce alongside. Note: This recipe has been written by Jenn Segal and republished on MudMatter with Author’s Permission. Please find the original link here – Grilled BBQ Chicken.

Arroz con Pollo
Arroz con pollo is a much-loved Latin American dish that combines seasoned rice, tender chicken, and vegetables in one big pot, making it the perfect meal to feed a crowd or enjoy with family. Arroz con pollo, which means “rice with chicken” in Spanish, is a beloved Latin American dish that’s similar to paella. My version is simple to make: start by seasoning and searing bone-in chicken pieces until golden brown, then sauté onions and bell peppers until fragrant and tender. Next, add rice, garlic, and tomato paste and toast everything before covering it with chicken broth, olives, and spices. Return the chicken to the pot and let everything cook in the oven until the rice is tender and the chicken is fully cooked. Finally, mix in peas and fresh cilantro. To serve, you can shred the chicken and mix it in with the rice for a more cohesive dish or leave it whole for a prettier presentation (my family prefers it shredded). Arroz con pollo is a comforting and satisfying meal perfect for feeding a hungry crowd. Serve it with a big salad and a traditional Latin American dessert like flan to complete the meal. What You’ll Need To Make Arroz con Pollo Step-by-Step Instructions Step 1: Season and Brown the Chicken Preheat the oven to 350°F and set an oven rack in the middle position. In a small bowl, mix together 1½ teaspoons salt, pepper, and 1 teaspoon of the cumin. Cut off any excessive fat on the chicken (leaving the skin intact). Blot the chicken with a paper towel and season both sides with the spice mixture. Heat the oil in a large (5 to 6-qt) Dutch oven or heavy-bottomed, high-sided oven-safe skillet over medium-high heat. Working in two batches, brown the chicken in a single layer until golden and crispy. For thighs, place the chicken skin side down, and sear until golden and crispy, 5 to 7 minutes. Flip and brown on the other side, 1 to 2 minutes more. For drumsticks, sear for 2 to 3 minutes on each side, turning to brown evenly all over. Using tongs, transfer the chicken to a large plate and set aside aside. Step 2: Sauté the Vegetables and Rice If there is a lot of oil left in the pan, pour off all but about 2 tablespoons of the fat. Return the pot to the stove and reduce the heat to medium-low. Add the onion and bell pepper to the pot and cook, stirring occasionally, until softened, 6 to 8 minutes. As you stir, scrape up any brown bits from the bottom of the pan and mix it into the vegetables. Add the rice, garlic, tomato paste, and remaining 1 teaspoon of cumin; cook, stirring constantly, until fragrant, another 2 to 3 minutes. Step 3: Add the Broth, Seasoning and Browned Chicken To The Pot Add the chicken broth, oregano, turmeric, sugar, olives, bay leaves, and remaining 1¼ teaspoons salt. Nestle the chicken on top of this mixture and pour any remaining chicken drippings into the pan as well, and bring to a boil. Step 4: Bake Cover the pot with a lid and immediately transfer to the oven to bake for 35 minutes, or until the chicken registers 175°F on a meat thermometer. Remove the pan from the oven and let sit, covered, on a wire rack or on the stovetop for 10 minutes. Uncover the pan, and use tongs to transfer the chicken to a plate. Remove the bay leaves, and fluff the rice. Mix the peas and cilantro, if using, into the rice. Return the chicken pieces to the top of the rice. Alternatively, remove the skin, pull the meat off of the bones, shred into bite-sized chunks, and mix in with the rice (discard the skin and bones). Serve or cover the pan to keep warm until ready to serve. Note: This recipe has been written by Jenn Segal and republished on MudMatter with Author’s Permission. Please find the original link here – Arroz con Pollo.