Articles contributed by the community, curated for your enjoyment and reading.
Filters
Reset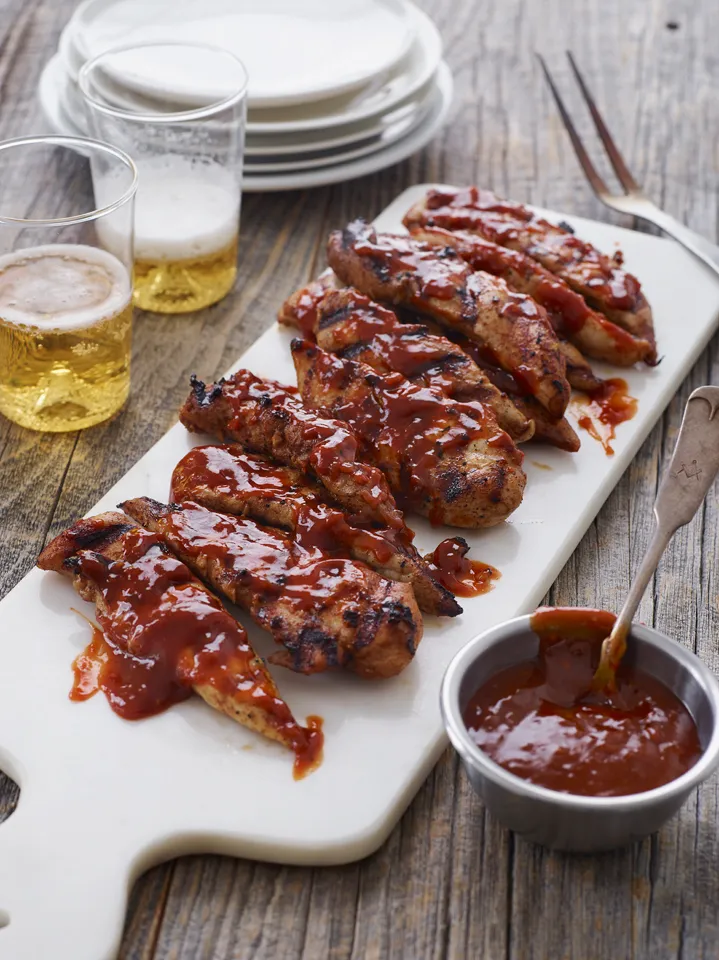
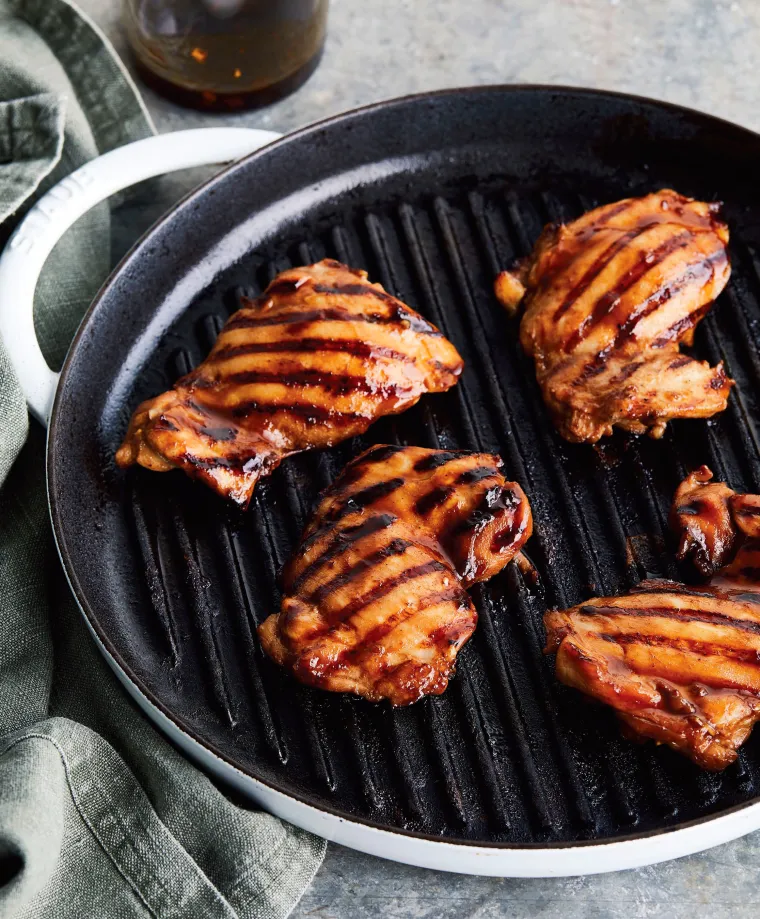
Grilled BBQ Chicken
This easy BBQ chicken is absolutely loaded with smoky barbecue flavor. We have a running joke about chicken in my family. Whenever I say we’re having chicken for dinner, my husband says, “Chicken again?” and then rattles off a seemingly endless list of chicken dinners his mother used to make: “Chicken Parm, chicken cutlets, chicken stir-fry, chicken casserole, chicken pot pie” and so on. The kids jump right on the bandwagon, groaning about all my chicken dinners. What they don’t realize is that this only makes me even more determined to change their minds about chicken. You could almost say I’m on a Chicken Crusade! Luckily, these BBQ chicken breasts always win everybody over. They are absolutely loaded with smoky barbecue flavor. I guarantee clean plates all around. Winner, winner chicken dinner! What You’ll Need To Make BBQ Chicken For this recipe, you can use chicken tenderloins or boneless skinless chicken breasts. If using chicken breasts, it’s important to pound them to an even 1/2-inch thickness before marinating. This both tenderizes the breasts and ensures they cook evenly. (Pounding is not necessary if using tenderloins, as tenderloins are naturally very tender.) Step-by-Step Instructions In a large bowl, combine the oil, garlic, salt, brown sugar, smoked paprika, cumin, chili powder, and cayenne pepper. Whisk to combine. Add the chicken to the bowl and toss with tongs until evenly coated. Cover the bowl and place in the refrigerator to marinate for at least 6 hours or up to 24 hours. Preheat the grill to high and oil the grates. Grill the chicken, covered, for 2 to 3 minutes. Flip the chicken, and then brush with some of the barbecue sauce. Cook for 2 to 3 minutes more. Transfer the chicken to a serving platter and serve with remaining barbecue sauce alongside. Note: This recipe has been written by Jenn Segal and republished on MudMatter with Author’s Permission. Please find the original link here – Grilled BBQ Chicken.

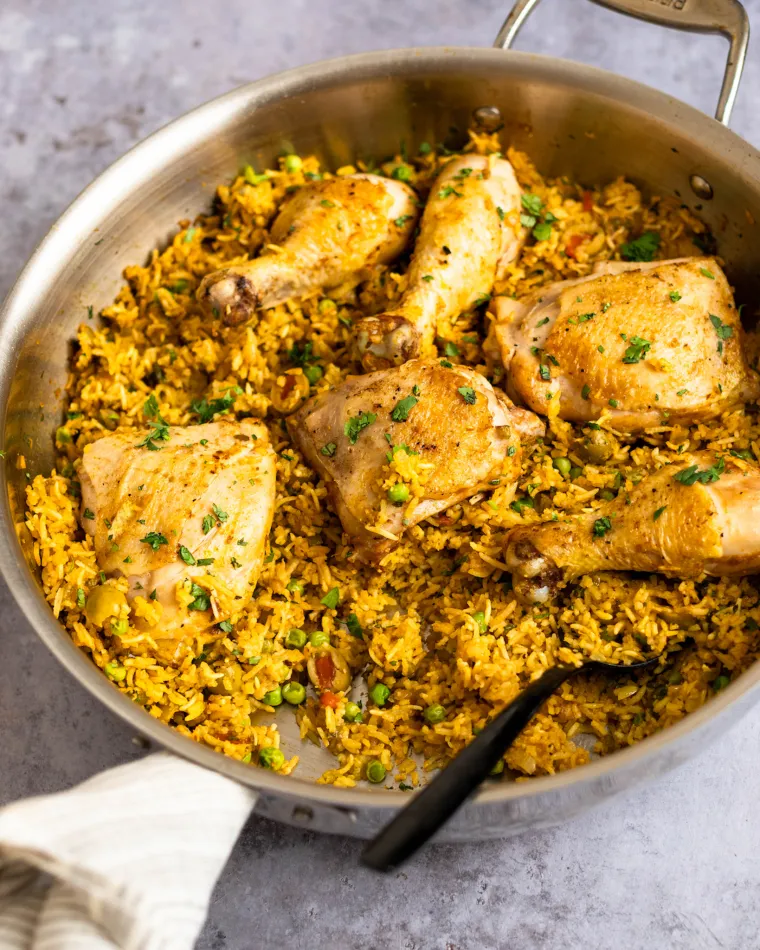
Arroz con Pollo
Arroz con pollo is a much-loved Latin American dish that combines seasoned rice, tender chicken, and vegetables in one big pot, making it the perfect meal to feed a crowd or enjoy with family. Arroz con pollo, which means “rice with chicken” in Spanish, is a beloved Latin American dish that’s similar to paella. My version is simple to make: start by seasoning and searing bone-in chicken pieces until golden brown, then sauté onions and bell peppers until fragrant and tender. Next, add rice, garlic, and tomato paste and toast everything before covering it with chicken broth, olives, and spices. Return the chicken to the pot and let everything cook in the oven until the rice is tender and the chicken is fully cooked. Finally, mix in peas and fresh cilantro. To serve, you can shred the chicken and mix it in with the rice for a more cohesive dish or leave it whole for a prettier presentation (my family prefers it shredded). Arroz con pollo is a comforting and satisfying meal perfect for feeding a hungry crowd. Serve it with a big salad and a traditional Latin American dessert like flan to complete the meal. What You’ll Need To Make Arroz con Pollo Step-by-Step Instructions Step 1: Season and Brown the Chicken Preheat the oven to 350°F and set an oven rack in the middle position. In a small bowl, mix together 1½ teaspoons salt, pepper, and 1 teaspoon of the cumin. Cut off any excessive fat on the chicken (leaving the skin intact). Blot the chicken with a paper towel and season both sides with the spice mixture. Heat the oil in a large (5 to 6-qt) Dutch oven or heavy-bottomed, high-sided oven-safe skillet over medium-high heat. Working in two batches, brown the chicken in a single layer until golden and crispy. For thighs, place the chicken skin side down, and sear until golden and crispy, 5 to 7 minutes. Flip and brown on the other side, 1 to 2 minutes more. For drumsticks, sear for 2 to 3 minutes on each side, turning to brown evenly all over. Using tongs, transfer the chicken to a large plate and set aside aside. Step 2: Sauté the Vegetables and Rice If there is a lot of oil left in the pan, pour off all but about 2 tablespoons of the fat. Return the pot to the stove and reduce the heat to medium-low. Add the onion and bell pepper to the pot and cook, stirring occasionally, until softened, 6 to 8 minutes. As you stir, scrape up any brown bits from the bottom of the pan and mix it into the vegetables. Add the rice, garlic, tomato paste, and remaining 1 teaspoon of cumin; cook, stirring constantly, until fragrant, another 2 to 3 minutes. Step 3: Add the Broth, Seasoning and Browned Chicken To The Pot Add the chicken broth, oregano, turmeric, sugar, olives, bay leaves, and remaining 1¼ teaspoons salt. Nestle the chicken on top of this mixture and pour any remaining chicken drippings into the pan as well, and bring to a boil. Step 4: Bake Cover the pot with a lid and immediately transfer to the oven to bake for 35 minutes, or until the chicken registers 175°F on a meat thermometer. Remove the pan from the oven and let sit, covered, on a wire rack or on the stovetop for 10 minutes. Uncover the pan, and use tongs to transfer the chicken to a plate. Remove the bay leaves, and fluff the rice. Mix the peas and cilantro, if using, into the rice. Return the chicken pieces to the top of the rice. Alternatively, remove the skin, pull the meat off of the bones, shred into bite-sized chunks, and mix in with the rice (discard the skin and bones). Serve or cover the pan to keep warm until ready to serve. Note: This recipe has been written by Jenn Segal and republished on MudMatter with Author’s Permission. Please find the original link here – Arroz con Pollo.
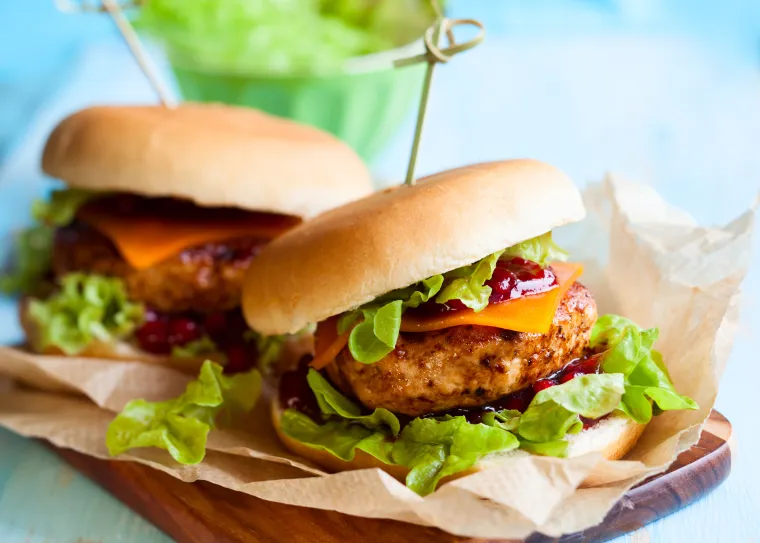
Grilled Turkey Burgers
With only 5 ingredients, you can throw these flavorful and juicy turkey burgers together in minutes. Most turkey burgers are dry and tasteless and leave you yearning for the real deal. Not these! I’ve added Italian turkey sausage – a trick often used with meatballs – which amps up the flavor and makes them incredibly juicy. The best part is that you can throw them together in a matter of minutes; only five ingredients and no chopping, slicing or dicing required. What You’ll Need To Make Grilled Turkey Burgers Step-by-Step Instructions Remove the sausage meat from the casings. The best way is to use kitchen shears to cut through the casings and then peel them away from meat. Add the ground turkey, pepper, Worcestershire sauce and Dijon mustard. Use your hand to mix together until well combined. Form the meat into 8 even patties about ½-inch thick, and place them on a foil-lined baking sheet. Clean the grill and preheat to high. To grease the grill, lightly dip a wad of paper towels in vegetable oil and, using tongs, carefully rub over the grates several times until glossy and coated. Place the turkey burgers on the grill and cook for five minutes, covered, until nice grill marks form. Flip and continue to cook, covered, for 3-5 minutes more. Heat the buns on the grill, assemble the burgers, and serve. Note: This recipe has been written by Jenn Segal and republished on MudMatter with Author’s Permission. Please find the original link here – Grilled Turkey Burgers.

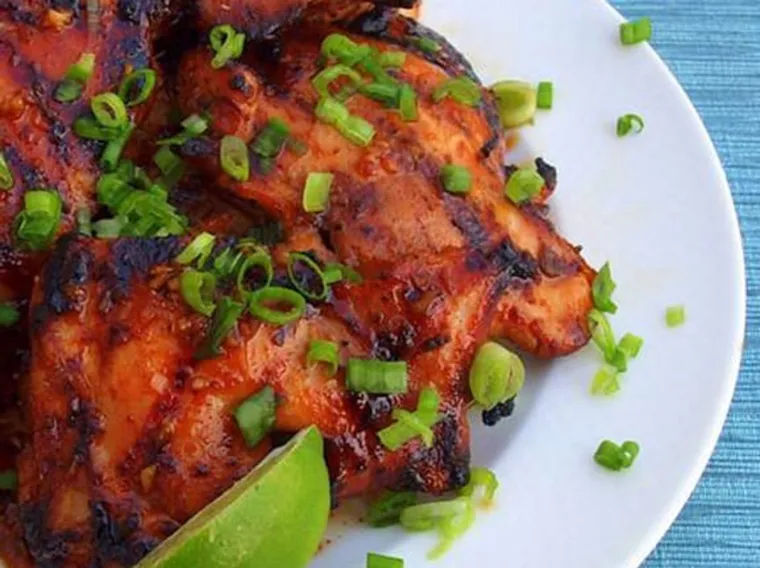
Grilled Jerk Chicken
Spicy, smoky and aromatic, Jerk chicken is Jamaica’s most iconic dish. Jerk is a style of cooking native to Jamaica. Some people believe the term comes from the word charqui, a Spanish term for jerked or dried meat, which eventually became jerky in English; others claim it’s related to the constant turning or jerking of the meat to load it with the spice blend and cook it thoroughly. The ingredients for jerk chicken marinade – soy sauce, allspice, nutmeg, Chinese 5-spice powder, and Scotch bonnet peppers – exemplify Caribbean cooking, which is a distinct blend of African, European, Indian, and Asian flavors. This grilled jerk chicken recipe, adapted from Food & Wine, is my go-to recipe. It’s spicy, but you can tone down the heat level by removing the seeds and membranes from the hot peppers. For best results, marinate the chicken overnight. The marinade is also great on beef, pork, or shrimp (although for shrimp, marinate for only 30 minutes to 1 hour), so feel free to double and freeze it for other uses. If you don’t have a grill (or grilling weather), the chicken can be roasted in the oven instead. What You’ll Need To Make Jerk Chicken Before we get to the step-by-step instructions, a few notes on the ingredients: I recommend using bone-in chicken thighs and drumsticks over bone-in breasts for this recipe; the flavor is better and they are easier to grill without drying out. If you’d like to use bone-in chicken breasts, look for smaller ones so they won’t burn on the outside before the inside is fully cooked. Or, start them on the grill and finish them in the oven. The recipe calls for either Scotch bonnet or habanero peppers. These two peppers are varieties of the same chili pepper species, and they have a similar flavor and level of heat. Scotch bonnet peppers are native to the Caribbean and are used to make authentic jerk chicken, but they can be hard to find; habanero peppers, grown primarily in Mexico, make a great substitute. The heat comes from the seeds and membranes, so throw in the whole peppers for spicy jerk chicken. For a milder dish, remove the seeds and membranes from one or both of the peppers. Be very careful when working with hot peppers. If you touch your eyes while handling them, it will be very painful. It’s a good idea to wear disposable gloves or wash your hands very well when you’re done. Step-by-Step Instructions Begin by making the marinade. Combine all of the ingredients except for the chicken in a food processor. Process until the vegetables are finely pureed. Place the chicken and marinade in a Ziploc freezer bag and let it marinate in the refrigerator at least eight hours or overnight. Preheat the grill to medium heat (about 350°F). Clean and oil the cooking grate. Place the chicken, skin side up, on the cooler side of the grill and cook, covered, turning and moving occasionally to prevent burning and flare-ups, for 35 to 40 minutes. If the skin is not yet crispy, move the chicken, skin side down, to the hotter side of the grill; cook, keeping a close watch to prevent burning, until the skin is rendered and crisp, a few minutes. If the skin is not yet crispy, move the chicken, skin side down, to the hotter side of the grill; cook, keeping a close watch to prevent burning, until the skin is rendered and crisp, a few minutes. How To Cook Jerk Chicken In The Oven As mentioned above, jerk chicken can be roasted in the oven if a grill is unavailable. Preheat the oven to 425°F and set an oven rack in the middle position. Line a baking sheet with aluminum foil for easy clean-up, and set an oven-proof rack on top. Spray the rack with nonstick cooking spray. Place the chicken on the rack, skin side up, and roast until lightly browned and cooked through, 40 to 45 minutes. Turn on broiler (leave the pan on the middle rack), and cook 1 to 3 minutes more, or until the skin is golden brown and crispy. If you happen to have leftover chicken, it’s delicious in tacos, wraps, quesadillas, or burrito bowls. Note: This recipe has been written by Jenn Segal and republished on MudMatter with Author’s Permission. Please find the original link here – Grilled Jerk Chicken.
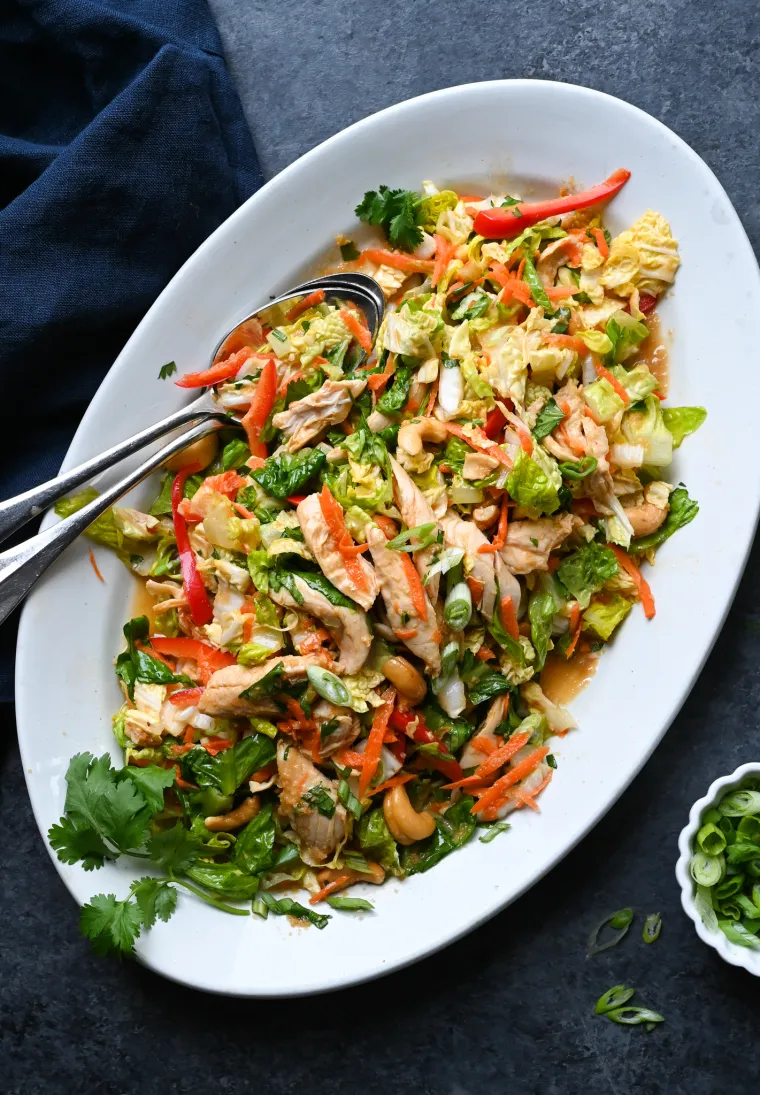
Chinese Chicken Salad
Make a restaurant-quality Chinese chicken salad at home with this easy recipe featuring crisp veggies and tender chicken tossed in a delicious sesame-ginger dressing. Chinese chicken salad is a California-style dish that perfectly blends the flavors of Chinese and American cuisine. Although it was a trendy restaurant menu item in the 1990s, for me, it’s a timeless favorite that will never go out of style. In fact, I would happily eat a salad like this every night of the week if I didn’t have a family to feed! The combination of fresh veggies, like Napa cabbage, crunchy carrots, and crisp bell peppers, combined with tender chicken and a sesame-ginger dressing make for a light and refreshing meal that always leaves you feeling satisfied. In this version, I’ve swapped out the traditional fried wonton strips with nuts to make the salad a bit healthier. However, if you prefer the crispy crunch of wontons, go ahead and add them in! The recipe is very easy to throw together, especially if you use leftover or rotisserie chicken instead of cooking your own — give it a try to see why it’s one of my all-time favorites! What You’ll Need To Make Chinese Chicken Salad Step-by-Step Instructions Make the dressing: In a food processor or blender, combine all of the dressing ingredients. Blend until smooth. Assemble the salad: Combine all of the salad ingredients in a large bowl. Add dressing, little by little, and toss to combine, until the salad is dressed to your liking. Taste and adjust seasoning if necessary. Serve immediately. Note: This recipe has been written by Jenn Segal and republished on MudMatter with Author’s Permission. Please find the original link here – Chinese Chicken Salad.
Char Siu Chicken
Andrea Nguyen’s savory-sweet char siu chicken is easy to make and hard to resist. This easy char siu chicken recipe comes from Vietnamese Food Any Day: Simple Recipes for True, Fresh Flavors by Andrea Nguyen. Nguyen writes, “Savory-sweet and garlicky Chinese barbecued pork, called char siu in Cantonese and xá xíu in Vietnamese, is hard to resist. Since the classic porky version requires a good hour (better yet, overnight) to marinate, my weeknight approach is to make it with chicken thighs and grill it for a wonderful old-school flavor…Enjoy char siu chicken for dinner with rice and a quick stir-fried vegetable or a salad. Use leftovers (or make a double batch) for banh mi, a noodle soup, or fried rice.” My only tweak to the recipe was to increase the quantities and double the sauce because it’s that good. What You’ll Need To Make Char Siu Chicken The nice thing about this recipe is that very little prep is required; most of the ingredients come out of bottles and jars. The most time-consuming part of the recipe is trimming the chicken thighs (I find it easiest to use sharp kitchen shears). If you don’t want to use dark meat, go ahead and use chicken tenderloins. Just keep in mind that they’ll cook in half the time and you’ll need slightly less since they don’t need to be trimmed. How To Make Char Siu Chicken In a large bowl, stir together the garlic, five-spice powder, honey, hoisin, soy sauce, ketchup, and sesame oil. Remove about half the marinade and set aside for glazing the chicken. Add the chicken to the bowl, coating the pieces well. Cover with plastic wrap and marinate at room temperature for 30 minutes, or refrigerate up to 24 hours (return to room temperature before cooking). Lightly oil a cast-iron stove-top grill pan and set over medium-high heat. Add the chicken and cook for 6 to 10 minutes, turning several times. To test for doneness, pierce the flesh with the tip of a knife; the chicken is cooked when clear juices flow out. During the last 2 minutes, when the chicken feels firmish, baste with the reserved marinade to freshen flavor and add sheen. Alternatively, prepare a medium charcoal fire or preheat a gas grill to medium and cook the chicken for 10 to 12 minutes, basting during the last 3 minutes. Transfer to a platter and let rest for 5 to 10 minutes before serving. Note: This recipe has been written by Jenn Segal and republished on MudMatter with Author’s Permission. Please find the original link here – Char Siu Chicken.
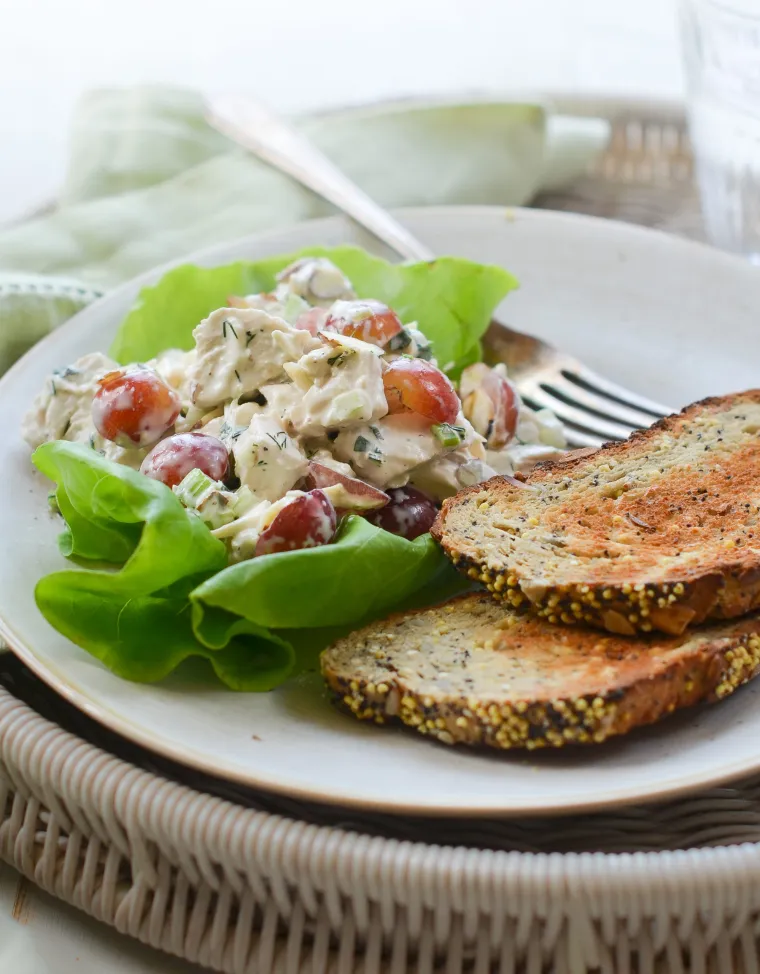
Chicken Salad with Grapes and Almonds
This savory-sweet chicken salad is delicious in a sandwich, scooped over greens, or eaten straight from the bowl. Back in May, The Kitchn published a fun chicken salad showdown by Amelia Rampe, pitting recipes from The New York Times, Southern Living, Ina Garten, and The Pioneer Woman against one another in the name of finding the best chicken salad on the internet. Each recipe uses a different method for cooking the chicken, different mix-ins, and different dressings. The Pioneer Woman’s savory-sweet chicken salad with grapes, almonds, and dill was crowned the winner, with Ina Garten’s recipe coming in a very close second. I loved both recipes, so I took what I liked from each, added a few touches of my own, and combined them into a version that’s delicious on a sandwich, scooped over greens, or eaten straight from the bowl. This is the fun of cooking! What You’ll Need To Make Chicken Salad with Grapes and Almonds Step-by-Step Instructions Preheat the oven to 425°F and set an oven rack in the middle position. Line a baking sheet with aluminum foil. Rub the chicken with the oil and sprinkle with 1 teaspoon salt and 1/2 teaspoon pepper. Roast for 25 to 30 minutes, or until or until a thermometer inserted into the thickest part of the breast reads between 160°F and 165°F (the temperature will continue to rise about 5 degrees as it cools). It’s important not to overcook the chicken or the salad will be dry. I highly recommend using a meat thermometer with a remote probe (affiliate link) so that you can monitor the temperature of the chicken without ever opening your oven. It takes all of the guesswork out of it. When the chicken is cool, remove the meat from the bones and discard the skin and bones. Dice the chicken into a 1/2-inch pieces. In a large mixing bowl, combine the mayonnaise, sour cream, lemon juice, mustard, sugar, 1 scant teaspoon salt, and 1/2 teaspoon pepper. Whisk to combine. Add the diced chicken, celery, scallions, grapes, almonds, and herbs to the dressing. Toss until well combined. Taste and adjust seasoning, if necessary. Chill the salad in the refrigerator for a few hours. Before serving, taste and adjust seasoning again, if necessary. Note: This recipe has been written by Jenn Segal and republished on MudMatter with Author’s Permission. Please find the original link here – Chicken Salad with Grapes and Almonds.
Asian-Inspired BBQ Chicken
Think of this dish as Chicken Teriyaki with a South Asian flair, or India meets the other flavors of Asia. Flavored with soy sauce, ginger, lime, and garam masala (an Indian spice blend), this dish blends ingredients from all over Asia. It’s deliciously different, perfect for when you want to fire up the grill and elevate the usual cookout fare. Because of the sugar content in the marinade, the chicken gets gorgeously caramelized and charred on the grill. For the chicken, you’ll need boneless, skinless chicken thighs. I know many people prefer chicken breasts, but I hope you’ll give the thighs a try here — they’re juicier and more flavorful than boneless chicken breasts (not to mention more economical), which makes them a much better match for the bold flavors in this dish. Note: This recipe has been written by Jenn Segal and republished on MudMatter with Author’s Permission. Please find the original link here – Asian-Inspired BBQ Chicken.

Curried Chicken Salad
This curried chicken salad is savory, sweet, and a little spicy, with lots of crunch from grapes, cashews, and celery. I originally shared this curried chicken salad on my salad column on Serious Eats in 2011. All these years later, it is still one of my favorites. Savory, sweet, and a little spicy – with lots of fresh crunch from grapes, cashews, celery, and scallions – it is wonderful over greens or piled into a sandwich. The creamy dressing is flavored with curry powder, a blend of spices like coriander, cumin, turmeric, ginger, cinnamon, and cardamom, to name just a few. I recommend using poached chicken to make the salad, but roasted chicken breasts or rotisserie chicken work well too. What You’ll Need To Make Curried Chicken Salad As mentioned above, I use poached chicken for this recipe — it’s easy and the method yields super tender chicken. If you’d prefer to use roasted chicken, you’ll need 3 pounds bone-in, skin-on chicken breasts. Preheat the oven to 425°F and line a baking sheet with aluminum foil. Arrange the chicken breasts skin-side up on the prepared baking sheet, and coat them with 1 tablespoon of olive oil and sprinkle with salt and pepper. Roast for 30 to 35 minutes, or until done, and then let cool. STEP-BY-STEP INSTRUCTIONS Make the dressing: In a medium bowl, combine the mayonnaise, sour cream, curry powder, honey, lime juice, and salt. Whisk to combine. Add the chicken, celery, grapes, scallions, cashews, and a pinch of cayenne pepper, if desired, to the dressing (if not serving immediately, hold off on adding the cashews so they stay crunchy). Toss well, and then taste and adjust the seasoning, if necessary. (If using a rotisserie chicken, be careful when mixing so that it doesn’t fall apart too much.) Chill the curried chicken salad until ready to serve. Note: This recipe has been written by Jenn Segal and republished on MudMatter with Author’s Permission. Please find the original link here – Curried Chicken Salad.
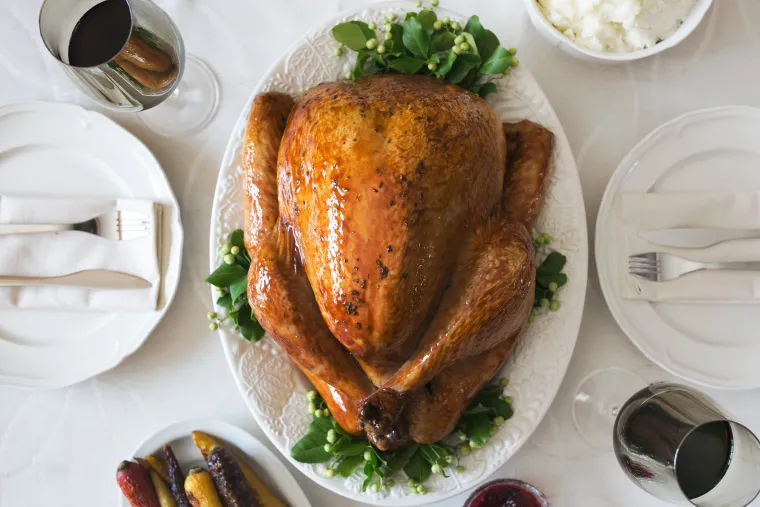
My Best Turkey Advice
This post may contain affiliate links. Read my full disclosure policy. Photo by Sarah Plfug I have been hosting Thanksgiving dinner for 20 years, and I have tried literally everything when it comes to cooking turkey. I’ve brined it, deep-fried it, marinated it, injected it, buttered it, dry-rubbed it, butterflied it, smoked it, and stuffed it. I’ve tried Kosher turkeys, organic turkeys, free-range turkeys, and self-basting turkeys. A few years ago, I even bought an oil-less outdoor propane turkey fryer called “The Big Easy,” which freed up my oven and actually made a wonderfully crisp-skinned and juicy turkey. (If you want to spend $160 on a large piece of equipment that will likely sit in storage collecting cobwebs 364 days a year, I highly recommend it!) From all this fussing with turkeys, I’ve come to realize that my turkey will never be perfect. Let’s face it: turkeys, on their own, just aren’t very good. That’s what gravy and cranberry sauce are for. As Mary Risley from Tante Marie’s Cooking School humorously points out in the video below (which you should definitely watch, especially if you have any turkey-cooking anxiety), “I have never had an outstanding turkey.” (Heads up: this video contains some foul language) https://www.youtube.com/watch?v=foA0MGUbYH0 Short of purchasing a special turkey cooker (this is the one I have), it is near impossible to cook a turkey perfectly: the white meat always cooks before the dark meat is done, and the skin on the bottom is never crisp (unless you flip the hot, sputtering bird mid-way through cooking…ummm, no thank you). So is it really worth it to go to great lengths — brining in big coolers for days in the garage, risking life and limb deep-frying in the driveway, pre-icing the breast of the turkey so it cooks more slowly (I swear, there’s a very respectable cooking magazine that wants you to do this) — to make that be-all-and-end-all turkey? It’s up to you, but I’m not interested in babysitting my turkey for three days to get only marginally better results at the end. My advice to you on Thanksgiving is to keep it simple. Make an easy roast turkey recipe, like this dry-brined roast turkey, with an over-the-top delicious gravy and some cranberry sauce to go with it. (Or, if you really don’t want to stress, go ahead and buy your turkey already roasted!) Serve lots of wine and focus your time and creativity on the side dishes and desserts because that’s what everyone really looks forward to anyway. Wishing you a happy and stress-free Thanksgiving! ❤️ Note: This recipe has been written by Jenn Segal and republished on MudMatter with Author’s Permission. Please find the original link here – My Best Turkey Advice.