
Suggested for you
Sachin Tendulkar
@sachin_rt
Sachin Tendulkar
@sachin_rt
Sachin Tendulkar
@sachin_rt
Sachin Tendulkar
@sachin_rt
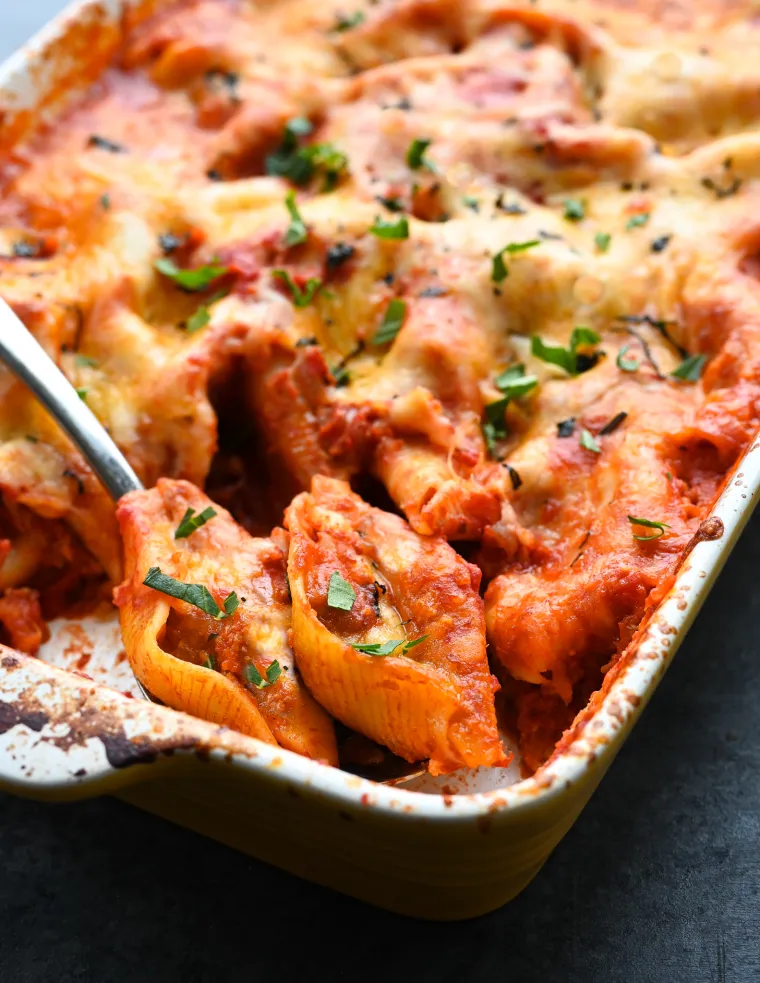
When I think of classic Italian stuffed shells, I think of cozy Sunday night dinners around the table with family. This recipe, adapted from Big Flavors from Italian America by America’s Test Kitchen, fits that bill perfectly. The recipe is fairly simple to make because there’s no need to parboil the shells before stuffing them. Instead, the shells are smothered in a thin tomato sauce prior to baking, ensuring the pasta cooks through. The filling is loaded with flavor, thanks to a blend of creamy ricotta, gooey fontina, and salty Pecorino Romano cheeses, as well as garlic, basil, and oregano. Finally, to make the dish even more irresistible, a generous sprinkle of fontina cheese over the shells creates a rich, cheesy topping. Even without any meat, this dish is as satisfying as the heartiest lasagna.
To stuff the shells, disposable pastry bags come in handy (and you can use them for decorating cakes and cookies or filling deviled eggs, too). However, if you don’t have them, a ziplock bag with a snipped corner does the job well.
What You’ll Need To Make Stuffed Shells
Step-by-Step Instructions
Step 1: Make the Sauce
Heat the oil in a large saucepan over medium heat until shimmering. Add the onion, salt, and pepper.
Cook, stirring occasionally, until softened and lightly browned, about 10 minutes. Stir in the garlic and red pepper flakes and cook until fragrant, about 30 seconds (don’t brown the garlic).
Stir in the crushed tomatoes, water, and sugar and bring to a gentle boil. Reduce the heat to medium-low and cook, uncovered, until flavors have melded, about 5 minutes. (The cooled sauce can be refrigerated for up to 3 days.)
Step 2: Make the Filling
Combine the ricotta cheese, shredded fontina (or whole-milk mozzarella) cheese, Pecorino Romano cheese, eggs, basil, cornstarch, garlic, oregano, and salt in a bowl.
Mix until thoroughly combined.
Transfer the filling to pastry bag or large zipper-lock bag. (If using a zipper-lock bag, be sure the corners are square; the rounded-corner bags are difficult to use.)
Step 3: Stuff and Bake the Shells
Adjust the oven rack to middle position and preheat the oven to 400°F. Place the shells open side up on the counter. Cut ½-inch off of the tip or corner of the bag.
Pipe the filling into shells until each is full.
Spread 1 cup of the sauce over the bottom of 9×13-inch baking dish. Transfer the shells, open side up, to the prepared dish.
Pour the remaining sauce evenly over the shells to completely cover.
Cover the dish tightly with aluminum foil. Bake until the shells are tender and the sauce is boiling rapidly, about 45 minutes. Remove the dish from the oven and discard the foil.
Sprinkle the fontina (or mozzarella) over top. Return to the oven and bake, uncovered, until the cheese is lightly browned, about 15 minutes.
Let the dish cool, uncovered, for 15 to 20 minutes (this rest is essential to fully cook the pasta).
Sprinkle with the basil and serve.
Please find original link here.
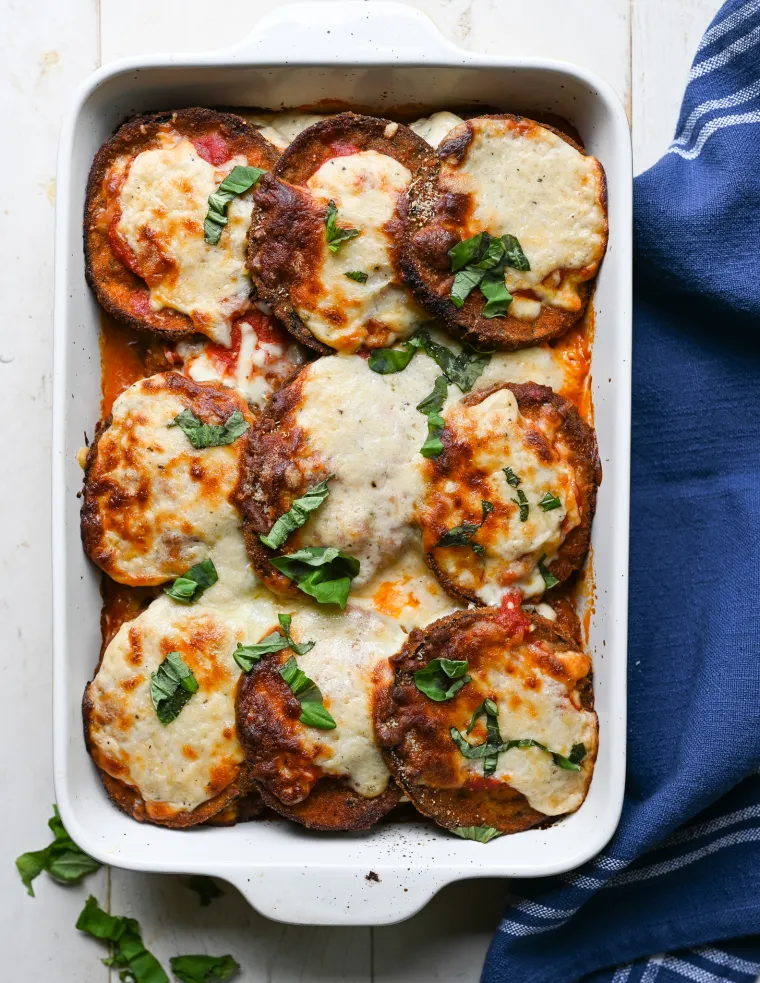
Eggplant Parmesan is a comforting layered casserole similar to lasagna, only with breaded and fried slices of eggplant replacing the noodles. The eggplant is shingled and layered in a baking dish with marinara sauce, mozzarella cheese, béchamel sauce, and Parmigiano Reggiano and then baked until bubbly and golden. The traditional preparation takes some time – particularly salting, breading, and frying the eggplant slices – but you can save time by using good-quality jarred marinara sauce. It’s very important to salt the eggplant for at least 90 minutes before frying – this not only seasons the eggplant from the inside out but also draws out the liquid so it absorbs less oil and gives it a creamy, silky texture.
You may be wondering if you can bake the eggplant instead of frying it. It will work if you use enough oil on the baking sheets, but I strongly recommend sticking with the traditional frying method, as it will give you the best result in terms of both flavor and texture. I serve eggplant parmesan as a main dish with a Caesar or green salad, but it can also be served as a side dish to meatballs, grilled steak, or Italian sausage.
What You’ll Need To Make Eggplant Parmesan
Step-by-Step Instructions
Step 1: Salt the Eggplant
In a large bowl, on a baking sheet, or directly on a cutting board, sprinkle 1 teaspoon of salt evenly all over the eggplant slices.
Lay out a few layers of paper towels on a large cutting board or baking sheet. Arrange about one-third of the eggplant slices in a single layer and cover with more paper towels. Continue stacking the eggplant and paper towels, finishing with a final layer of paper towels. Let sit for 1½ to 2 hours. Press on the paper towels to absorb any excess liquid before proceeding.
Step 2: Make the Béchamel Sauce
Béchamel sauce is not necessarily traditional in eggplant parmesan, but I love the richness it adds. It counters the acidity of the marinara sauce and also prevents the melted mozzarella cheese from turning rubbery.
Melt the butter in a small saucepan over medium heat, then add the flour.
Cook, whisking constantly, for 2 minutes.
Add the milk and whisk until evenly combined.
Bring to a boil, then reduce the heat to medium-low and simmer, whisking constantly, for 2 minutes, until the mixture thickens. Add the Parmigiano Reggiano, salt, and pepper.
Whisk to combine and set aside.
tep 3: Bread and Fry the Eggplant
Combine the flour and ¾ teaspoon salt on a large plate. Whisk the eggs with 2 tablespoons cold water in a wide bowl. Mix the breadcrumbs with ¾ teaspoon salt on a large plate.
Lightly coat each slice of eggplant in the flour, shaking off excess.
Dip in egg mixture, letting any excess drip off.
Then dredge in the breadcrumbs, pressing with your fingertips so the crumbs adhere. (Use one hand for the dry ingredients – the flour and breadcrumbs – and one for the egg mixture – it’s much neater this way!) Set the breaded eggplant slices on a baking sheet.
ine another baking sheet with a few layers of paper towels. Pour enough oil into a large (12-inch) skillet to measure about ¼-inch deep and heat over medium heat until hot (if you dip a piece of eggplant into the oil, it will sizzle immediately). Working in batches, add as much eggplant as will fit in a single layer.
Fry, flipping once, until golden brown, about 3 minutes per side.
Transfer to the paper towel-lined baking sheet. Repeat, frying the remaining eggplant and layering it between sheets of paper towels to drain.
Step 4: Assemble and Bake
Preheat the oven to 425°F and set an oven rack in the middle position.
Spread ¾ cup of the marinara sauce over the bottom of a 9×13-inch baking dish.
Layer in one-third of the eggplant slices, overlapping the slices to fit.
Cover the eggplant with another ¾ cup of marinara sauce.
Sprinkle with 1 cup of the mozzarella cheese, then spoon one-third of the béchamel sauce over the cheese (if the béchamel has solidified a bit, it’s fine to add it in dollops; no need to spread it around).
Repeat two more layers, leaving the edges of the eggplant exposed on the top layer to create crispy edges. Sprinkle with the Parmigiano Reggiano.
Bake until bubbling and golden brown, 30 to 35 minutes. Cool, loosely covered with foil, for about 20 minutes, then scatter the basil over top (if using), cut into slices, and serve.
Make-Ahead/Freezer-Friendly Instructions
Eggplant parmesan can be assembled up to 2 days before baking; it can also be frozen, baked, or unbaked, for up to 3 months. (If freezing, defrost in the refrigerator overnight prior to reheating/baking.)
Please find original recipe here.

An Italian-American dish that originated in the city of Philadelphia, stromboli is like a rolled-up version of pizza. Filled with cheese and Italian deli meats, like pepperoni, salami, and ham, and served with marinara sauce for dipping, it’s a huge crowd-pleaser – perfect for game day, an easy dinner, or anytime you’re having people over. Just keep in mind that stromboli disappears quickly; I recommend making two rolls, especially if you’re feeding men and boys.
I use my favorite homemade pizza dough to make stromboli, pizza, and calzones but store-bought dough works very well, too. Don’t worry if your stromboli bursts a little while baking; it’s normal for some cheese to ooze out of the crust. In fact, some say that the name for this dish was taken from Mt. Stromboli, one of the three active volcanos in Italy because the ingredients look like they are about to explode from a volcano.
What You’ll Need To Make Stromboli
Step-by-Step Instructions
On a lightly floured work surface, stretch and/or roll the dough into a 10×12-inch rectangle, about 1/4-inch thick.
Arrange the dough rectangle so the long side is closest to you. Brush the surface with the oil, leaving a 1-inch border around the edges. Spread the garlic evenly over the top of the oil, then sprinkle with the oregano, a pinch of red pepper flakes (if using), and the pecorino romano.
Shingle the provolone slices evenly over the pecorino romano, followed by the ham, mozzarella, and cured meats.
Brush the borders of the dough with the egg (reserve the remaining egg for brushing the top of the stromboli). Fold the bottom third of the stromboli in toward the middle.
Fold the top third of stromboli down to cover first fold, creating a wide log, like a folded letter. Pinch the seam tightly to seal.
Transfer the stromboli to the prepared baking sheet, seam side down. Pinch the ends tightly to seal and tuck underneath. Loosely cover the stromboli with plastic wrap and let rise at room temperature for 1 hour. (The stromboli won’t look much different after the rise; that’s okay.)
Preheat the oven to 375°F and set an oven rack in the middle position. Brush the top of the dough with the remaining egg. Using a sharp knife, make 5 evenly spaced 1/2-inch-deep slits, 1-1/2 inches long, on top of the stromboli.
Bake until golden brown, puffy, and bubbling, about 35 minutes (if you have a thermometer, the center should register 200°F). Some grease or cheese may bubble out of the sides and top; that’s normal. Use a paper towel to blot any excess grease on the baking sheet.
Let the stromboli cool on the baking sheet for 15 to 20 minutes, then transfer to a cutting board and cut into 1-inch-thick slices. Serve warm or at room temperature, with marinara sauce on the side (if using).
Please find original recipe here.
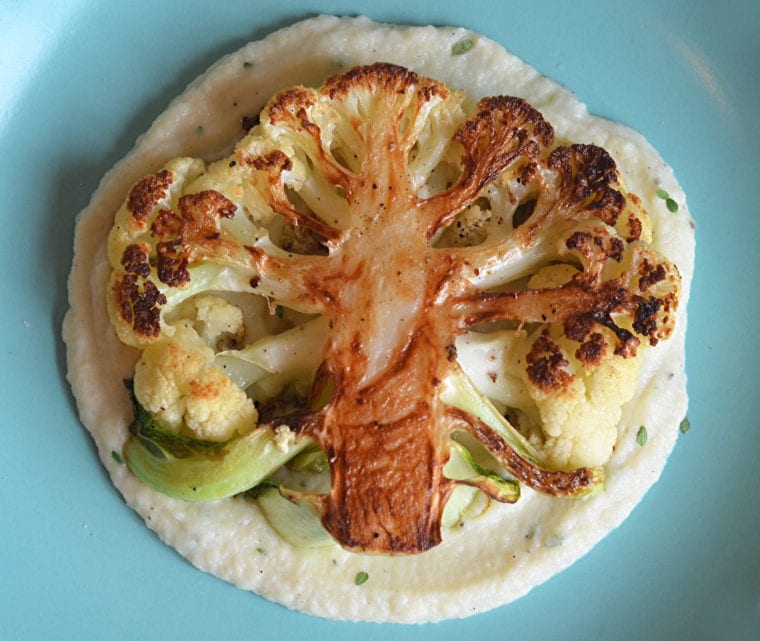
The idea for this recipe came to me after I discovered an amazing documentary series on Netflix called Chef’s Table, which debuted last year. Each episode of the show focuses on a world-renowned chef and gives an intimate view of their life, their restaurants and their journey to mastering their craft. It’s beautifully done and so inspiring — I binge-watched the entire first season in just a few days. You can watch the trailer below.
One of the featured chefs on the series is Dan Barber, the chef and co-owner of Blue Hill in Manhattan and Blue Hill at Stone Barns in Pocantico Hills, New York. After learning about him, I was eager to try some of his recipes; a quick Google search led me to his Cauliflower Steak with Cauliflower Purée in Bon Appétit and Food52’s Genius Recipes column. The recipe goes along with Barber’s nose-to-tail, whole-farm eating approach, as he uses the center of the cauliflower to make the “steaks” and the remaining florets to make the purée. I love the idea as a way to jazz up the trendy cauliflower steak, so I decided to feature my own slightly adapted version here.
What you’ll need to make Cauliflower steaks
How to make Cauliflower steaks
To begin, use a sharp knife to cut two 1-inch-thick slices from the center of the cauliflower. Cut the remaining florets into 1/2-inch pieces.
In a medium pot, bring the broth and 1/2 teaspoon of salt to a boil. Add the cauliflower and bring back to a boil.
Cover, reduce the heat to low and steam for about 15 minutes, or until cauliflower is very tender.
Use a slotted spoon to transfer the cauliflower to a food processor. Add 1/2 cup of the broth from the pot, along with the butter.
Process until smooth, then add the thyme and process until just combined.
Heat 1-1/2 tablespoons vegetable oil in a large ovenproof skillet over medium-high heat. Add the cauliflower steaks to the skillet, nice side down (whichever side is prettier), and then drizzle the cauliflower steaks with the remaining 1/2 tablespoon oil. Sprinkle each steak with 1/4 teaspoon salt and a few grinds of black pepper.
Cook until the first side is golden brown, 4-5 minutes. Flip the cauliflower steaks over and transfer the pan to the oven. Bake until tender, about 10 minutes.
Rewarm the cauliflower purée. Then, divide the purée between 2 plates, and top each with a cauliflower steak, nice side up.
Please find original recipe here.

Savor the classic flavors (and colors) of Italy with a crispy thin-crust Margherita pizza that rivals your favorite pizzeria!
Margherita pizza is a beloved Italian classic that traces its roots back to Naples, where it was first created in honor of Queen Margherita of Savoy. The story goes that during her visit to Naples in 1889, she was served a pizza featuring the colors of the Italian flag: red from tomatoes, white from mozzarella cheese, and green from fresh basil. This simple yet flavorful pizza quickly became a symbol of Italian pride and has since captured the hearts of pizza lovers around the world.
A traditional Margherita pizza is made with a few key ingredients: a rich tomato sauce, creamy mozzarella, fragrant basil leaves, and sometimes a sprinkle of grated Parmesan. While it's often baked in a wood-fired oven for that perfect crispy crust, you can easily recreate this delicious pizza at home with just a hot oven and a sheet pan. I recommend using a homemade pizza dough for the best results, though store-bought dough works just as well. The sauce is a quick, no-cook Neapolitan style made from canned San Marzano tomatoes, which you can prepare in just five minutes!
When making Margherita pizza, the key is simplicity. The magic is in the quality of the ingredients, so don't overload your pizza with too many toppings. A little sauce and cheese go a long way — too much can make the pizza soggy. Less is definitely more when it comes to this iconic pizza!
What You’ll Need To Make Margherita Pizza
Homemade pizza dough is ideal, but store-bought may be substituted (these dough balls weigh about 1 pound each).
San Marzano tomatoes are a variety of plum tomatoes that originate from the town of San Marzano sul Sarno, near Naples, Italy. They have a sweeter, less acidic, and more concentrated flavor than typical roma tomatoes. Many supermarkets carry them but don’t worry if you can’t find them; regular crushed tomatoes will work.
Look for a fresh mozzarella ball that is not packed in water. (Or, if the cheese is packed in water, be sure to dry it well.) Also, it’s important to use authentic Parmigiano Reggiano, which you can identify by looking at the rind, which is embossed with the name over and over. If the cheese is already grated, it should be labeled “Parmigiano Reggiano,” not “Parmesan.”
Step-By-Step Instructions
Make the sauce by combining the crushed tomatoes, olive oil, garlic, salt, pepper, and sugar in a small bowl.
Mix to combine. Alternatively, if you prefer a smoother sauce, you can blend the ingredients in a food processor or blender. (Note: This recipe makes enough sauce for four pizzas. You can refrigerate extra sauce for up to one week, or freeze for up to three months.)
On a lightly floured surface, using your hands, stretch and press one ball of dough into an 12-inch round.
Transfer the dough to a cornmeal-dusted baking sheet, and gently stretch it out again so that it maintains its shape.
Spread 1/4 cup + 2 tablespoons of the sauce over the dough, leaving a 1/2-inch border around the edges.
Slide the baking sheet into the oven and bake for 7 minutes, until the crust is partially cooked.
Remove from the oven, and scatter half of the mozzarella cubes over the sauce, followed by half of the Parmigiano-Reggiano.
Slide the pan back into the oven and cook until the crust is golden brown and the cheese is melted and bubbling, about 4 minutes more.
Remove the pizza from the oven and transfer to a cutting board. Sprinkle with the basil and slice. Repeat with the remaining pizza dough and ingredients. (If you’d like to bake the two pizzas at the same time, you can fire up two ovens. Or, if you don’t mind the crust a little thicker, you can form the two dough balls into 8×12-inch rectangles and place them side by side on the baking sheet.)
Please find original recipe link here.
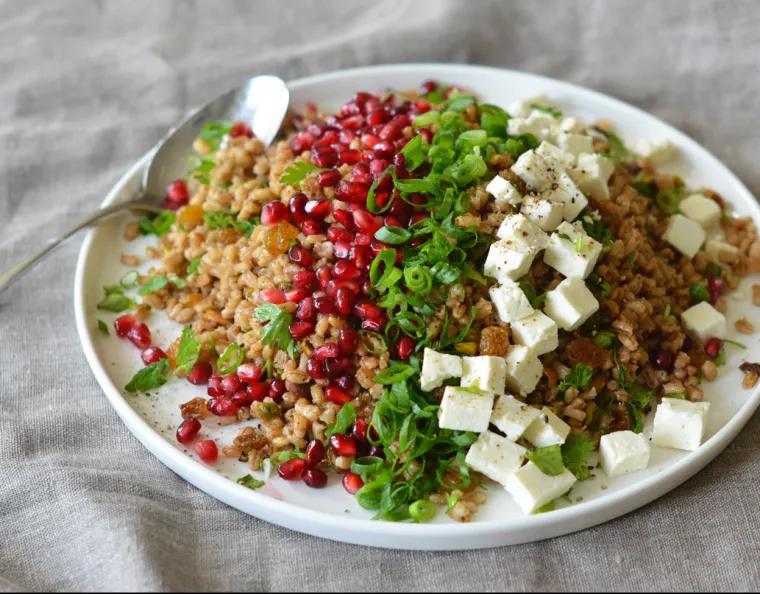
Inspired by the flavors of Egypt, this gorgeous barley salad is adorned with feta, scallions, pistachios, raisins and pomegranate seeds.
Modestly adapted from The Complete Make-Ahead Cookbook from America’s Test Kitchen, this Middle Eastern barley salad incorporates crunchy pistachios, tangy pomegranate molasses, earthy spices, and sweet golden raisins. Salty feta, scallions, and juicy pomegranate seeds adorn the top of the dish, making a gorgeous composed salad with lively flavors and textures. It’s a wonderful dish to keep in the fridge for healthy lunches, and it also makes a festive-looking potluck dish for the holidays.
What you’ll need to make Egyptian Barley Salad
Step-by-Step Instructions
Begin by cooking the barley. In order for the grains to remain distinct, rather than cohesive as in a pilaf, America’s Test Kitchen uses the “pasta method” to boil the barley.
Drain the barley, then spread it on a rimmed baking sheet to cool.
Meanwhile, make the dressing by whisking together the olive oil, pomegranate molasses, lemon juice, sugar, cinnamon, cumin, and salt. (Note that pomegranate molasses is sold at some large grocers, Whole Foods, or Middle Eastern markets. You can also buy it online.)
Toss with the cooled barley, cilantro, raisins, and pistachios.
Spread the barley salad evenly onto a serving platter and arrange feta, scallions, and pomegranate seeds in diagonal rows on top. Drizzle with extra olive oil and serve.
Find original recipe link here.
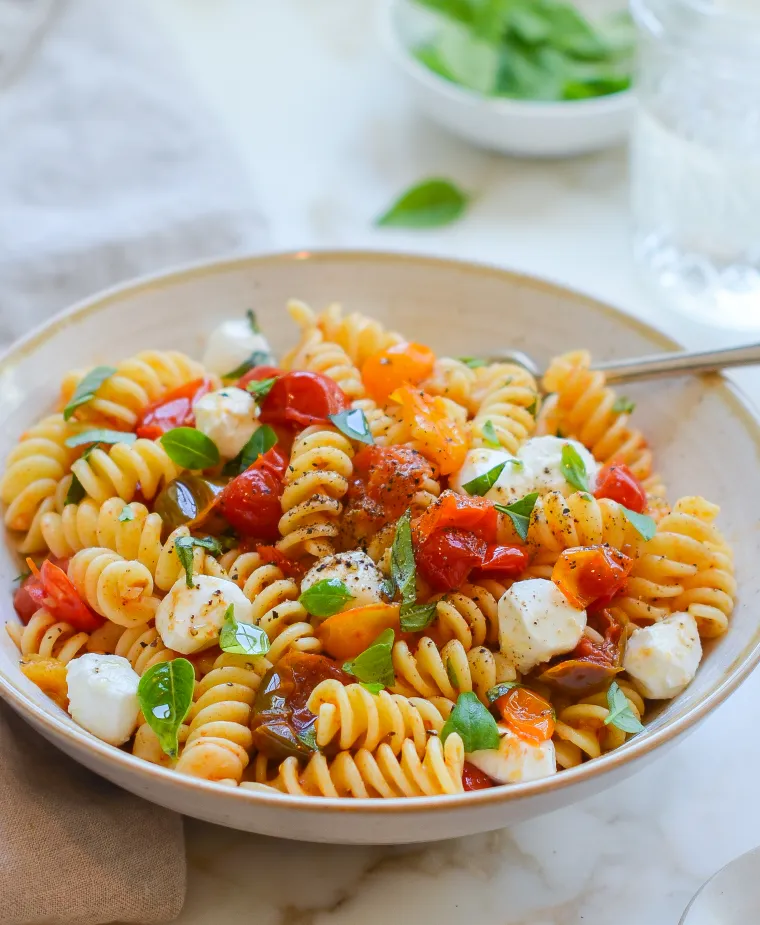
Simple yet spectacular, this fusilli alla Caprese requires just a handful of ingredients, comes together quickly, and is delicious hot or cold.
Sometimes cooking weeknight dinners can feel like a chore, but when a dish is as simple and spectacular as this one, it can be therapy. Adapted from Giada De Laurentis, fusilli alla Caprese calls for just a handful of good-quality ingredients – and the sauce cooks in less time than it takes to boil the pasta! What’s more, it’s delicious cold, should you have any leftover. Thank you to my dear friend Kelly Santoro for sharing the recipe with me.
What You’ll Need To Make Fusilli Alla Caprese
Since the recipe calls for so few ingredients, it’s important not to skimp on quality. You’ll need good extra-virgin olive oil, fresh minced garlic (no jarred stuff!), sweet cherry tomatoes, fresh basil, and fresh mozzarella.
Fusilli is the ideal pasta shape for this recipe – because of its corkscrew shape, the sauce clings nicely to it. But if you’re unable to find fusilli in your store, rotini, penne, or farfalle pastas are all good alternatives.
If your store happens to carry packages of assorted colors of cherry tomatoes, I love the color they add to the dish; if not no worries – it will still be lovely.
For the cheese, I like to use mozzarella pearls; these are the tiniest mozzarella balls, named for their size. Most large supermarkets carry them conveniently packaged in 8-oz pouches but, if you can’t find them, simply buy a ball of fresh mozzarella and dice it into cubes.
How To Make Fusilli Alla Caprese
Begin by boiling the fusilli until al dente. You’ll need to reserve 1/2 cup of the cooking water to use in the sauce. It’s easy to forget when you drain the pasta, so I always set out a liquid measuring cup as a visual reminder.
Next, use a small serrated knife to halve the cherry tomatoes.
Make the sauce: in a large skillet, heat the olive oil over medium heat. Add the garlic and sauté until fragrant, 1 to 2 minutes; do not burn.
Add the halved tomatoes, salt, and pepper and increase the heat to medium-high.
Cook, stirring occasionally, until the tomatoes start to soften and burst, 4 to 5 minutes.
Using a fork, smash the tomatoes into a chunky sauce.
Add the drained fusilli to the pan and toss to combine.
Right before serving, toss in the basil and mozzarella pearls. (It’s important to do this at the last minute so the cheese doesn’t melt too much.)
Taste and adjust seasoning, adding the reserved pasta water little by little if the pasta seems dry. Spoon into bowls and serve.
Please find original recipe link here.
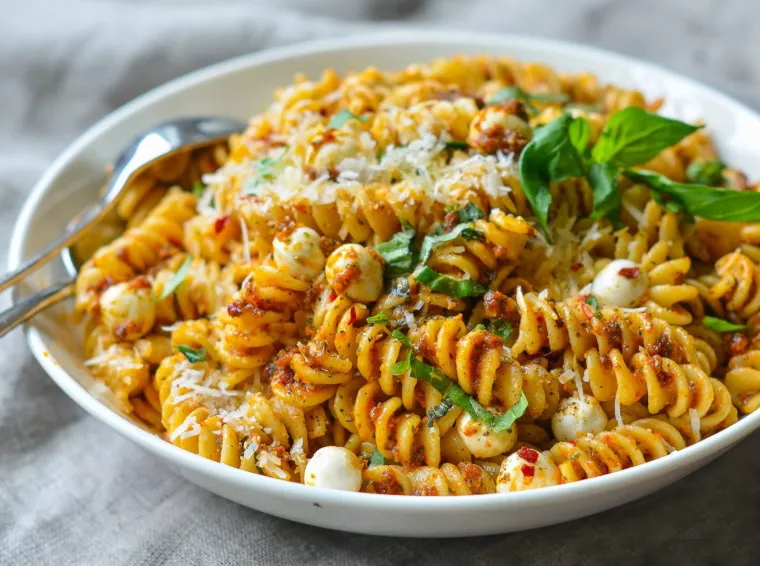
Quick, simple and family-approved — this pasta with sun-dried tomato pesto and fresh mozzarella pearls is delicious hot or cold.
Quick, simple, and family-approved, this pasta with sun-dried tomato pesto and fresh mozzarella pearls makes a fabulous weeknight supper, and it also doubles as a vibrant pasta salad for a cookout. Pair it with a simple arugula salad and warm crusty bread. Or for a more substantial meal, grill some Italian sausages to serve alongside. The pesto yields enough for two dinners, and it freezes nicely, too.
What you’ll need to make pasta with sun-dried tomato pesto
STEP-BY-STEP INSTRUCTIONS
To begin, bring a large pot of salted water to a boil. (Add enough salt so that the water tastes like the sea.) Cook the pasta according to the package instructions until al dente. You’ll need to reserve some of the cooking water for the sauce. It’s easy to forget to do this, so I always set a liquid measuring cup out as a visual reminder.
Meanwhile, make the pesto. In the bowl of a food processor fitted with the steel blade, combine the sun-dried tomatoes with their oil, garlic, salt, red pepper flakes, sugar, basil, pine nuts, Parmigiano-Reggiano and olive oil.
Pulse, scraping down the sides as necessary, until the mixture is finely puréed. Divide the mixture in half. Set aside.
Reserve about 1 cup of the pasta cooking water (you’ll need it for the sauce), then drain the pasta.
Add the pasta back to the pan. Add half of the pesto and stir to combine, adding the reserved pasta water little by little, until the pasta is well-coated and moistened. I usually use about 3/4 cup of the pasta water, but you may need more or less. (Refrigerate or freeze the remaining pesto for another meal.)
Taste and adjust seasoning with more salt and red pepper flakes, if necessary. Right before serving, toss in 2 tablespoons chopped basil and the mozzarella pearls (it’s important to do this right before serving so the cheese doesn’t melt from the heat of the pan).
Transfer to a serving dish or pasta bowls and serve with more grated Parmigiano-Reggiano.
Please find original recipe link here.
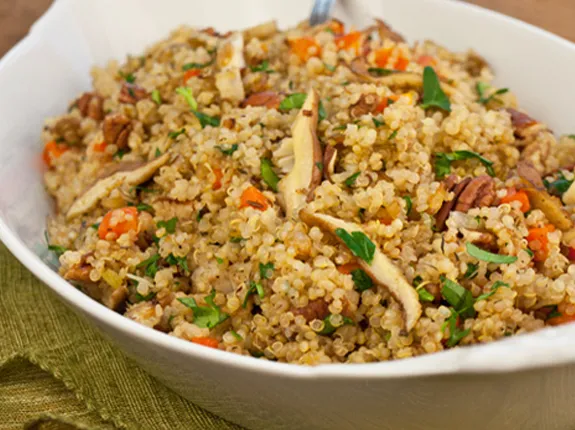
This quinoa pilaf is gussied up with sautéed onions, carrots, shiitake mushrooms and pecans. It makes an earthy and hearty dish.
This quinoa pilaf is the kind of dish that will remind you that eating healthy doesn’t have to leave you hungry. It’s one of the reasons I love quinoa (pronounced keen-wah). It looks like couscous and eats like a grain but it’s actually the tiny seed of a plant related to leafy greens like spinach and Swiss chard.
Quinoa is incredibly high in protein and fiber and contains all of the essential amino acids your body needs. What’s more? It’s gluten-free, cooks quickly (just 15 minutes!) and can take on limitless flavors. Here, the quinoa is gussied up with sautéed onions, carrots, shiitake mushrooms, and pecans to make an earthy and hearty dish.
What you’ll need to make Quinoa Pilaf
One of the secrets to making delicious quinoa is to ignore the instructions on the package, which almost always call for too much liquid and result in mushy quinoa. For quinoa that is light, fluffy and slightly crunchy, the ideal ratio is 1 cup quinoa to 1-2/3 cup liquid.
How to make quinoa pilaf
To begin, bring the chicken broth and quinoa to a boil, then cover the pot and simmer for 15 minutes. It will look like this when it’s done…
In the meantime, cook the onions gently in olive oil until they start to soften.
Add the diced carrots and thyme and continue to cook until the carrots are just tender.
Next, stir in the shiitake mushrooms and garlic, and continue cooking until the mushrooms are done.
Finally, stir in the cooked quinoa, pecans, and parsley.
That’s all there is to it. Transfer to a serving dish and enjoy as a hearty side or meatless main course.
Enjoy.
Please find original recipe link here.
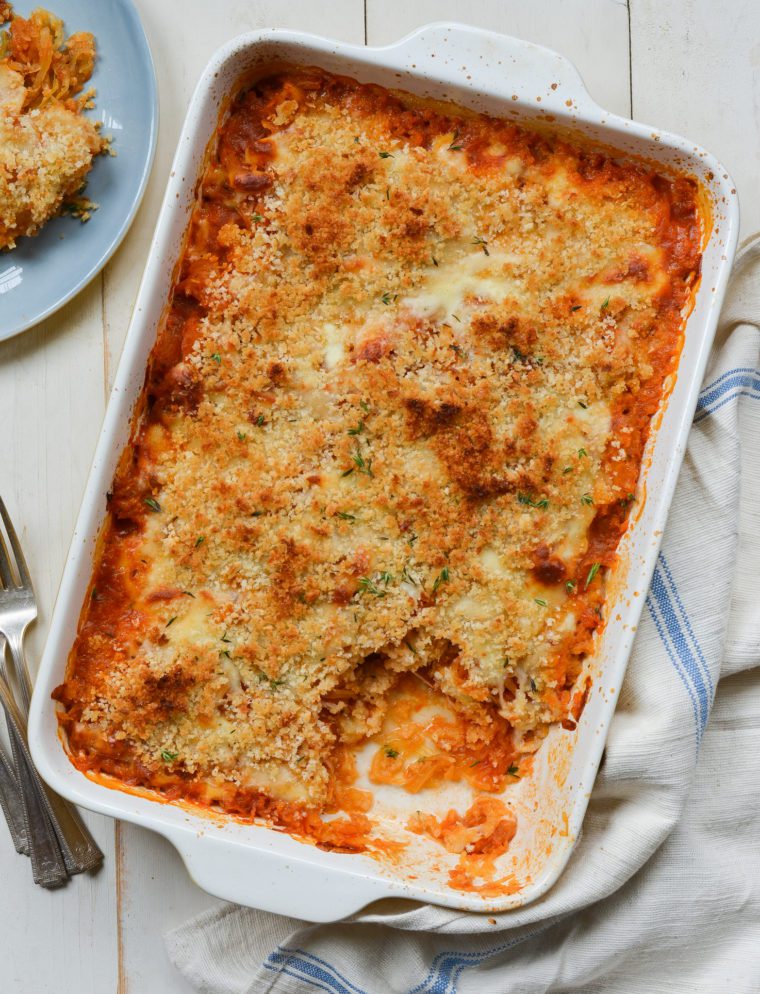
This cheesy spaghetti squash casserole is vegetarian comfort food.
Spaghetti squash is a gift from the diet gods. When roasted, it miraculously transforms into low-carb, low-cal, spaghetti-like strands. Here, I toss it with good-quality jarred marinara sauce, top it with shredded cheese and crispy bread crumbs, and bake it until gooey and golden brown. The casserole makes a comforting vegetarian main course or side dish for meatballs or Italian sausage.
If you’ve never cooked spaghetti squash, it can be a little intimidating because it’s one of those large, awkward vegetables you’re not quite sure how to go at. For this recipe, I use two medium squash rather than one large one, as the smaller squash are easier to cut. I also sharpen my chef’s knife before I get started; it makes all the difference. (Pro tip: you’re much more likely to cut yourself with a dull knife than a sharp one. I use an electric knife sharpener regularly to keep my knives in tip-top shape.)
What You’ll Need To Make Cheesy Baked Spaghetti Squash
Step-by-Step Instructions
Step 1: Prep the Spaghetti Squash
Using a very sharp chef’s knife, cut a sliver off of the stem end of each squash (this creates a flat surface to cut the squash in half).
Stand each squash upright on a cutting board and slice through them top to bottom to cut each squash in half (use your body weight to press the knife down).
Using a soup spoon, scrape out the seeds and discard them.
Step 2: Roast the Spaghetti Squash
Place the squash halves cut-side-up on a foil-lined baking sheet. Drizzle with the oil and sprinkle evenly with 1 teaspoon salt and 1/2 teaspoon pepper.
Flip the squash halves so they are cut-side-down.
Roast for 40 to 50 minutes, or until the squash is golden brown underneath and the flesh is tender when pierced with a fork. You should be able to scrape the strands away from the skin easily. Flip the squash halves so they are cut-side-up, and let sit until cool enough to handle.
Use a fork to scrape out and fluff the strands.
Step 3: Toss the Spaghetti Squash with Sauce and Seasonings
Increase the oven temperature to 425°F. Place the strands in a large bowl. Add the marinara sauce, 3/4 teaspoon salt, 1/4 teaspoon pepper, and thyme.
Toss gently until the squash is evenly coated. Taste and add adjust seasoning if necessary.
Step 4: Assemble and Bake
Transfer the mixture to a 9 x 13-inch baking dish.
Sprinkle the mozzarella cheese evenly over top, followed by the Parmigiano-Reggiano.
In a small bowl, combine the melted butter with the panko, and mix until the panko is evenly coated.
Sprinkle the panko mixture evenly over the cheese.
Bake for 25 to 30 minutes, or until the top is golden.
Let cool for a few minutes, then sprinkle with more fresh thyme and serve.
Please find original recipe link here.