Articles contributed by the community, curated for your enjoyment and reading.
Filters
Reset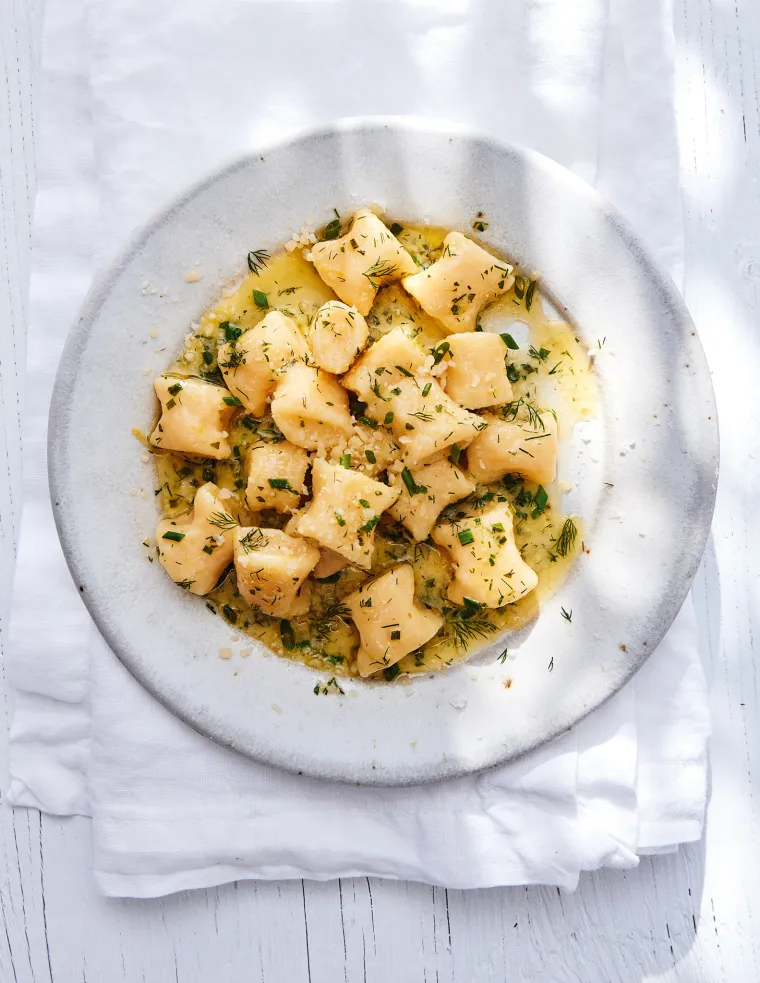
Ricotta Gnocchi
This seriously delicious and oh-so-easy ricotta gnocchi recipe is just one gem among many in Catherine McCord’s new cookbook, Meal Prep Magic: Time-Saving Tips for Stress-Free Cooking. Packed with wholesome, easy-to-follow recipes the whole family will love, this book will change the way you think about preparing meals—say goodbye to mealtime stress, hello to being more organized, and enjoy more quality time with loved ones. As someone who’s admittedly right-brained and organizationally-challenged, I found this book to be both inspiring and incredibly practical. And that color-coded refrigerator on the cover? Now, that’s some serious fridge goals! Ricotta Gnocchi Unlike the more commonly known potato gnocchi, ricotta gnocchi is quick and easy to make and requires no special equipment. Potato gnocchi is made from boiled, riced potatoes combined with flour and egg. This dough is then rolled into ropes, cut into bite-sized pieces, and pressed with a fork to create ridges that can catch sauce. It has a soft and somewhat chewy texture, with a mild flavor that works well with a wide variety of sauces. Ricotta gnocchi substitutes ricotta cheese for the potatoes, resulting in a lighter, creamier texture. The preparation process is similar to potato gnocchi, but it’s much simpler to make — no need to cook, peel or rice potatoes! However, keep in mind that the moisture content of the ricotta can make the dough a bit tricky to handle. It’s important to use a good quality, well-drained ricotta to avoid overly wet dough (I use the widely available Galbani brand). Please find original article here.

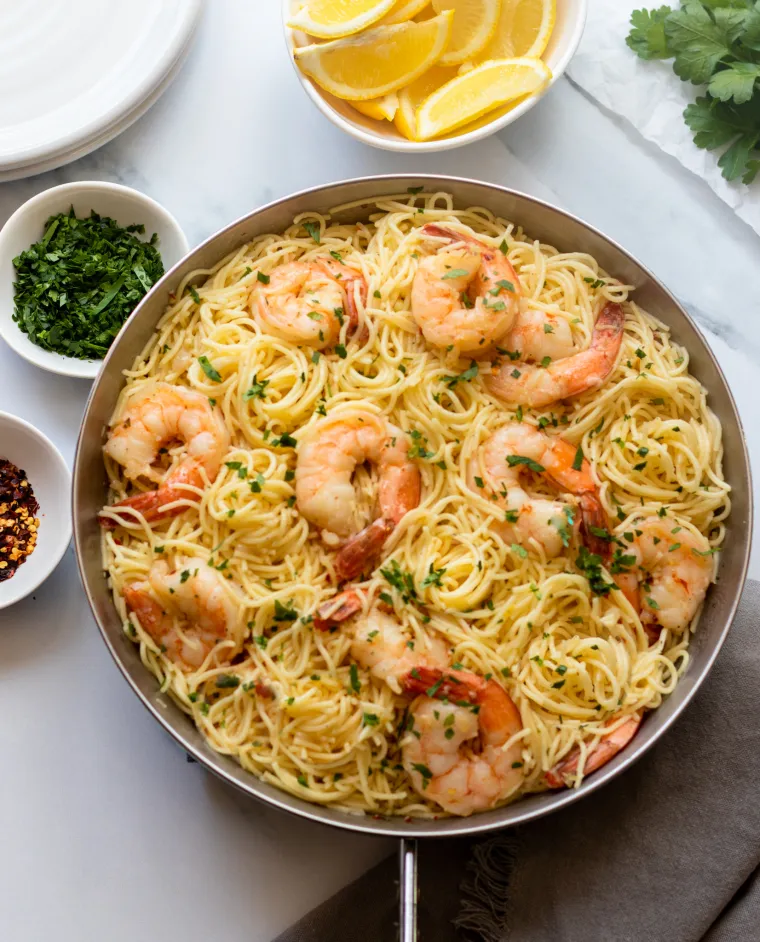
Shrimp Scampi with Pasta
Succulent shrimp bathed in a garlicky, white wine and lemon-infused butter sauce — shrimp scampi makes an excellent sauce for pasta. However, in many recipes, the pasta is more of an afterthought, left in need of more flavor and sauce. In this version, both the pasta and the shrimp share the spotlight equally. While you could certainly use any long pasta — think spaghetti, linguine, or fettuccine — my preference is for angel hair or capellini. The thin, delicate strands have a knack for soaking up the garlicky sauce, packing maximum flavor into every bite. Speaking of garlic, the recipe demands a generous six cloves, so if your garlic press has been gathering dust, now’s the time to break it out and put it to work! Making shrimp scampi with pasta is fairly simple, but it’s important to watch the shrimp’s cooking time. If you cook them for too long, they can become rubbery. The trick is to take them off the heat as soon as they turn opaque and pink. What You’ll Need To Make Shrimp Scampi with Pasta Pro Tip: When a recipe calls for wine, select a bottle that is inexpensive but still good enough to drink. If you don’t want to open a large bottle, look for mini bottles that are sold in four-packs and contain about ¾ cup (160ml) of wine per bottle; they are ideal for cooking. Always avoid “cooking wines,” as they contain salt and other additives. Step-by-Step Instructions Bring a large pot of salted water to a boil. Add the pasta and cook to al dente according to the package instructions. Reserve 1 cup of the cooking water, then drain. Pro Tip: Most pasta recipes suggest reserving some of the pasta water before draining. This cooking water serves an important purpose. When pasta is cooking, it releases some of its starch, and that starchy, salty water makes a great thickener for sauces. If you’re concerned you may forget to save the cooking water, put a measuring cup in your colander. That way, when you go to drain the pasta, you’ll have that visual reminder. Meanwhile, heat the oil in a large skillet over medium heat. Add the shallots and cook, stirring frequently, for about 1 minute. Stir in the garlic, red pepper flakes, and ¼ teaspoon each salt and pepper. Add the shrimp and cook, stirring occasionally, until they are pink and just cooked through, about 3 minutes. Transfer the shrimp to a plate. Add the wine to the skillet and simmer until reduced by half, 3 to 4 minutes. Add the butter, lemon juice, and lemon zest, ½ cup of the reserved cooking water, and ½ teaspoon salt. Stir until the butter is melted. Add the drained pasta and continue to cook, tossing, until the pasta is warmed through, adding more of the reserved cooking water as needed if the pasta seems dry. Return the shrimp and any juices from the plate to the skillet and toss with the pasta. Stir in the parsley, then taste and adjust seasoning, if necessary. Serve with lemon wedges. Please find original recipe here.
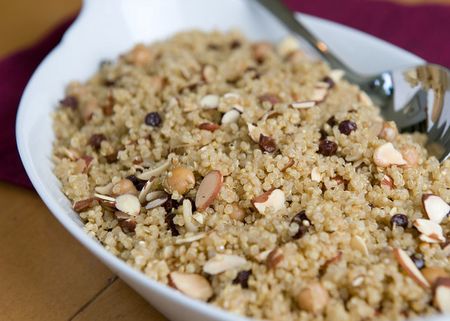
Quinoa Pilaf with Chickpeas, Currants & Almonds
Leery of health foods with names you can’t pronounce? Me too, which is why it took me so long to discover quinoa (pronounced keen-wah), otherwise known as the “Supergrain of the Future.” What you’ll need to make quinoa pilaf with chickpeas, currants, and almonds Here I’ve taken a page from the aromatic couscous dishes of North Africa, flavoring it with onions, garlic, chicken broth, and spices, then adding currants, chickpeas, and toasted almonds. It’s a terrific accompaniment to any simply prepared entrée…and it’s just as good cold for lunch or a picnic. If you’re at all hesitant about using curry powder or cumin, not to worry…the flavors here are very mild and work well together. The currants and honey complement the spices with a touch of delicious sweetness, and the chickpeas and almonds add protein and crunch. Give it a try. My husband loves it, and he has no idea how good it is for him. Please find original recipe link here.
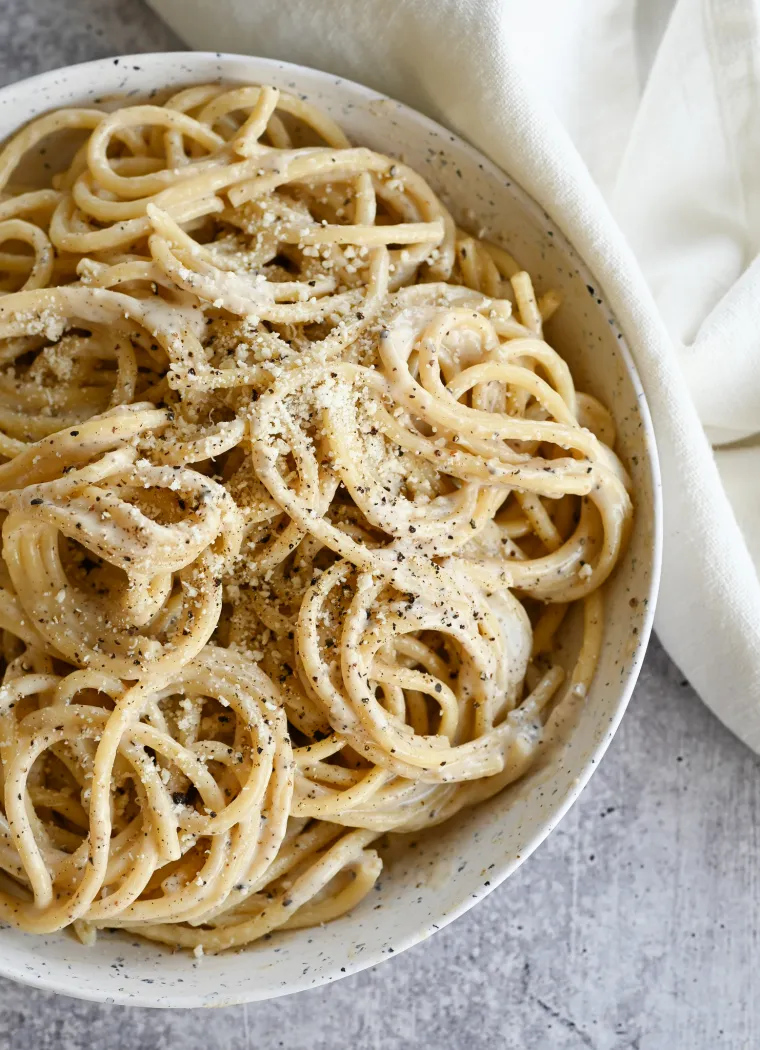
Cacio e Pepe
One of the simplest pasta dishes in existence, cacio e pepe is a Roman dish that translates to “cheese and pepper” (it’s pronounced kaa-chee-ow-ee-peh-pay). It is traditionally made from just three ingredients – coarsely grated black pepper, finely grated Pecorino Romano cheese, and pasta – but many versions also call for a bit of olive oil, butter, or cream. The magic happens when some of the starchy, salty pasta cooking water is added to these basic ingredients to make a rich, creamy sauce. Think of it as an uncomplicated, peppery Italian mac and cheese. This version is adapted from That Noodle Life: Soulful, Savory, Spicy, Slurpy, a deliciously fun new cookbook by Mike and Stephanie Le from iamafoodblog. The recipe feeds two since it’s the perfect no-food-in-the-house dinner or late-night snack to throw together on a whim, but it can easily be doubled. The original recipe in the book is made using the traditional method of slowly adding the cheese and pasta water to the cooked noodles, stirring constantly to emulsify the sauce. This technique takes practice, as the cheese tends to clump up and stick to the pan if it gets too hot. To ensure a creamy sauce, I borrow a trick from Italian chef Luciano Monosilio and blitz the pasta water and cheese in a blender before adding it to the pasta. You still have to be careful not to overheat the sauce, but not nearly as much so. What You’ll Need To Make Cacio e Pepe Pasta: The recipe calls for either bucatini (also known as perciatelli) or spaghetti. Bucatini resembles spaghetti but is slightly thicker and has a small hole that runs through the center, so it is essentially hollow spaghetti (buco actually translates to “hole”). Bucatini is ideal for soaking up the sauce, but spaghetti is a great alternative if you can’t find it. Cheese: Pecorino Romano is a salty, sharp-flavored cheese made from sheep’s milk. It can be found in most supermarkets near the Parmigiano-Reggiano. While the two cheeses are sometimes interchangeable in recipes, I recommend sticking with the Pecorino Romano here, as it has a bolder flavor. Pepper: Make sure to use freshly ground black pepper – it’s significantly more flavorful than pre-ground pepper – and set your grinder to the coarsest setting. As for the amount, I’ve given a range depending on how peppery you like your pasta. Butter: While not a traditional ingredient in cacio e pepe, the butter is used to “bloom” the fresh ground pepper before mixing it in with the pasta. It also makes for a creamier sauce without diluting the other flavors. Step-by-Step Instructions In a Dutch oven or large pot, bring 2 quarts of water and 1 teaspoon of salt to a boil. Add the pasta and cook according to package instructions until al dente. Reserve 1 cup of the pasta cooking water and drain. Set the same pot over low heat and melt the butter. Add the pepper. Cook, stirring constantly, until fragrant, about 1 minute. Add the drained pasta to the pot and toss to coat evenly. Remove the pot from the heat. In a blender, combine the cheese and ⅔ cup of the pasta cooking water. Blend until smooth and creamy, 10 to 15 seconds. Add the sauce to the pasta in the pot and toss with tongs. Place the pot back over low heat and cook, stirring constantly with the tongs, until the sauce is the consistency of a thin cream sauce, a few minutes. Add more of the reserved pasta water to thin the sauce only if necessary. Be careful at this stage: if the sauce gets too hot, it will start to clump up and stick to the pot and tongs. Once the sauce is the right consistency, immediately transfer the pasta to bowls and serve. Pass more cheese and pepper at the table, if desired. Please find original recipe link here.
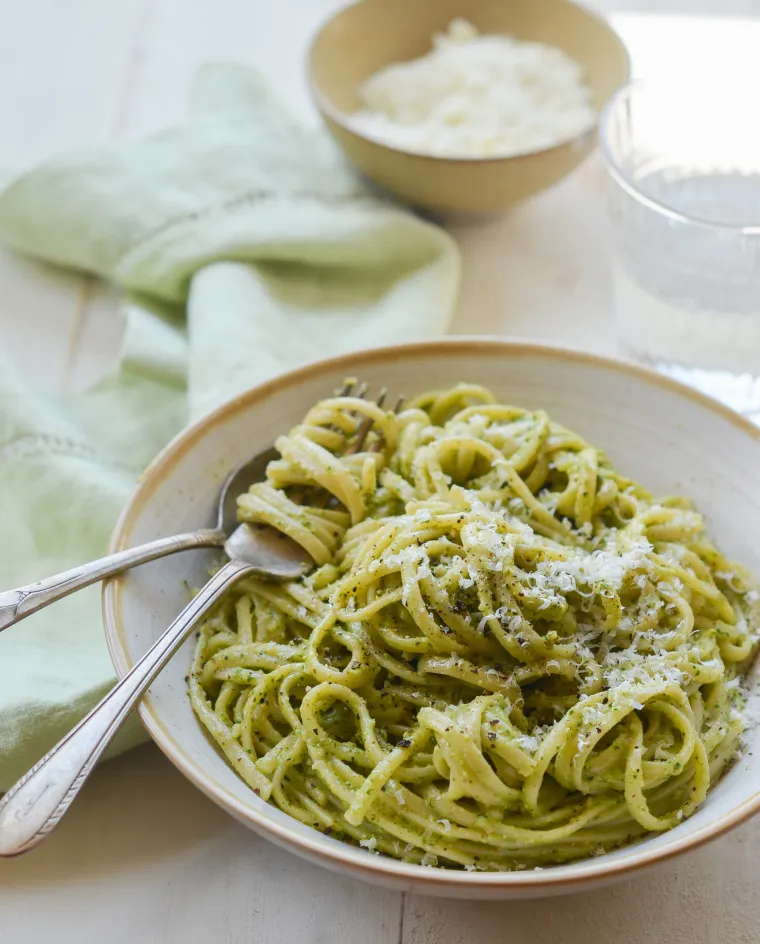
Linguine with Creamy Arugula Walnut Pesto
I love Anne Burrell’s recipes, and this pasta dish, adapted from her cookbook Cook Like a Rock Star: 125 Recipes, Lessons, and Culinary Secrets (Clarkson Potter, 2011), is one of my favorites. It’s a creamy twist on pesto pasta, and it’s super quick to make — you can have it on the table in 25 minutes, tops. While the pasta cooks, you whip up a pesto with toasted walnuts, peppery arugula, sharp cheese, and garlic. When the pasta is ready, you toss it with the pesto, a bit of cream, and some of the pasta cooking water for a lusciously rich and flavorful dish. What You’ll Need To Make Linguine with Creamy Arugula Walnut Pesto Step-By-Step Instructions Bring a large pot of salted water to a boil. Add the linguine and cook according to package instructions until al dente. Meanwhile, place the walnuts on the prepared baking sheet and bake for 6 to 7 minutes, or until fragrant. In a food processor, combine the toasted walnuts, arugula, garlic, pecorino Romano, Parmigiano Reggiano, salt, and pepper. Process until the mixture resembles a coarse paste. While the machine is running, drizzle in the olive oil through the feed tube until the mixture is mostly smooth. Reserve about 1½ cups of the pasta cooking water, then drain the linguine in a colander. Combine the pesto, cream, 1/2 cup of the cooking water, and drained linguine in a large saucepan. Toss over medium heat until the pasta is evenly coated with the sauce and warmed through. Add more pasta water as necessary to thin the sauce. Serve immediately and enjoy! Please find original recipe here.
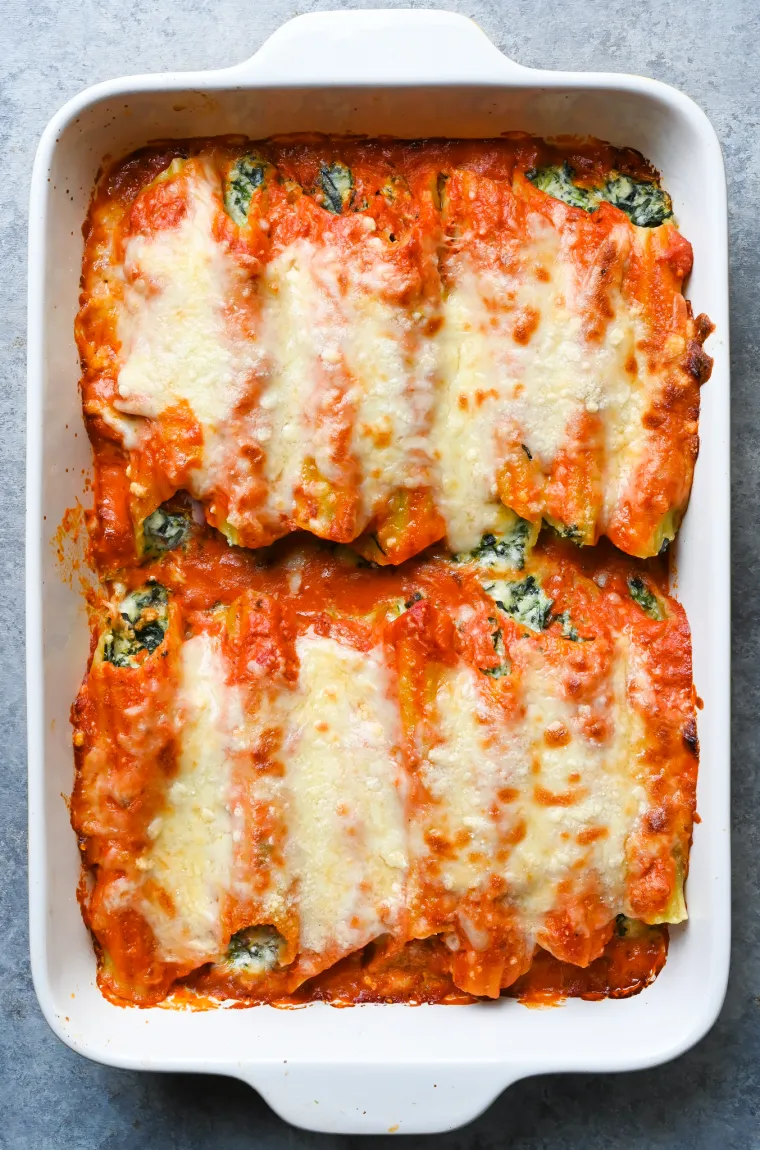
Spinach Manicotti
Looking for an easy way to elevate your traditional spinach manicotti recipe? I have a wonderful recipe that incorporates a few shortcuts and cooking tricks that take this classic dish to the next level without any extra work for you. First, I add heavy cream to good-quality jarred marinara sauce, creating a rich tomato sauce that pairs perfectly with the cheesy spinach filling. It’s as easy as opening a jar and a carton! Next, I add creamy mascarpone, mozzarella, and sharp Pecorino Romano cheeses to the traditional ricotta and spinach filling. This not only adds delicious flavor but also prevents the filling from becoming grainy, which is a common issue with pasta dishes made with ricotta cheese. Fun fact: the word “manicotti” means “little sleeve” in Italian, describing the cylindrical shape of the pasta tubes. It’s a great prep-ahead dish to pop in the oven when you’ve got company coming or simply for enjoying with family. Pair it with a salad and some crusty bread for a cozy and satisfying meal. What You’ll Need To Make Spinach Manicotti Step-by-Step Instructions Step 1: Parboil the Manicotti Shells Bring a large pot of salted water to a boil. Cook the manicotti shells for exactly 6 minutes (they will only be partially cooked). Drain well and rinse with cold water. Add the ricotta, mascarpone cheese, 1 cup of the mozzarella, 1 cup of the Pecorino Romano, the spinach, basil, garlic, oregano, and salt. Mix until evenly combined. Transfer the filling to a pastry bag or large zip-lock bag. (If using a zip-lock bag, be sure the corners are square; the rounded-corner bags are difficult to use.) Twist and squeeze the bag so the filling is in one corner. With scissors, snip a ¾-inch opening in corner. Pipe the filling into both ends of the manicotti shells, filling until completely full. Step 3: Make the Sauce In a large bowl, combine the marinara sauce and heavy cream. Mix to combine. Transfer the filling to a pastry bag or large zip-lock bag. (If using a zip-lock bag, be sure the corners are square; the rounded-corner bags are difficult to use.) Twist and squeeze the bag so the filling is in one corner. With scissors, snip a ¾-inch opening in corner. Pipe the filling into both ends of the manicotti shells, filling until completely full. Step 3: Make the Sauce In a large bowl, combine the marinara sauce and heavy cream. Mix to combine. Step 4: Assemble & Bake Spread ¾ cup of the sauce into a 9×13-inch baking dish. Arrange the stuffed manicotti shells, narrow side up, over the sauce. Pour just enough sauce to cover the manicotti (you’ll have about ¾ cup leftover; save it for serving). Cover the dish tightly with aluminum foil. Bake for 35 minutes. Uncover and top the manicotti with the remaining 1 cup mozzarella and ¼ cup Pecorino Romano cheeses. Bake, uncovered, for 10 to 15 minutes more, until the cheese is melted and lightly golden. (To brown the cheese further, turn on the broiler and bake for a few more minutes, keeping a close eye, until the cheese is golden.) Let sit for about 10 minutes before serving. Please find original recipe here.
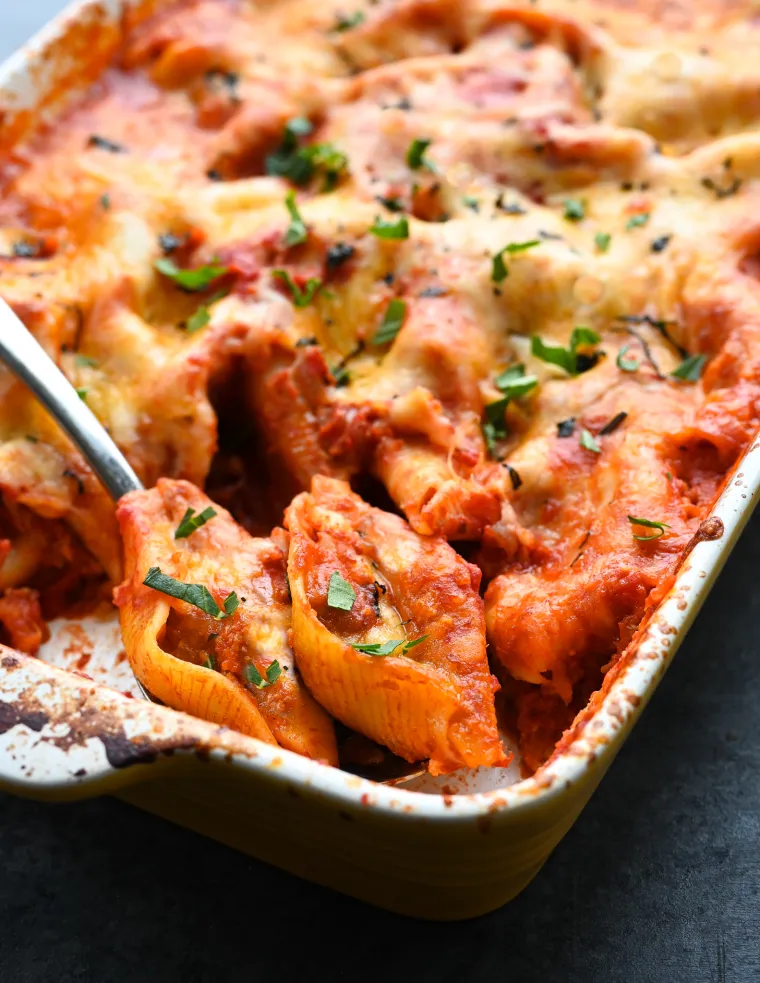
Cheesy Stuffed Shells
When I think of classic Italian stuffed shells, I think of cozy Sunday night dinners around the table with family. This recipe, adapted from Big Flavors from Italian America by America’s Test Kitchen, fits that bill perfectly. The recipe is fairly simple to make because there’s no need to parboil the shells before stuffing them. Instead, the shells are smothered in a thin tomato sauce prior to baking, ensuring the pasta cooks through. The filling is loaded with flavor, thanks to a blend of creamy ricotta, gooey fontina, and salty Pecorino Romano cheeses, as well as garlic, basil, and oregano. Finally, to make the dish even more irresistible, a generous sprinkle of fontina cheese over the shells creates a rich, cheesy topping. Even without any meat, this dish is as satisfying as the heartiest lasagna. To stuff the shells, disposable pastry bags come in handy (and you can use them for decorating cakes and cookies or filling deviled eggs, too). However, if you don’t have them, a ziplock bag with a snipped corner does the job well. What You’ll Need To Make Stuffed Shells Step-by-Step Instructions Step 1: Make the Sauce Heat the oil in a large saucepan over medium heat until shimmering. Add the onion, salt, and pepper. Cook, stirring occasionally, until softened and lightly browned, about 10 minutes. Stir in the garlic and red pepper flakes and cook until fragrant, about 30 seconds (don’t brown the garlic). Stir in the crushed tomatoes, water, and sugar and bring to a gentle boil. Reduce the heat to medium-low and cook, uncovered, until flavors have melded, about 5 minutes. (The cooled sauce can be refrigerated for up to 3 days.) Step 2: Make the Filling Combine the ricotta cheese, shredded fontina (or whole-milk mozzarella) cheese, Pecorino Romano cheese, eggs, basil, cornstarch, garlic, oregano, and salt in a bowl. Mix until thoroughly combined. Transfer the filling to pastry bag or large zipper-lock bag. (If using a zipper-lock bag, be sure the corners are square; the rounded-corner bags are difficult to use.) Step 3: Stuff and Bake the Shells Adjust the oven rack to middle position and preheat the oven to 400°F. Place the shells open side up on the counter. Cut ½-inch off of the tip or corner of the bag. Pipe the filling into shells until each is full. Spread 1 cup of the sauce over the bottom of 9×13-inch baking dish. Transfer the shells, open side up, to the prepared dish. Pour the remaining sauce evenly over the shells to completely cover. Cover the dish tightly with aluminum foil. Bake until the shells are tender and the sauce is boiling rapidly, about 45 minutes. Remove the dish from the oven and discard the foil. Sprinkle the fontina (or mozzarella) over top. Return to the oven and bake, uncovered, until the cheese is lightly browned, about 15 minutes. Let the dish cool, uncovered, for 15 to 20 minutes (this rest is essential to fully cook the pasta). Sprinkle with the basil and serve. Please find original link here.
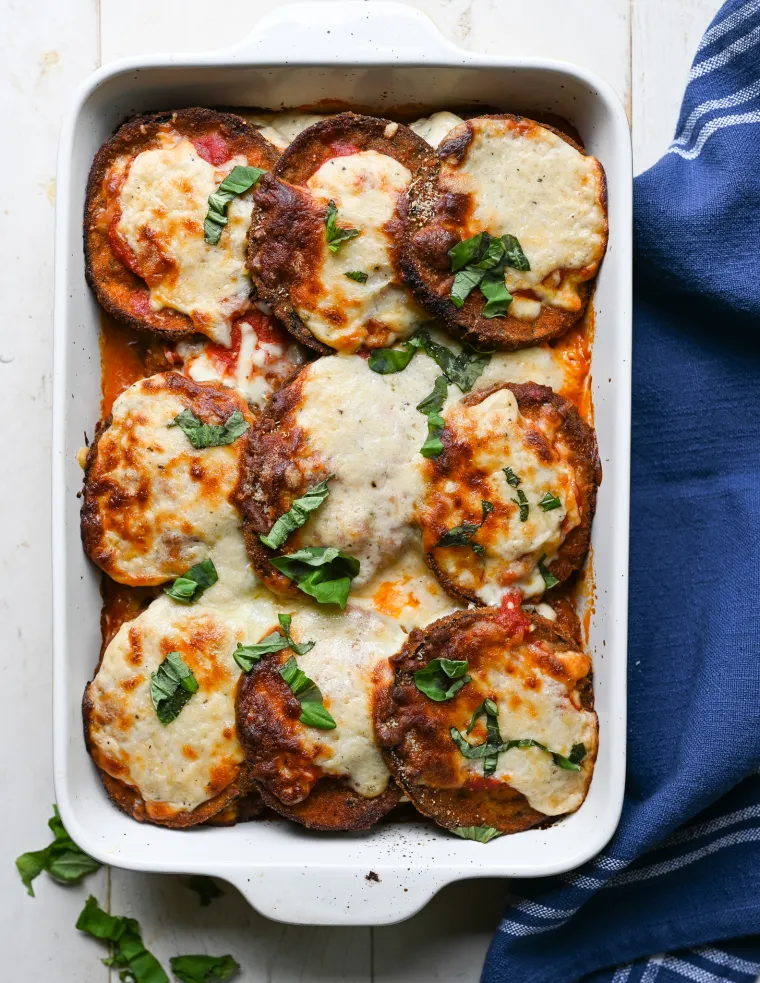
Eggplant Parmesan
Eggplant Parmesan is a comforting layered casserole similar to lasagna, only with breaded and fried slices of eggplant replacing the noodles. The eggplant is shingled and layered in a baking dish with marinara sauce, mozzarella cheese, béchamel sauce, and Parmigiano Reggiano and then baked until bubbly and golden. The traditional preparation takes some time – particularly salting, breading, and frying the eggplant slices – but you can save time by using good-quality jarred marinara sauce. It’s very important to salt the eggplant for at least 90 minutes before frying – this not only seasons the eggplant from the inside out but also draws out the liquid so it absorbs less oil and gives it a creamy, silky texture. You may be wondering if you can bake the eggplant instead of frying it. It will work if you use enough oil on the baking sheets, but I strongly recommend sticking with the traditional frying method, as it will give you the best result in terms of both flavor and texture. I serve eggplant parmesan as a main dish with a Caesar or green salad, but it can also be served as a side dish to meatballs, grilled steak, or Italian sausage. What You’ll Need To Make Eggplant Parmesan Step-by-Step Instructions Step 1: Salt the Eggplant In a large bowl, on a baking sheet, or directly on a cutting board, sprinkle 1 teaspoon of salt evenly all over the eggplant slices. Lay out a few layers of paper towels on a large cutting board or baking sheet. Arrange about one-third of the eggplant slices in a single layer and cover with more paper towels. Continue stacking the eggplant and paper towels, finishing with a final layer of paper towels. Let sit for 1½ to 2 hours. Press on the paper towels to absorb any excess liquid before proceeding. Step 2: Make the Béchamel Sauce Béchamel sauce is not necessarily traditional in eggplant parmesan, but I love the richness it adds. It counters the acidity of the marinara sauce and also prevents the melted mozzarella cheese from turning rubbery. Melt the butter in a small saucepan over medium heat, then add the flour. Cook, whisking constantly, for 2 minutes. Add the milk and whisk until evenly combined. Bring to a boil, then reduce the heat to medium-low and simmer, whisking constantly, for 2 minutes, until the mixture thickens. Add the Parmigiano Reggiano, salt, and pepper. Whisk to combine and set aside. tep 3: Bread and Fry the Eggplant Combine the flour and ¾ teaspoon salt on a large plate. Whisk the eggs with 2 tablespoons cold water in a wide bowl. Mix the breadcrumbs with ¾ teaspoon salt on a large plate. Lightly coat each slice of eggplant in the flour, shaking off excess. Dip in egg mixture, letting any excess drip off. Then dredge in the breadcrumbs, pressing with your fingertips so the crumbs adhere. (Use one hand for the dry ingredients – the flour and breadcrumbs – and one for the egg mixture – it’s much neater this way!) Set the breaded eggplant slices on a baking sheet. ine another baking sheet with a few layers of paper towels. Pour enough oil into a large (12-inch) skillet to measure about ¼-inch deep and heat over medium heat until hot (if you dip a piece of eggplant into the oil, it will sizzle immediately). Working in batches, add as much eggplant as will fit in a single layer. Fry, flipping once, until golden brown, about 3 minutes per side. Transfer to the paper towel-lined baking sheet. Repeat, frying the remaining eggplant and layering it between sheets of paper towels to drain. Step 4: Assemble and Bake Preheat the oven to 425°F and set an oven rack in the middle position. Spread ¾ cup of the marinara sauce over the bottom of a 9×13-inch baking dish. Layer in one-third of the eggplant slices, overlapping the slices to fit. Cover the eggplant with another ¾ cup of marinara sauce. Sprinkle with 1 cup of the mozzarella cheese, then spoon one-third of the béchamel sauce over the cheese (if the béchamel has solidified a bit, it’s fine to add it in dollops; no need to spread it around). Repeat two more layers, leaving the edges of the eggplant exposed on the top layer to create crispy edges. Sprinkle with the Parmigiano Reggiano. Bake until bubbling and golden brown, 30 to 35 minutes. Cool, loosely covered with foil, for about 20 minutes, then scatter the basil over top (if using), cut into slices, and serve. Make-Ahead/Freezer-Friendly Instructions Eggplant parmesan can be assembled up to 2 days before baking; it can also be frozen, baked, or unbaked, for up to 3 months. (If freezing, defrost in the refrigerator overnight prior to reheating/baking.) Please find original recipe here.

Stromboli
An Italian-American dish that originated in the city of Philadelphia, stromboli is like a rolled-up version of pizza. Filled with cheese and Italian deli meats, like pepperoni, salami, and ham, and served with marinara sauce for dipping, it’s a huge crowd-pleaser – perfect for game day, an easy dinner, or anytime you’re having people over. Just keep in mind that stromboli disappears quickly; I recommend making two rolls, especially if you’re feeding men and boys. I use my favorite homemade pizza dough to make stromboli, pizza, and calzones but store-bought dough works very well, too. Don’t worry if your stromboli bursts a little while baking; it’s normal for some cheese to ooze out of the crust. In fact, some say that the name for this dish was taken from Mt. Stromboli, one of the three active volcanos in Italy because the ingredients look like they are about to explode from a volcano. What You’ll Need To Make Stromboli Step-by-Step Instructions On a lightly floured work surface, stretch and/or roll the dough into a 10×12-inch rectangle, about 1/4-inch thick. Arrange the dough rectangle so the long side is closest to you. Brush the surface with the oil, leaving a 1-inch border around the edges. Spread the garlic evenly over the top of the oil, then sprinkle with the oregano, a pinch of red pepper flakes (if using), and the pecorino romano. Shingle the provolone slices evenly over the pecorino romano, followed by the ham, mozzarella, and cured meats. Brush the borders of the dough with the egg (reserve the remaining egg for brushing the top of the stromboli). Fold the bottom third of the stromboli in toward the middle. Fold the top third of stromboli down to cover first fold, creating a wide log, like a folded letter. Pinch the seam tightly to seal. Transfer the stromboli to the prepared baking sheet, seam side down. Pinch the ends tightly to seal and tuck underneath. Loosely cover the stromboli with plastic wrap and let rise at room temperature for 1 hour. (The stromboli won’t look much different after the rise; that’s okay.) Preheat the oven to 375°F and set an oven rack in the middle position. Brush the top of the dough with the remaining egg. Using a sharp knife, make 5 evenly spaced 1/2-inch-deep slits, 1-1/2 inches long, on top of the stromboli. Bake until golden brown, puffy, and bubbling, about 35 minutes (if you have a thermometer, the center should register 200°F). Some grease or cheese may bubble out of the sides and top; that’s normal. Use a paper towel to blot any excess grease on the baking sheet. Let the stromboli cool on the baking sheet for 15 to 20 minutes, then transfer to a cutting board and cut into 1-inch-thick slices. Serve warm or at room temperature, with marinara sauce on the side (if using). Please find original recipe here.

Performance optimization and monitoring in ASP.NET Core: Best Practices with Examples
Introduction: Performance optimization and monitoring play a vital role in ensuring the efficiency, scalability, and reliability of ASP.NET Core applications. In this comprehensive guide, we’ll delve into various techniques, best practices, and tools for optimizing performance and monitoring the health of ASP.NET Core applications, accompanied by detailed examples for each concept. Optimizing Performance: 1. Efficient Database Querying with Entity Framework Core: Efficient database querying is crucial for improving application performance. With Entity Framework Core, we can optimize database access by minimizing the number of round-trips and optimizing query execution. Example: // Before Optimization var products = dbContext.Products.Where(p => p.CategoryId == categoryId).ToList(); // After Optimization var products = dbContext.Products.AsNoTracking().Where(p => p.CategoryId == categoryId).ToList(); In the optimized query, we use AsNoTracking() to disable change tracking for read-only operations, resulting in improved performance. 2. Caching Strategies for Improved Performance: Caching frequently accessed data can significantly reduce database round-trips and improve application response times. ASP.NET Core provides built-in caching mechanisms that we can leverage to implement caching strategies effectively. Example: public async Task<List<Product>> GetProductsAsync(int categoryId) { var cacheKey = $"products_{categoryId}"; if (!_cache.TryGetValue(cacheKey, out List<Product> products)) { products = await dbContext.Products.Where(p => p.CategoryId == categoryId).ToListAsync(); _cache.Set(cacheKey, products, TimeSpan.FromMinutes(10)); // Cache for 10 minutes } return products; } In this example, we cache the products retrieved based on the category ID for a specified duration, enhancing application performance. 3. Asynchronous Programming for Scalability: Asynchronous programming enables applications to handle multiple concurrent operations efficiently, leading to improved scalability and responsiveness. By utilizing async/await keywords in ASP.NET Core, we can execute asynchronous operations seamlessly. Example: public async Task<ActionResult> GetProductsAsync() { var products = await dbContext.Products.ToListAsync(); return Ok(products); } This example demonstrates retrieving products asynchronously from the database, enhancing the scalability of the application. 4. Compression for Network Efficiency: Compressing HTTP responses can significantly reduce bandwidth usage and improve network efficiency. ASP.NET Core supports response compression middleware, allowing us to compress HTTP responses before sending them to clients. Example: public void Configure(IApplicationBuilder app) { app.UseResponseCompression(); } By enabling response compression middleware, we can reduce data transfer sizes and improve overall network efficiency. 5. Lazy Loading for Improved Page Load Times: Lazy loading is a technique used to defer loading resources until they are needed, enhancing initial page load times and improving user experience. In ASP.NET Core applications, we can implement lazy loading for resources such as images and scripts. Example: <img src="placeholder.jpg" data-src="image.jpg" loading="lazy" alt="Lazy Loaded Image"> This example illustrates lazy loading of an image by specifying the actual image source in the data-src attribute, reducing initial page load times. Monitoring and Diagnostics: 1. Application Insights for Real-time Monitoring: Application Insights is a powerful tool provided by Azure for monitoring and diagnosing ASP.NET Core applications in real time. By integrating Application Insights into our application, we can gain valuable insights into application performance, availability, and usage. Example: public void ConfigureServices(IServiceCollection services) { services.AddApplicationInsightsTelemetry(Configuration["InstrumentationKey"]); } By adding Application Insights telemetry, we can monitor various metrics such as request rates, response times, and server resource utilization, enabling proactive performance monitoring and diagnostics. 2. Logging and Error Handling with Serilog: Logging is essential for capturing and analyzing application events, errors, and diagnostic information. Serilog is a popular logging library for ASP.NET Core applications, offering flexible configuration and various output sinks for logging data. Example: public void ConfigureLogger() { Log.Logger = new LoggerConfiguration() .WriteTo.File("log.txt") .CreateLogger(); } By configuring Serilog to log to a file, we can capture application events and errors for troubleshooting and analysis, enhancing the overall monitoring and diagnostics capabilities of the application. 3. Health Checks for Application Health Monitoring: Health checks are endpoints that provide information about the health of an application and its dependencies. By implementing health checks in ASP.NET Core applications, we can monitor the health and availability of critical components, such as databases, external services, and internal dependencies. Example: public void ConfigureServices(IServiceCollection services) { services.AddHealthChecks(); } This example demonstrates adding health checks to the ASP.NET Core application, enabling continuous monitoring of the application’s health and readiness. 4. Profiling and Performance Analysis with MiniProfiler: MiniProfiler is a lightweight profiling tool that helps identify performance bottlenecks in ASP.NET Core applications. By integrating MiniProfiler into our application, we can profile individual requests and identify areas for performance optimization. Example: public async Task<ActionResult> GetProductsAsync() { using (MiniProfiler.Current.Step("GetProductsAsync")) { var products = await dbContext.Products.ToListAsync(); return Ok(products); } } By wrapping the database query in a MiniProfiler step, we can measure the execution time and identify potential performance bottlenecks, enhancing the overall performance tuning and monitoring capabilities of the application. Conclusion: Optimizing performance and monitoring the health of ASP.NET Core applications are essential for delivering a seamless user experience and ensuring the reliability and scalability of the application. By implementing the techniques and best practices outlined in this guide, ASP.NET Core developers can optimize application performance, enhance scalability, and proactively monitor and diagnose issues, ensuring the smooth operation of their applications in production environments. Please find original article here.