Cooking

Chicken Tikka Masala
Chicken tikka masala is a dish of yogurt-marinated broiled chicken in a creamy, spice-infused tomato sauce. Chicken tikka masala is a dish of yogurt-marinated and broiled chicken in a creamy, spice-infused tomato sauce. It’s surprisingly easy to make, and it’s a great intro to Indian food for kids, as it’s not too spicy. The sauce is seasoned with garam masala, a fragrant Indian spice blend typically made from peppercorns, mace, cinnamon, cloves, cardamom, and nutmeg. You can find it at most large supermarkets (McCormick makes it as part of their Gourmet Collection), but feel free to substitute curry powder if need be. Serve with basmati rice, buttered peas, and naan for a fabulous family feast. What you’ll need to make chicken tikka masala Step-by-Step Instructions Begin by chopping the chicken breasts into chunks. Feel free to substitute boneless skinless chicken thighs if you like, but I prefer white meat for this recipe since the sauce is quite rich. In a bowl large enough to hold the chicken, combine the yogurt, salt and spices. Whisk to combine. Then add the chicken and mix until it is evenly coated. Cover and marinate in the refrigerator for at least 1 hour or overnight. When you’re ready to cook the chicken, preheat the broiler and set an oven rack in the top position. Line a baking sheet with aluminum foil and set a wire rack on top; spray the rack with nonstick cooking spray. Place the chicken on the prepared rack, spooning any marinade left in the bowl over the chicken. Broil for 7 to 8 minutes, until browned on top. (The chicken does not need to be flipped over.) While the chicken cooks, start the sauce. Melt the butter over medium heat in a large pan. Add the onions and ginger and cook, stirring frequently, until softened, 5 to 7 minutes. Do not brown; reduce the heat if necessary. Add the spices and cook 2 minutes more. Add the tomatoes, heavy cream, salt, sugar, pepper and 1/2 cup water. Bring to a boil, then reduce the heat to medium-low and simmer, uncovered, until thickened, about 15 minutes. Add the broiled chicken to the sauce and simmer until the chicken is warmed through and fully cooked, a few minutes. Sprinkle the cilantro over the chicken and serve with buttered Indian basmati rice and/or naan. Enjoy! Video Tutorial Note: This recipe has been written by Jenn Segal and republished on MudMatter with Author’s Permission. Please find the original link here – Chicken Tikka Masala.

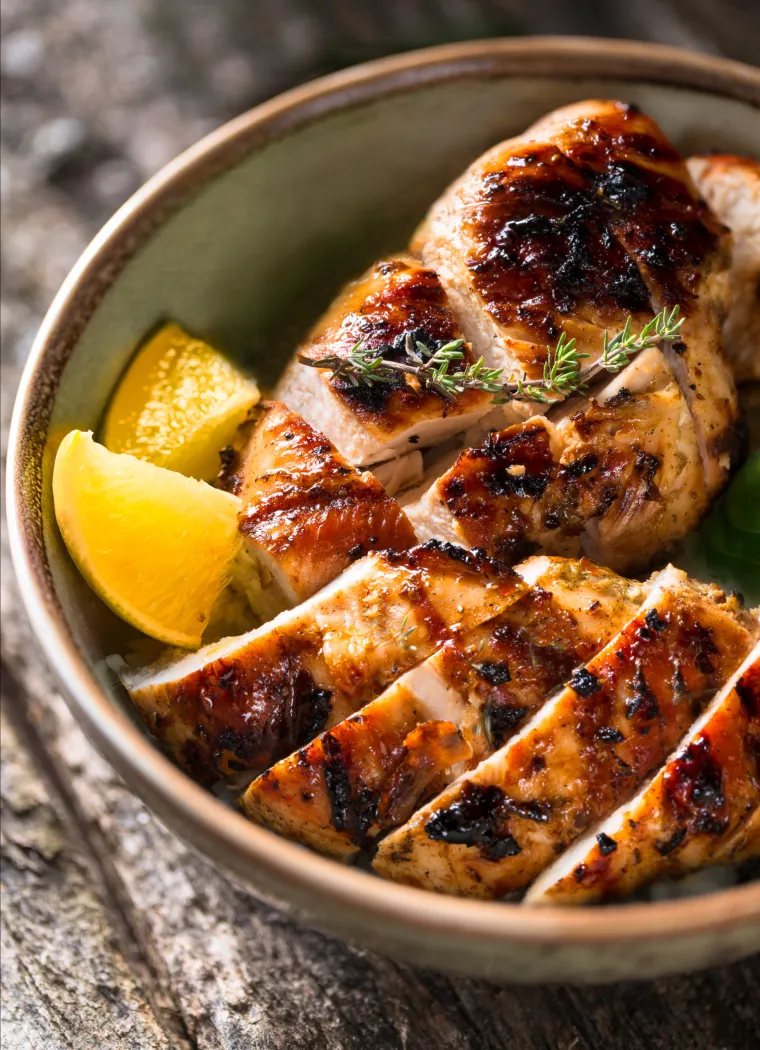
The Best Grilled Chicken
Say goodbye to dry, bland grilled chicken breasts. This recipe guarantees juicy, flavorful chicken every time. Sometimes in cooking the simplest dishes are the hardest to get right, and grilled chicken is a perfect example. Because boneless chicken breasts are so lean, they often turn out dry, rubbery, and bland. Contrary to popular belief, marinating alone will not prevent grilled chicken from drying out; in fact, it’s often the marinade that causes the problem! My technique and marinade ensure tender, juicy, and flavorful grilled chicken every time. You can serve the fillets on their own as a healthy main course (kids love them), topped with cheese on a toasted bun, or, as I often do, sliced over a Caesar salad. Bonus: the recipe is quick and easy. You do all of the prep ahead of time and you won’t even dirty a single bowl. What You’ll Need To Make THE BEST Grilled Chicken STEP-BY-STEP Instructions Step 1: Pound the Chicken Place the chicken breasts in a 1-gallon freezer bag and pound to an even ½-inch thickness. This both tenderizes the meat and ensures even cooking. Left in their natural shape, the thin side of the fillet dries out while the thicker side finishes cooking. If you don’t have a meat mallet, a rolling pin or a saucepan will both work well. Step 2: Make the Marinade Lemon is a key ingredient in this marinade, but I only use the zest. Contrary to conventional wisdom, acidic ingredients (such as vinegar or lemon juice) do not tenderize lean boneless chicken breasts. Just the opposite: they “cook” the exterior of the meat and give it a leathery texture. The zest gives the chicken ample lemon flavor without affecting the chicken’s succulent texture. The best tool for zesting citrus is a fine or microplane grater. Simply rub the lemon in one direction against the blades, turning the lemon as you go. Be sure to remove only the yellow part; the white pith underneath is bitter. Once you’ve zested the lemon, mix all of the marinade ingredients except for the chicken together in a 1-gallon zip-lock bag (go ahead and use the same one you used for pounding if it is still in good shape). Add the chicken breasts to the bag and massage the marinade into the meat until evenly coated. Step 3: Marinate Seal the bag and place in a bowl in the refrigerator (the bowl protects against leakage); let the chicken marinate for at least 4 hours or overnight. Step 4: Grill When you’re ready to eat, preheat your grill to high heat and oil the grates (clean, oiled grates will give you the best grill marks). Be sure your grill is very hot before cooking the chicken; you want nice grill marks and char in the short amount of time it takes to cook these. When pounded thin, chicken breasts only need 2 to 3 minutes per side…no more! If you try to flip the chicken and it feels stuck, try giving it 30 seconds. It’ll release naturally when it’s ready. You’ll notice that the recipe calls for the grill to be covered while the chicken is cooking. This creates convection heat which helps give the chicken a nicely charred exterior and a tender, moist interior. After removing the chicken from the grill, let it rest for 3 to 4 minutes before cutting into it. This will help keep the juices in and retain the meat’s moisture. (The timing is perfect as it’s just enough to get it onto plates, add sides, and put on the table). While this chicken is best right off the grill, it’s also the kind of thing you can make a double batch of and freeze for future use in salads, pastas, and sandwiches. Freezer-Friendly Tips Make sure the chicken is completely cooled before freezing it. Keep the chicken pieces whole (no slicing before freezing). To avoid multiple pieces stuck together (which extends defrosting time), wrap each piece individually in plastic wrap and then place them all in a ziploc bag. This also allows you to defrost one piece at a time if you’d like. Video Tutorial Note: This recipe has been written by Jenn Segal and republished on MudMatter with Author’s Permission. Please find the original link here - The Best Grilled Chicken.

White Chicken Chili
Made with a rotisserie chicken, this hearty white chicken chili is a one-pot meal that you can have on the table in under an hour. When chili is made with chicken or turkey, white beans, and broth (rather than tomatoes), it is called “white chili” because it appears light in color rather than a deep red. It’s a bit lighter and brothier than ground beef chili or Texas-style chili, but it’s still rich and comforting. I have tried countless recipes for white chicken chili over the years, from super-easy crockpot recipes to more authentic, time-consuming versions made from a wide array of chili peppers and hominy. This recipe adapted from Food Network falls somewhere in the middle effort-wise, and it’s the one my family loves best. It’s a hearty one-pot meal you can have on the table in under an hour. What you’ll need to make white chicken chili Before we get to the step-by-step photos, a few notes about the ingredients: The recipe calls for a store-bought rotisserie chicken. I typically shred the chicken as soon as I get home from the grocery store; it’s easier to do while the chicken is still warm, eliminates a step at dinnertime, and also takes up less room in the fridge. The larger peppers you see in photo are mild poblanos. The small chili pepper is a spicy jalapeño. As always, when working with jalapeños, wear gloves or wash your hands very well afterwards (and always avoid touching your eyes). The seeds and ribs in the pepper hold all of the heat. I remove and discard them to keep the chili mild and family-friendly, but if you like a spicy chili, save them and stir some in at the end. I use low-sodium chicken broth for the chili; the canned beans are fairly high in sodium, so using a low-sodium variety broth helps to keep the flavor of the chili from being overly salty. I use frozen corn as it’s available year-round (there’s no need to defrost the corn before incorporating it into the recipe). If fresh corn is in season and you’d prefer to use that, you’ll need kernels from 1 ear of corn. Step-by-Step Instructions Begin by combining half of the white beans in a food processor with one cup of the chicken broth. Process until you have a smooth purée. This is what will thicken the broth. Set aside In a large pot or Dutch oven, heat the oil and add the the onions and peppers. Cook until soft, about 4 minutes, then add the garlic. Cook a minute more, then add the spices. Continue cooking for another minute to toast the spices. Add the chicken broth, salt and puréed bean mixture and bring to a boil. Reduce the heat and simmer for 20 minutes. Stir in the shredded chicken, beans, corn, and lime and simmer until everything is warmed through. You will notice that the chili is quite soupy. This is intentional. It thickens as it sits — in fact, if you make it ahead of time, you will likely need to add some broth or water to thin it out. Plus, I find that if the broth is too thick, the chili gets gloppy and unappealing. A soupy broth is good! Serve with sour cream, lime wedges, shredded cheese and crushed tortilla chips. Note: This recipe has been written by Jenn Segal and republished on MudMatter with Author’s Permission. Please find the original link here – White Chicken Chili

Baked Ziti with Sausage
This bubbling baked ziti is perfect for feeding a crowd, and it freezes well too. This baked ziti is a MAJOR family-pleaser. Loaded with Italian sausage, which packs a ton of flavor, it’s similar to meat lasagna but without the fuss; it’s easy enough for a weeknight but also special enough for company; and it makes a great prep-ahead potluck dish. To save time, go ahead and use pre-shredded mozzarella cheese from a bag; just be sure it’s made from whole milk (low-fat won’t taste nearly as good). While the baked ziti is in the oven, throw together a big Italian salad and warm some bread, and dinner is served! What You’ll Need to Make Baked Ziti with Sausage Ricotta cheese is a traditional addition to baked ziti, but I leave it out because it has a tendency to get dry and grainy when baked. I use heavy cream to add richness instead. For the mozzarella cheese, I recommend using whole milk mozzarella; it melts beautifully. You can purchase a plastic-wrapped brick of mozzarella (pictured above and sold in the dairy case) and shred it yourself. (To make it easier to work with, pop it in the freezer for 15 to 20 minutes prior to shredding.) Or, to save time time, use pre-shredded mozzarella; just be sure it is made from whole milk. Avoid fresh buffalo mozzarella, which is best suited for salads. Many grocers sell bulk Italian sausage (pictured above), which is simply ground sausage without the casings. If you can’t find it, you can ask your butcher to take the meat out of the casings or do it yourself. Step-by-Step Instructions For Baked Ziti Step 1: Boil the Noodles Bring a large pot of salted water to a boil. Cook the ziti according to the package instructions until a few minutes shy of al dente, about 7 minutes. (It will continue to cook in the oven, so you want to undercook it just a bit.) Drain and add the pasta back to the pot. Set aside. Step 2: Make the Sauce Heat a large sauté pan over medium-high heat, and crumble the sausage into the pan. Cook the sausage, breaking apart with a wooden spoon, until lightly browned and just cooked through, 5 to 6 minutes. Use a slotted spoon to transfer the cooked sausage to a plate. Drain all but 1 tablespoon of the fat from the pan and set over low heat (if you don’t have enough fat in the pan, add a tablespoon of olive oil). Add the garlic and cook, stirring constantly with a wooden spoon, until soft but not browned, about 1 minute. Add the heavy cream, 1/3 cup of the pecorino Romano, and basil to the pan. Then stir in the cooked sausage. Carefully pour the contents of the sauté pan into the large pot with the pasta and gently stir to combine. Step 3: Assemble & Bake Spoon half of the mixture into a 9 x 13-inch baking dish. Sprinkle with half of the shredded mozzarella and half of the remaining pecorino Romano. Spoon the remaining pasta mixture on top and sprinkle with the remaining mozzarella and pecorino Romano. Transfer to the oven and bake, uncovered, until the cheese has melted and browned, 15 to 20 minutes. Spinach Quiche Made with heavy cream and Gruyère, this rich spinach quiche is classic French. Of all the spinach quiches I’ve tried over the years, this classic French version is my favorite. The recipe comes from my childhood friend Trish, who is not only one of the funniest people I know, but also a stunning hostess. When Trish entertains, she goes all out – beautiful table settings, seasonal cocktails, fabulous food, and (best of all) hilarious party games. She once created an entire game of Jeopardy! for our old high school gang, complete with categories like Prom Dates, ’80s Pop Stars, and Senior Superlatives. Note: This recipe has been written by Jenn Segal and republished on MudMatter with Author’s Permission. Please find the original link here – Baked Ziti with Sausage.
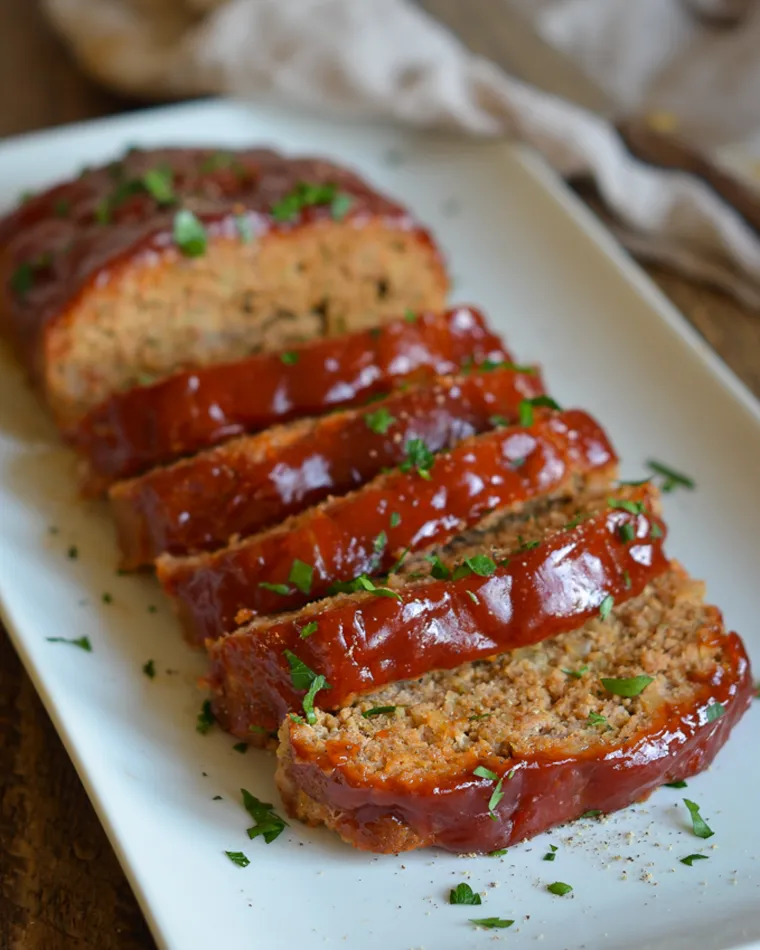
Turkey Meatloaf
A family favorite, this turkey meatloaf is as flavorful and juicy as one made with ground beef. Swapping ground turkey for ground beef is a great way to make meatloaf a bit healthier. However, for all its merits as a low-fat alternative to ground beef, ground turkey can be dry and bland. The key to making a good turkey meatloaf is to add flavor and moisture without adding fat, which would defeat the whole purpose of making it lighter. I season this turkey meatloaf with sautéed onions and garlic, and I also add some of the sweet and tangy glaze directly to the meatloaf mixture, which makes the meatloaf flavorful and juicy. One tip if you’re making this for kids: be sure to chop the onions very finely. My experience is that kids do not like finding flecks of onions (or flecks of anything, really!) in their meatloaf. Naturally, leftovers make excellent meatloaf sandwiches. What you’ll need To Make Turkey Meatloaf Step-by-Step Instructions Begin by making the glaze: in a medium bowl, combine the ketchup, brown sugar, apple cider vinegar, and mustard. Whisk to combine. Next, in a small pan, heat the olive oil and add the onions. Cook until softened, then add the garlic and cook for a few minutes more. Meanwhile, in a large bowl, combine 1/4 cup of the glaze with the Worcestershire sauce, Dijon mustard, paprika, thyme, salt, pepper, and eggs. Whisk to combine. Mix in the onion mixture. Then add the bread crumbs and turkey. Use your hands to mix it all together. Form two loaves on a baking sheet. Then spread the remaining BBQ glaze over top. Bake for 40 to 45 minutes. I prefer this “free-form” meatloaf to those made in a loaf pan; clean-up is so much easier and all the extra fat is able to ooze out during baking. Scrape the fat away from the loaves, transfer to a platter, and slice. Note: This recipe has been written by Jenn Segal and republished on MudMatter with Author’s Permission. Please find the original link here – Turkey Meatloaf.
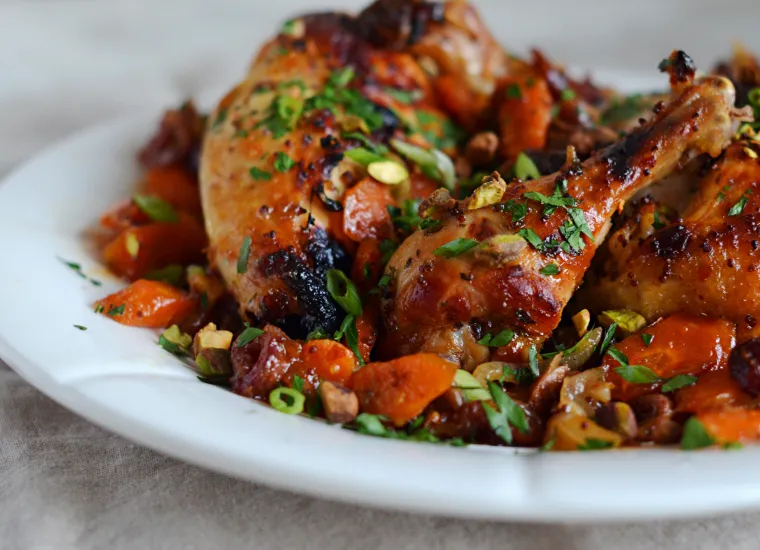
Sweet & Spicy Roast Chicken with Carrots, Dates & Pistachios
This sheet-pan roast chicken dinner is the perfect no-fuss dish for company. Everything can be prepared and assembled a day in advance, so all that’s left to do at dinnertime is pop it in the oven. Don’t you just love discovering new “keeper” recipes? The first time I made Melissa Clark’s fabulous Sweet & Spicy Roast Chicken from The New York Times, I knew it’d be a family favorite for years to come. The chicken is immersed in a honey, citrus, and chili-infused marinade, and then roasted on a sheet pan with carrots and dates. Before serving, herbs, scallions, and pistachios are added for freshness, color, and crunch. Not only is it delicious, but it’s also the perfect no-fuss dish for company. Everything can be prepared and assembled a day in advance, so all that’s left to do at dinnertime is pop it in the oven. Serve with couscous and a green vegetable and dinner is done! What you’ll need to make Sweet & Spicy roast chicken The original recipe is wonderful as printed but, as with any recipe, each time I’ve made it, I’ve tweaked it to suit my style and my family’s taste. What follows is the version I make today. How to make Sweet & Spicy roast chicken Begin by making the marinade: whisk together the lemon zest, lemon juice, orange zest, orange juice, olive oil, mustard, honey, red pepper flakes, garlic, thyme, and salt. Place the chicken, carrots, onions, and dates in a large sealable plastic bag. Add the marinade and seal shut. Massage to make sure everything is evenly coated with the marinade, then marinate in the refrigerator for at least 6 hours or overnight. Transfer all ingredients from the bag, including the marinade, to a rimmed sheet pan. Turn the chicken skin side up. Roast until chicken is lightly browned and cooked through, 40 to 45 minutes. Turn on broiler (leave pan on middle rack), and cook a few minutes more, or until the skin is golden brown and crispy. Watch very carefully: the honey in the marinade can cause the skin to burn quickly! Transfer the chicken, carrots, onions and dates onto a platter, along with the sauce in the pan. Sprinkle the parsley, scallions and pistachio nuts over top and serve. Note: This recipe has been written by Jenn Segal and republished on MudMatter with Author’s Permission. Please find the original link here – Sweet & Spicy Roast Chicken with Carrots, Dates & Pistachios.
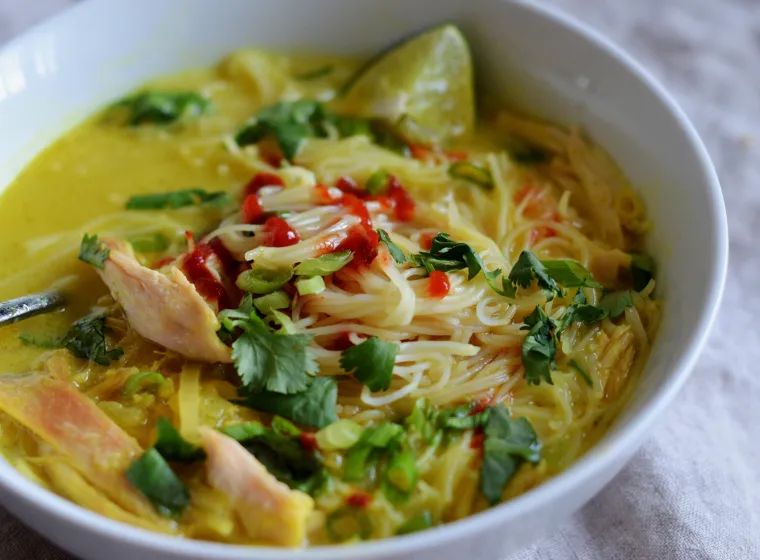
Thai-Inspired Chicken & Rice Noodle Soup
This spicy, fragrant, slurpy noodle soup, inspired by some of my favorite Thai restaurant dishes, is like sunshine on a dreary day. What’s more, it’s made with rotisserie chicken and Thai pantry staples (available in most supermarkets)—such as green curry paste, fish sauce, coconut milk, and fresh ginger—so it’s almost instant gratification. Whether I’m feeling worn down or just in need of a little comfort, there is nothing like a bowl of chicken noodle soup, and this is one of my favorite renditions. Be sure to keep the rice noodles separate from the soup until ready to serve. If you put them in the broth before serving, they will continue to cook and become too soft. What you’ll need To Make Chicken & Rice Noodle Soup You’ll notice that the recipe calls for Thai green curry paste, an excellent substitute for hard-to-find Asian ingredients, like lemongrass and galangal. You can find it, along with the other Asian pantry staples, in the Asian section of most large supermarkets. Along with Thai red curry paste, it is a wonderful ingredient – I use it to make many Thai-style recipes, such as shrimp and chicken curry, butternut squash soup with coconut milk, and curry chicken skewers with coconut-peanut sauce. Step-by-step Instructions Begin by heating the oil in a medium soup pot. Add the shallots and ginger and cook, stirring frequently, until softened, 3 to 5 minutes. Next, add the green curry paste and cook, stirring constantly, for 1 minute more. Add the chicken broth, coconut milk, fish sauce, brown sugar, lime juice, and turmeric; bring to a gentle simmer. Continue simmering for 5 minutes. Meanwhile, cook the rice noodles by dropping them in boiling water. Let sit for a few minutes to soften. Then drain. When ready to serve, divide the noodles and chicken into serving bowls. Ladle the broth over top and sprinkle with cilantro and scallions. Serve with Sriracha sauce and lime wedges. Note: This recipe has been written by Jenn Segal and republished on MudMatter with Author’s Permission. Please find the original link here –Thai-Inspired Chicken & Rice Noodle Soup.
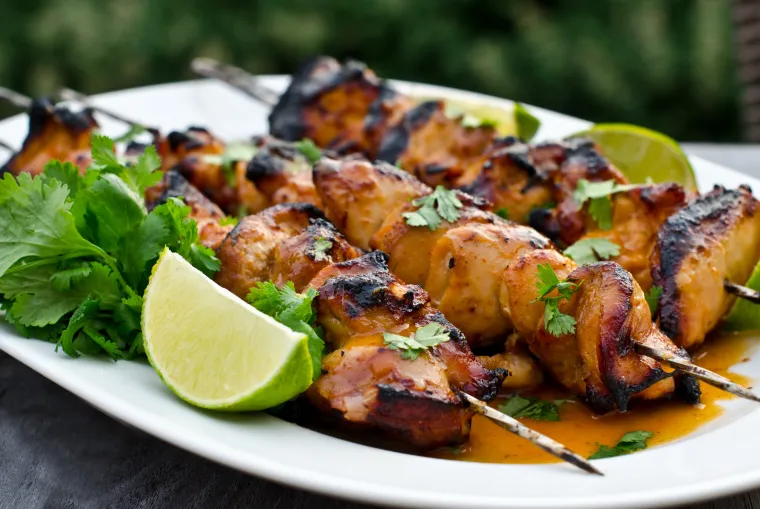
Honey, Lime & Sriracha Chicken Skewers
These chicken skewers marinated in honey, lime juice and Sriracha taste every bit as good as they look. These chicken skewers marinated in honey, lime juice, and Sriracha are every bit as good as they look — and if you haven’t tried Sriracha, the Asian hot sauce named after the coastal city of Si Racha in Thailand, this is the perfect recipe to taste just how delicious it is. Made from sun-ripened chili peppers, distilled vinegar, garlic, sugar, and salt, Sriracha is used in soups, sauces, noodle dishes, omelets, burgers or anything else to add a delicious spicy taste. It has become so popular in the States that you can find it in the international section of most supermarkets. What You’ll Need To Make Honey, Lime & Sriracha Chicken Step-by-Step Instructions Begin by making the marinade. In a blender, combine the zest of a lime, fresh lime juice, honey, soy sauce, vegetable oil, garlic, ginger, and Sriracha. (Even though you’re puréeing the marinade, it’s a good idea to roughly chop the garlic and ginger so they get incorporated — some blenders can’t handle large chunks.) Purée until completely smooth, then set aside 1/2 cup of the marinade to use as a drizzling sauce. Next, prepare the chicken. I’ve specified boneless skinless chicken thighs for this recipe because they’re more flavorful than chicken breasts and easier to cook without drying out. I know many people prefer white meat but I’ve tried both in this recipe and, trust me, it’s much better made with dark meat. The only drawback to using chicken thighs is that they need to be trimmed before you cook them. I think it’s easiest to use kitchen shears as opposed to a knife. So, using scissors, simply cut off any gristle and large chunks of fat (don’t fret over every little bit as it mostly melts away on the grill) and then cut the meat into 2-inch pieces. Place the chicken in a Ziplock bag with the remaining marinade and refrigerate for at least 6 hours or overnight. After the chicken has marinated, thread the pieces onto skewers. Preheat your grill to medium-high heat. Scrape the grates clean to prevent the chicken from sticking, then dip a wad of paper towels in oil and rub the grates until smooth and shiny. Grill the chicken, turning occasionally to promote even browning, for 10-15 minutes. Keep an eye on it — the honey in the marinade causes the chicken to caramelize on the grill and turn a beautiful, rich brown color; however, the chicken can burn if the grill is too hot. Lower the heat if the chicken is browning too fast. Transfer the skewers to a platter and drizzle with the reserved marinade. Sprinkle chopped cilantro over top and serve. Enjoy! Note: This recipe has been written by Jenn Segal and republished on MudMatter with Author’s Permission. Please find the original link here – Honey, Lime & Sriracha Chicken Skewers.
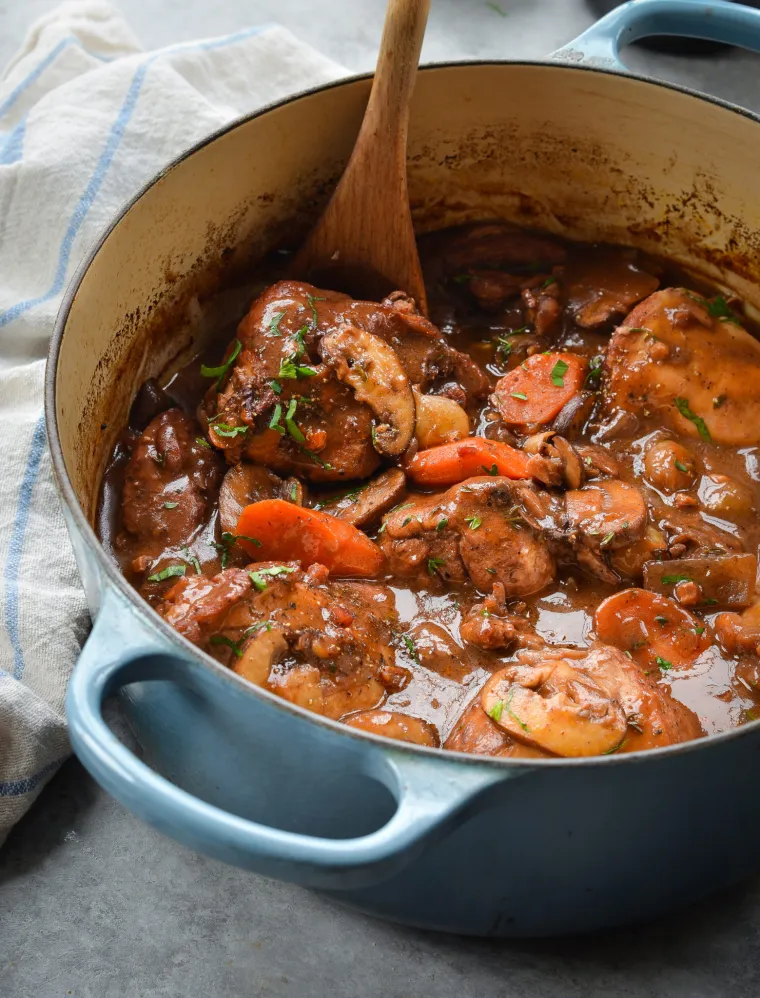
Coq au Vin
Coq au vin is a hearty French stew of chicken braised in red wine with mushrooms and crisp pancetta. Rich and brimming with flavor, coq au vin is a classic French stew of chicken braised in red wine with mushrooms and crispy pancetta. It’s the perfect cooking project to tackle on a chilly weekend when you’ve got a few hours to burn. As with most stews, coq au vin is even better the next day, and it freezes well, too. Serve with buttered egg noodles, mashed potatoes, or a good crusty bread — basically anything to soak up the full-flavored sauce. What You’ll Need To Make Coq au Vin Before we get to the step-by-step, a few notes about the ingredients: Traditional recipes for coq au vin call for a whole cut-up chicken (a coq is an old rooster), but I prefer to use only bone-in chicken thighs only. The thighs remain tender and succulent when braised for a long time, whereas white meat tends to dry out. Pancetta is simply Italian bacon. Instead of being smoked like American bacon, it is cured with salt and spices and then dried. You can find it in the deli at most supermarkets or precut and packaged in the refrigerated gourmet foods aisle, which is a great time saver. For the wine, a Burgundy or Pinot Noir is traditional but any light or medium bodied red wine, such as Merlot or Zinfandel, will work. You don’t need to use an expensive bottle; just make sure it’s good enough to drink (no supermarket cooking wine!). Cognac, a type of French brandy, is used in cocktails like sangria, but it also adds complex flavor to savory dishes like chicken pot pie, steak au poivre, and gravy. You may notice that my recipe does not call for the traditional garnish of pearl onions. They can be difficult to find, and I actually prefer the stew without them. If you’d like to add them, be sure to brown them in butter and cook them thoroughly before adding them to the finished stew. How To Make Coq au Vin To begin, heat the oil in a large (5-qt) Dutch oven or heavy-bottomed pot over medium heat. Add the pancetta (or bacon) and cook until the fat has rendered and the pancetta is crispy, 5 to 8 minutes. Using a slotted spoon, transfer the pancetta to a paper-towel-lined plate, leaving the fat in the pan. Season the chicken all over with 2 teaspoons salt and ½ teaspoon pepper. Increase the heat to medium-high and brown half of the chicken in a single layer, skin side down, until golden and crispy, about 5 minutes (brown on the skin side only). Using tongs, transfer the chicken to a plate; set aside. Pour off all but about 2 tablespoons of the fat, then return the pot to the stove and reduce the heat to medium-low. Cook the onions, stirring occasionally, until softened and just starting to brown, 3 to 5 minutes. Add the garlic and cook, stirring constantly, until fragrant, about 1 minute more. Pour in the Cognac and cook, stirring to scrape the brown bits from the bottom of the pan, until the Cognac has evaporated. Add the wine, chicken broth, tomato paste, balsamic vinegar, sugar, thyme, bay leaf, and ½ teaspoon salt and bring to a boil. Add the chicken and any accumulated juices from the plate back to the pot, along with the carrots. Bring to a simmer, then cover and cook over low heat for 30 minutes, or until the chicken and carrots are cooked through. While the chicken cooks, heat the remaining 2 tablespoons of oil in a large skillet over medium heat. Add the mushrooms and 1/4 teaspoon salt and cook, stirring frequently, until the mushrooms are golden brown, about 5 minutes. Set aside. Also while the chicken cooks: In a small bowl, combine the softened butter and flour. Mash with a spoon to make a smooth paste. In French, this is called a beurre manié (or kneaded butter). Set aside. Using a slotted spoon, transfer the cooked chicken to a plate. The wine gives it a purplish hue. Using a fork and knife, pull the skin off of the chicken (it should slide right off) and discard. The skin has served its purpose by lending flavor to the sauce and protecting the meat from drying out. You don’t have to do remove it, but it’s soggy at this point and I think the dish is more appetizing without it. Increase the heat in the Dutch oven/pot to medium and stir in three-quarters of the flour and butter paste. Gently boil until the sauce is thickened, 5 to 7 minutes; add the remaining paste if you’d like the sauce a little thicker. Fish out and discard the bay leaf. Add the chicken and any accumulated juices back to the pot and simmer, uncovered, for about 10 minutes. Right before serving, stir in the browned mushrooms and pancetta. Taste and adjust seasoning, if necessary. Serve immediately or let cool, chill in the refrigerator, and reheat when ready to serve. Note: This recipe has been written by Jenn Segal and republished on MudMatter with Author’s Permission. Please find the original link here – Coq au Vin.
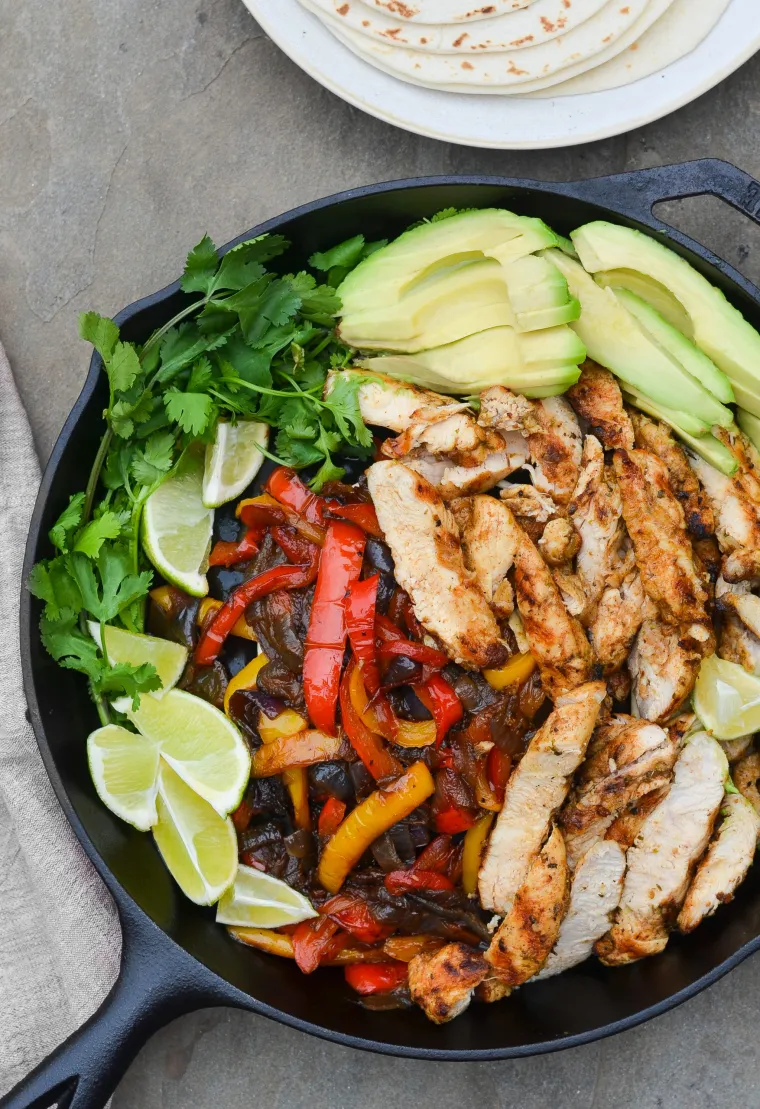
Chicken Fajitas
Smoky grilled chicken, sizzling peppers and onions, and all the classic accompaniments – Whip up chicken fajitas at home that rival those from your favorite Tex-Mex restaurant! Chicken fajitas are a popular Tex-Mex dish consisting of flavorful chicken strips served with sautéed onions and bell peppers. The chicken is typically marinated in a mixture of spices, such as chili powder, cumin, and paprika, along with lime and garlic, which adds flavor and helps tenderize the meat. The dish is accompanied by warm flour tortillas and various accompaniments like guacamole, sour cream, salsa, and shredded cheese. In restaurants, fajitas are presented on a sizzling cast iron plate for added flair. Although replicating that sizzling plate experience at home can be a tad risky, it’s possible to prepare homemade fajitas that are just as good, if not better! My fajitas are not only flavorful and customizable but also super easy to prepare, making them a great option for weeknight dinners or casual gatherings. As a bonus, leftovers taste great in salads, tacos, burritos, and more. What you’ll need to make Chicken Fajitas Chicken: You can use boneless skinless chicken breasts or chicken tenderloins for this recipe. If using breasts, they need to be pounded to an even thickness before marinating. Tenderloins do not require pounding, making them a a great time-saver. Spices: I use chili powder, cumin, oregano, smoked paprika, and lime zest to flavor my chicken. Don’t be tempted to buy a fajita seasoning packet from the supermarket; they contain additives and aren’t nearly as tasty as what you can pull together quickly at home. If you’d like to add a little heat to your spice mixture, include a generous pinch of cayenne pepper. Peppers: Bell peppers are standard, but if you’re a spicy food lover, try substituting some of the bell peppers for poblano or even jalapeño peppers. Step-by-Step Instructions To begin, pound the chicken breasts to an even 1/2-inch thickness. This both tenderizes the chicken and ensures that it cooks evenly. (Note: If using chicken tenderloins, you can skip this step.) Next, make the marinade by combining the oil, garlic, lime zest, ancho chili powder, smoked paprika, cumin, oregano, and salt right in a Ziplock bag (no dirty bowls!). Note that I don’t use lime juice in the marinade. I find that acidic ingredients alter the texture of boneless skinless chicken breasts, making them tough and leathery. The zest of the lime imparts lime flavor without changing the texture of the meat. Mash all of the ingredients together. Then add the chicken and marinate for at least 8 hours or overnight. When you’re ready to grill, heat the oil in a large pan over medium-high heat. Add the peppers and onions. Deglaze the pan with a little water, scraping up the brown bits, and continue cooking until the vegetables are caramelized and tender. When you’re ready to eat, preheat the grill to high. Grill the chicken, covered, for 2 to 3 minutes per side. Transfer the chicken to a cutting board and slice into strips. Arrange the chicken and peppers on a platter and set out with all the fixins, like guacamole, salsa, shredded cheese, sour cream and cilantro. Be sure to warm your tortillas before serving; warming helps to make the tortillas softer and more pliable, and it also enhances their flavor. Note: This recipe has been written by Jenn Segal and republished on MudMatter with Author’s Permission. Please find the original link here – Chicken Fajitas.