
Suggested for you
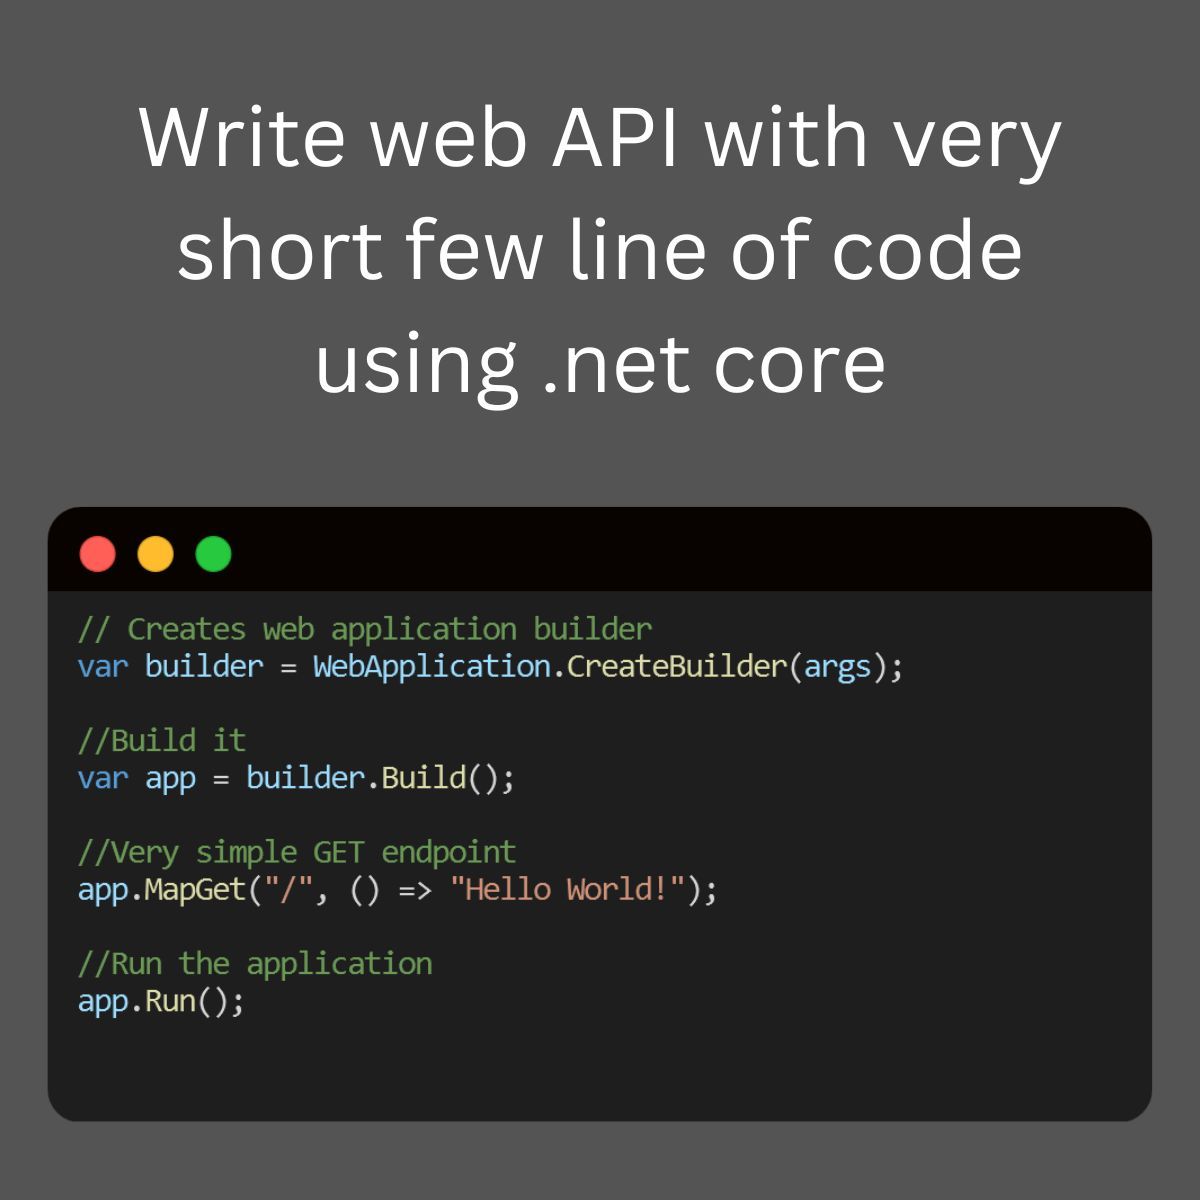
NET Core Minimal API, write a very short line of code
Write Web API with very short lines of code using .NET Core Minimal API. Github - https://github.com/mayurlohite/MinimalApiCore What if I tell you that you can build a full web API with just a few lines of code? Yes, you can do it with the new Minimal API feature of ASP. NET Core 6.0 and greater. From this minimal API, you can build a complete web API with all the features that you need. Just one file, you can build a full web API. Helpful for Micro-services. Find out working example of - ASP.NET Core 8.0 - Minimal API Example - Expenses API implementation using ASP.NET Core Minimal API, Entity Framework Core, SQL Server and Swagger UI. Github - https://github.com/mayurlohite/MinimalApiCore Would you like to implement this into your project? Feel free to share your thoughts!

Differences between IEnumerable and IQueryable in C#
In every .NET application we need to manipulate IEnumerable and IQueryable interfaces to hold collections. The basic use of IEnumerable and IQueryable is to hold the collection of data & perform Ordering, Grouping & Filtering of data based on project/application requirements. The first thing to keep in mind is that since the IQueryable interface is an inheritance of IEnumerable, it possesses all of IEnumerable's capabilities. Both are limited to process on C# collections. The important difference between IEnumerableand IQueryable is: IQueryable - The Filter is apply at server level/side and fetch only required results from source. So processing time is less. IEnumerable- It fetch all data from source first and later apply the filter at client level/side. Which can be result in fetching unnecessary data and it increase processing time. Lets understand this with an example. We have created Console application in .NET Core to fetch Books from SQL Server database and we are using Entity Framework Core to fetch the books (books table). We built it over Code-First approach. This is our Book.cs Entity [Table("Books")] public class Book { [Key] public int BookId { get; set; } [StringLength(255)] public string? Title { get; set; } public decimal Price { get; set; } } We have around 10 records added into database by using seed data method. Lets understand the differences by using below code. We have written both queries in LINQ. class Program { static void Main(string[] args) { using (var context = new BookDemoDbContext()) { var booksIEnumerable = (from book in context.Books select book) .AsEnumerable<Book>().Take(2).ToList(); var booksIQurable = (from book in context.Books select book) .AsQueryable<Book>().Take(2).ToList(); } Console.ReadKey(); } } In first query we are trying to fetch 2 books in IEnumerable interface. var booksIEnumerable = (from book in context.Books select book) .AsEnumerable<Book>().Take(2).ToList(); Lets see what above LINQ query has been executed in SQL Server with the help of SQL Server profiler (for IEnumerable). Below query is traced in profiler. The query is simple SELECT statement without any where clause or TOP statement. It means it selecting all rows from SQL server database and just pick 2 records on client side. SELECT [b].[BookId], [b].[Price], [b].[Title] FROM [Books] AS [b] The diagram shows graphical representation of how IEnumerableworks. In first query we are trying to fetch 2 books in IQueryableinterface. var booksIQurable = (from book in context.Books select book) .AsQueryable<Book>().Take(2).ToList(); Lets see what above LINQ query has been executed in SQL Server with the help of SQL Server profiler (for IQueryable). Below query is traced in profiler. The TOP filter has been applied with parameter and its value = 2, so it means it fetch only 2 records from Books table. So it avoids fetching unnecessary data from database. exec sp_executesql N'SELECT TOP(@__p_0) [b].[BookId], [b].[Price], [b].[Title] FROM [Books] AS [b]',N'@__p_0 int',@__p_0=2 The diagram shows graphical representation of how IQueryable works. Download Source Code https://github.com/mayurlohite/IEnumerableVsIQueryable See the difference in action, watch this video https://www.youtube.com/watch?v=1x7Pf5geDd4 Conclusion Hence, when working with in-memory collections—where data is kept locally in the memory of the application—select IEnumerable<T>. When working with huge data sets or querying external data sources, use IQueryable<T> as it enables effective server-side processing and query optimization. Your performance needs and the type of data source will determine which option is best. If you have any questions, Please connect me on LinkedIn. Explore more articles.
How to check if string is null or empty? or it does not contains anything in C#
In every project developed within the .NET framework, whether it's a web, console, Windows, or mobile application, it is crucial to validate whether a string is empty, null, or contains anything, including whitespace. Therefore, I'm sharing this C# tip to demonstrate the optimal approach for checking if a string is null, empty, or consists solely of blank space. Certainly! In C#, you can efficiently check if a string is null, empty, or contains only whitespace using the string.IsNullOrWhiteSpace method. This method returns true if the string is null, empty, or consists only of white-space characters; otherwise, it returns false. The term "white space" includes all characters that are not visible on screen. For example, space, line break, tab and empty string are white space characters. Lets take example. Create a new console application in Visual Studio. Try this code below. class Program { static void Main(string[] args) { string nullString = null; string emptyString = ""; string whitespaceString = " "; string nonEmptyString = "Mudmatter"; Console.WriteLine("Result by using checking double quotes method - Wrong Method"); Console.WriteLine("{{nullstring}} is null or empty? {0}", nullString == ""); Console.WriteLine("{{emptyString}} is null or empty? {0}", emptyString == ""); Console.WriteLine("{{whitespaceString}} is null or empty? {0}", whitespaceString == ""); Console.WriteLine("{{nonEmptyString}} is null or empty? {0}", nonEmptyString == ""); Console.WriteLine(""); Console.WriteLine("---------------------------------------"); Console.WriteLine(""); Console.WriteLine("Result by using IsNullOrEmpty method - OK but not good"); Console.WriteLine("{{nullstring}} is null or empty? {0}", string.IsNullOrEmpty(nullString)); Console.WriteLine("{{emptyString}} is null or empty? {0}", string.IsNullOrEmpty(emptyString)); Console.WriteLine("{{whitespaceString}} is null or empty? {0}", string.IsNullOrEmpty(whitespaceString)); Console.WriteLine("{{nonEmptyString}} is null or empty? {0}", string.IsNullOrEmpty(nonEmptyString)); Console.WriteLine(""); Console.WriteLine("----------------------------------------"); Console.WriteLine(""); Console.WriteLine("Result by using IsNullOrWhiteSpace method - Best method"); Console.WriteLine("{{nullstring}} is null or empty? {0}", string.IsNullOrWhiteSpace(nullString)); Console.WriteLine("{{emptyString}} is null or empty? {0}", string.IsNullOrWhiteSpace(emptyString)); Console.WriteLine("{{whitespaceString}} is null or empty? {0}", string.IsNullOrWhiteSpace(whitespaceString)); Console.WriteLine("{{nonEmptyString}} is null or empty? {0}", string.IsNullOrWhiteSpace(nonEmptyString)); Console.ReadKey(); } } Output: Short Video https://www.youtube.com/watch?v=t-yumUzLIoY Conclusion There are various methods to check if string is empty or not but the best method is using the string.IsNullOrWhiteSpace method. This method can check empty, null & any white space characters which are not visible on screen. So I recommend to use the string.IsNullOrWhiteSpace method.

Check Session Timeout by Using ActionFilters in MVC
In a dynamic web application, the session is crucial to hold the information of current logged in user identity/data. So someone without authentication cannot have access to some Page or any ActionResult, to implement this kind of functionality, we need to check session exists (is not null) in every action which required authentication. So, the general method is as follows: [HttpGet] public ActionResult Home() { if(Session["ID"] == null) return RedirectToAction("Login","Home"); } We have to check the above 2 statements each time and in each ActionResult, but it may cause 2 problems. Repeat Things: As per the good programming stranded, we don't have to repeat the things. Create a module of common code and access it multiple times/repeatedly Code missing: We have to write code multiple times so it might happen some time we forget to write code in some method or we missed it. How To Avoid? The ASP.NET MVC provides a very great mechanism i.e., Action Filters. An action filter is an attribute. You can apply most action filters to either an individual controller action or an entire controller. If you want to know more about action filter, please click here. So we will create a custom Action Filter that handles session expiration and if session is null, redirect to Login Action. Create a new class in your project and copy the following code: namespace Mayur.Web.Attributes { public class SessionTimeoutAttribute : ActionFilterAttribute { public override void OnActionExecuting(ActionExecutingContext filterContext) { HttpContext ctx = HttpContext.Current; if (HttpContext.Current.Session["ID"] == null) { filterContext.Result = new RedirectResult("~/Home/Login"); return; } base.OnActionExecuting(filterContext); } } } Now our Action Filter is created and we are ready to use it. The following code will show you how we can apply attribute to Action or to complete controller. 1. Apply to Action [HttpGet] [SessionTimeout] public ActionResult MyProfile() { return View(); } 2. Apply to Controller [SessionTimeout] public class HomeController : Controller { [HttpGet] public async ActionResult MyProfile() { return View(); } [HttpGet] public async ActionResult MyQuestions() { return View(); } [HttpGet] public async ActionResult MyArticles() { return View(); } } Now all actions of Home Controller will check for session when hit with the help of Action Filter. So we have reduced the code and repetitive things. This is the benefits of Action Filters. Happy coding !!!

Helper to validate image in MVC
In almost 90% of projects, we need to upload images to server and store them. In most cases, hackers try to exploit an image upload system and try to upload exploitable materials like web-shells, some harmful scripts, table deletions scripts, etc. To prevent this, I have written one helper function which validates file in many conditions and makes sure the file is in correct image format. The code is not fully written by me, I researched many articles and filtered the conditions which helps us to validate the required output. /// <summary> /// Verifies that a uploading file is in valid Image format /// </summary> /// <param name="postedFile">File which is selected for upload</param> /// <param name="imageMinBytes">Minimum file size in byte</param> /// <param name="imageMaxBytes">Maximum file size in byte</param> /// <returns>true if the file is a valid image format and false if it's not</returns> public static bool IsValidImageFormat(HttpPostedFileBase postedFile, int imageMinBytes, long imageMaxBytes) { //------------------------------------------- // Check the image extension //------------------------------------------- if (Path.GetExtension(postedFile.FileName).ToLower() != ".jpg" && Path.GetExtension(postedFile.FileName).ToLower() != ".png" && Path.GetExtension(postedFile.FileName).ToLower() != ".gif" && Path.GetExtension(postedFile.FileName).ToLower() != ".jpeg") { return false; } //------------------------------------------- // Check the image MIME types //------------------------------------------- if (postedFile.ContentType.ToLower() != "image/jpg" && postedFile.ContentType.ToLower() != "image/jpeg" && postedFile.ContentType.ToLower() != "image/pjpeg" && postedFile.ContentType.ToLower() != "image/gif" && postedFile.ContentType.ToLower() != "image/x-png" && postedFile.ContentType.ToLower() != "image/png") { return false; } //------------------------------------------- // Attempt to read the file and check the first bytes //------------------------------------------- try { if (!postedFile.InputStream.CanRead) { return false; } if (postedFile.ContentLength < imageMinBytes) { return false; } byte[] buffer = new byte[512]; postedFile.InputStream.Read(buffer, 0, 512); string content = System.Text.Encoding.UTF8.GetString(buffer); if (Regex.IsMatch(content, @"<script|<html|<head|<title|<body| <pre|<table|<a\s+href|<img|<plaintext|<cross\-domain\-policy", RegexOptions.IgnoreCase | RegexOptions.CultureInvariant | RegexOptions.Multiline)) { return false; } } catch (Exception) { return false; } //------------------------------------------- // Try to instantiate new Bitmap, if .NET will throw exception // we can assume that it's not a valid image //------------------------------------------- try { using (var bitmap = new System.Drawing.Bitmap(postedFile.InputStream)) { } } catch (Exception) { return false; } return true; } Hope it will help you. Let me know your thoughts!

A cookie wrapper class in MVC
A Simple Cookie Wrapper Class for MVC: Easily Manage Cookies in Your Web Application In web development, managing cookies efficiently is a crucial part of building user-friendly applications. In this post, I will show you how to create a simple and reusable cookie helper class in MVC, which allows you to easily create, read, update, and delete cookies. This approach simplifies cookie management and ensures your code is clean and easy to maintain. Introduction to Cookie Management in MVC Cookies are small pieces of data stored in the user's browser. They are typically used for sessions, preferences, and other user-specific data. In MVC applications, handling cookies manually can be cumbersome. That's where a helper class comes in handy. Let’s build a CookieHelper.cs class to abstract the common operations like creating, reading, updating, and deleting cookies. CookieHelper Class Code Create a new file named CookieHelper.cs and paste the following code into it. This class defines the basic functionality you need for working with cookies in your MVC application. using System; using System.Web; public class CookieHelper { #region Constants // The name of the cookie to be used public const string CookieName = "UserName"; #endregion #region Enums public enum CookieInterval { SECOND = 0, MINUTE = 1, HOUR = 2, DAY = 3, MONTH = 4, YEAR = 5 }; #endregion #region Utility Methods // Calculates the expiration date for the cookie based on the given duration and unit private static DateTime CalculateCookieExpiry(int duration, CookieInterval durationUnit) { DateTime cookieExpire = DateTime.Now; switch (durationUnit) { case CookieInterval.SECOND: cookieExpire = DateTime.Now.AddSeconds(duration); break; case CookieInterval.MINUTE: cookieExpire = DateTime.Now.AddMinutes(duration); break; case CookieInterval.HOUR: cookieExpire = DateTime.Now.AddHours(duration); break; case CookieInterval.DAY: cookieExpire = DateTime.Now.AddDays(duration); break; case CookieInterval.MONTH: cookieExpire = DateTime.Now.AddMonths(duration); break; case CookieInterval.YEAR: cookieExpire = DateTime.Now.AddYears(duration); break; default: cookieExpire = DateTime.Now.AddDays(duration); break; } return cookieExpire; } #endregion #region Public Methods // Creates a cookie with a specific name, value, and expiration time public static string CreateCookie(string cookieName, string cookieValue, CookieInterval durationUnit, int duration) { HttpCookie cookie = new HttpCookie(cookieName) { Value = cookieValue, Expires = CalculateCookieExpiry(duration, durationUnit) }; HttpContext.Current.Response.Cookies.Add(cookie); return cookieValue; } // Reads the value of an existing cookie by its name public static string ReadCookie(string cookieName) { HttpCookie cookie = HttpContext.Current.Request.Cookies[cookieName]; return cookie?.Value ?? string.Empty; } // Updates the value and expiration of an existing cookie public static string UpdateCookie(string cookieName, string newCookieValue, CookieInterval durationUnit, int duration) { HttpCookie cookie = HttpContext.Current.Request.Cookies[cookieName]; if (cookie != null) { cookie.Value = newCookieValue; cookie.Expires = CalculateCookieExpiry(duration, durationUnit); HttpContext.Current.Response.Cookies.Add(cookie); } return newCookieValue; } // Deletes a cookie by setting its expiration date to the past public static void DeleteCookie(string cookieName) { HttpCookie cookie = new HttpCookie(cookieName) { Expires = DateTime.Now.AddDays(-1) }; HttpContext.Current.Response.Cookies.Add(cookie); } #endregion } How to Use the CookieHelper Class Now that you have the CookieHelper class, let's walk through some common scenarios: creating, reading, updating, and deleting cookies. 1. Create a Cookie To create a cookie, you simply call the CreateCookie method with the cookie's name, value, duration unit (such as days or months), and duration: string cookieValue = CookieHelper.CreateCookie(CookieHelper.CookieName, "This is a test cookie", CookieHelper.CookieInterval.DAY, 7); This will create a cookie that expires in 7 days. 2. Read a Cookie To read the value of an existing cookie, use the ReadCookie method: string cookieValue = CookieHelper.ReadCookie(CookieHelper.CookieName); If the cookie exists, this will return its value. If it doesn't, it will return an empty string. 3. Update a Cookie To update the value of an existing cookie, call the UpdateCookie method: string updatedCookieValue = CookieHelper.UpdateCookie(CookieHelper.CookieName, "Updated cookie value", CookieHelper.CookieInterval.DAY, 14); This will update the cookie's value and reset its expiration date to 14 days from now. 4. Delete a Cookie To delete a cookie, use the DeleteCookie method: CookieHelper.DeleteCookie(CookieHelper.CookieName); This will remove the cookie by setting its expiration date to a past date, effectively deleting it from the user's browser. Conclusion With this simple CookieHelper class, you can easily manage cookies in your MVC applications. Whether you're creating, reading, updating, or deleting cookies, the code is clean and easy to use. Feel free to use this class in your project, and let me know your thoughts or any improvements you might suggest!