
Suggested for you
Sachin Tendulkar
@sachin_rt
Sachin Tendulkar
@sachin_rt
Sachin Tendulkar
@sachin_rt
Sachin Tendulkar
@sachin_rt
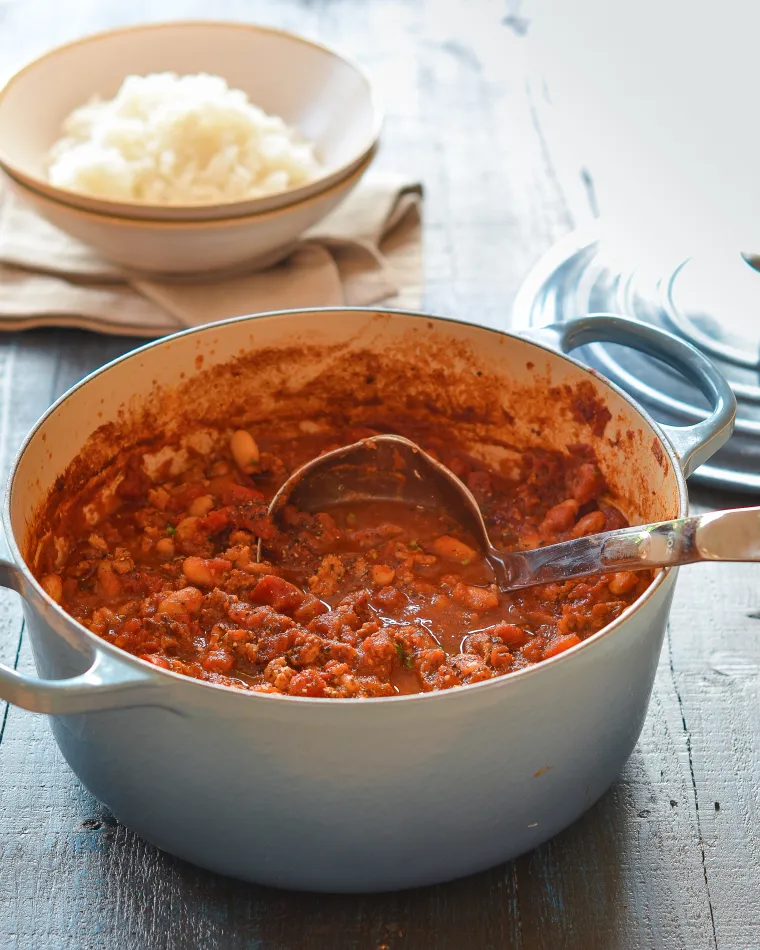
This chicken chili is a hearty, healthy dish you can feel good about eating.
This is a healthy chili that you can actually feel good about eating: it’s made from scratch, loaded with veggies, and chock-full of protein-rich chicken and beans. Don’t worry, it’s still hearty and delicious — even your manly football fanatics will love it.
What you’ll need to make Chicken Chili with White Beans
.
At first glance, the list of ingredients looks long but it’s really just a lot of spices; and while it simmers on the stove for almost two hours, active cooking time is only about 30 minutes.
It’s important to use regular ground chicken – not the kind labeled “lean” – and same goes if you’re substituting ground turkey. Also, use Pomi boxed chopped tomatoes if you can find them; they are superior to canned tomatoes and lend nice texture to the chili.
How to make it
To begin, heat the oil in a large Dutch oven or nonreactive soup pot over medium heat. Add the onions and red bell pepper and cook, stirring frequently, until softened, 8 to 10 minutes. Add the garlic and cook, stirring to prevent garlic from burning, about two minutes more.
Increase the heat to medium-high. Add the ground chicken, chili powder, cumin, coriander, red pepper flakes, oregano, cayenne pepper, and salt.
As the chicken cooks, use a wooden spoon to break the meat into very small clumps; cook until no longer pink, about 5 minutes.
Add the tomatoes, chicken broth, and sugar.
Bring to a boil, then reduce the heat to low and simmer, partially covered with lid ajar, for about one hour, stirring occasionally. Stir in the white beans and simmer, uncovered for about 50 minutes more, or until the meat is tender and the flavors are well combined.
For a soupier chili, you can add additional water. For a thicker chili, simmer uncovered until the desired consistency is reached. Taste and add more salt if necessary. Note that this chili is moderately spicy; feel free to adjust to your liking by increasing or decreasing the cayenne and red pepper flakes.
Note: This recipe has been written by Jenn Segal and republished on MudMatter with Author’s Permission. Please find the original link here – Chicken Chili with White Beans.
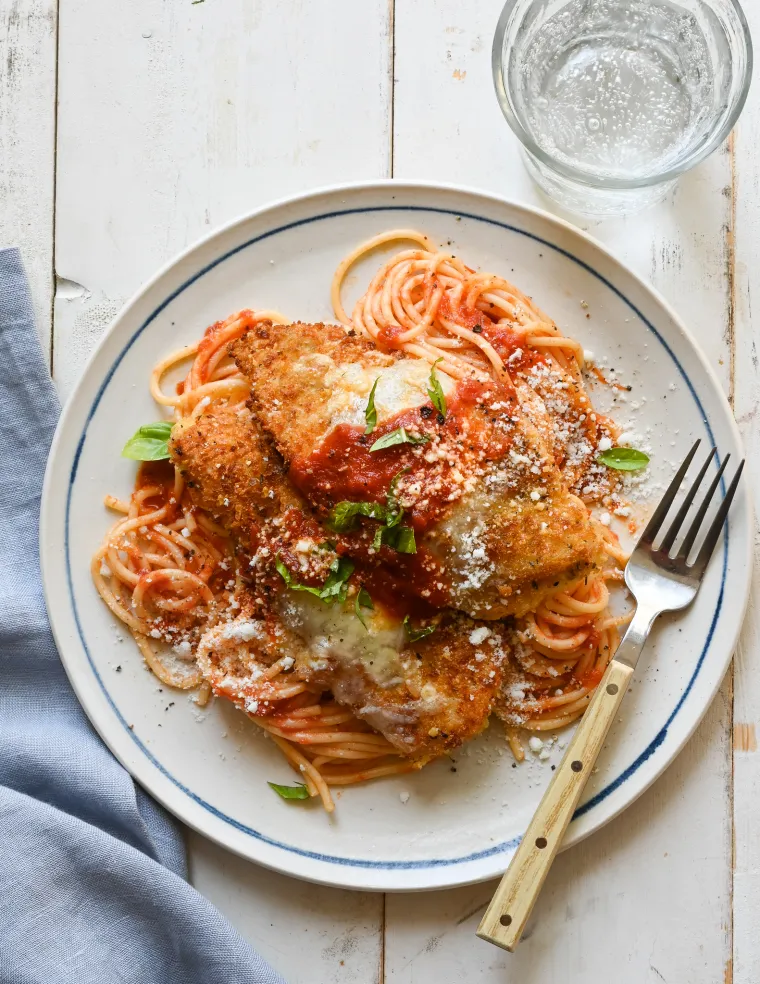
This family- and weeknight-friendly chicken parmesan will rival your favorite Italian restaurant’s version.
Chicken parmesan is a major family pleaser, but the traditional recipe can be time-consuming to make. Between the homemade sauce and pounding, breading, and pan-frying the chicken — not to mention melting the cheese over the chicken in the oven — the classic preparation takes well over an hour and leaves you with a sinkful of dishes. This easy recipe incorporates a few smart shortcuts, like using good-quality jarred sauce and chicken tenderloins, making it totally doable on a weeknight. You’ll notice that I don’t smother the chicken with sauce and cheese; this keeps the crust crispy (and you can always serve more sauce on the side). Chicken parm is a great dish to serve when you have people over since much of the prep can be done ahead of time. Serve with pasta, spaghetti squash, a salad, or a roasted vegetable.
What You’ll Need To Make Chicken Parmesan
Most recipes call for boneless skinless chicken breasts, which need to be sliced in half horizontally and pounded thin. I use chicken tenderloins, which can be quickly flattened with the palm of your hand to ensure even, quick cooking. Unlike the ready-to-cook thinly sliced chicken cutlets you find at the store, they are guaranteed to be tender and juicy.
I recommend using jarred marinara sauce. The recipe only calls for 1-1/2 cups of sauce, so it doesn’t make sense to make it from scratch, especially when there are plenty of good store-bought options (I like Rao’s or Victoria).
Japanese-style panko creates a feathery, crisp crust, and it also stays crispy long after it is cooked, so you don’t have to pan-fry the chicken at the very last minute.
Mozzarella cheese is usually called for in chicken parmesan recipes. However, I prefer fontina, a semisoft cheese with a buttery, nutty flavor. Fontina stays gooey after it’s melted, while mozzarella tends to turn rubbery as soon as it comes out of the oven. Most large supermarkets carry Swedish or Danish fontina (with a red wax rind), which is ideal for cooking. If you can’t find it, shredded whole milk mozzarella is fine.
Step-by-Step Instructions
Step 1: Prep and Bread the Chicken
Begin by prepping the tenderloins. You may notice a white tendon at the end of the tenderloin. Go ahead and trim it off with a knife or kitchen shears. Using the palm of your hand, gently flatten the tenderloins so that they are an even 1/4-inch thickness.
Season the flattened chicken all over with 1-1/4 teaspoons salt and 1/2 teaspoon pepper.
In a large shallow bowl (I use a pie plate), combine the panko, 3/4 cup of the Parmigiano Reggiano, the oregano, the thyme, 3/4 teaspoon salt, and 1/4 teaspoon pepper.
Mix well, making sure there are no clumps of cheese.
Place the flour in another shallow bowl. Beat the eggs in a third bowl. Set up a breading station in this order: flour, eggs, panko.
Dredge the chicken in the flour, coating evenly.
Dip in the eggs, letting any excess drip off; then dredge in the panko mixture, turning and patting to adhere.
Place the breaded chicken on a lined baking sheet. (The recipe can be prepared up to this point, covered, and refrigerated up to 8 hours ahead of time. The breaded tenders can also be frozen for up to 3 months.)
Step 2: Pan-Fry the Chicken
In a large nonstick skillet, heat about 1/8 inch of oil over medium heat until shimmering. Place 5 or 6 tenders in the pan in a single layer.
Cook until the first side is golden brown, 2 to 3 minutes. Flip the chicken and cook for another 2 to 3 minutes, until golden and cooked through. Cook the remaining chicken in the same manner, adding additional oil only if necessary.
Step 3: Top the Chicken with Cheese and Broil
Place the cooked chicken on a foil-lined baking sheet. Sprinkle the fontina and remaining 2 tablespoons Parmigiano Reggiano over the center of the chicken tenderloins, leaving the sides bare so that they remain crispy.
Broil until the cheese is melted and bubbling, 1 to 2 minutes.
Step 4: Serve
Warm the marinara sauce, then taste and adjust seasoning to your liking. With store-bought sauce, I find a generous pinch of sugar and some fresh basil go a long way.
Transfer the chicken to a serving platter or individual plates. Spoon the marinara sauce over the cheese, again leaving the sides bare so that they stay crispy. Sprinkle with fresh basil and serve.
Note: This recipe has been written by Jenn Segal and republished on MudMatter with Author’s Permission. Please find the original link here – Easy Chicken Parmesan.
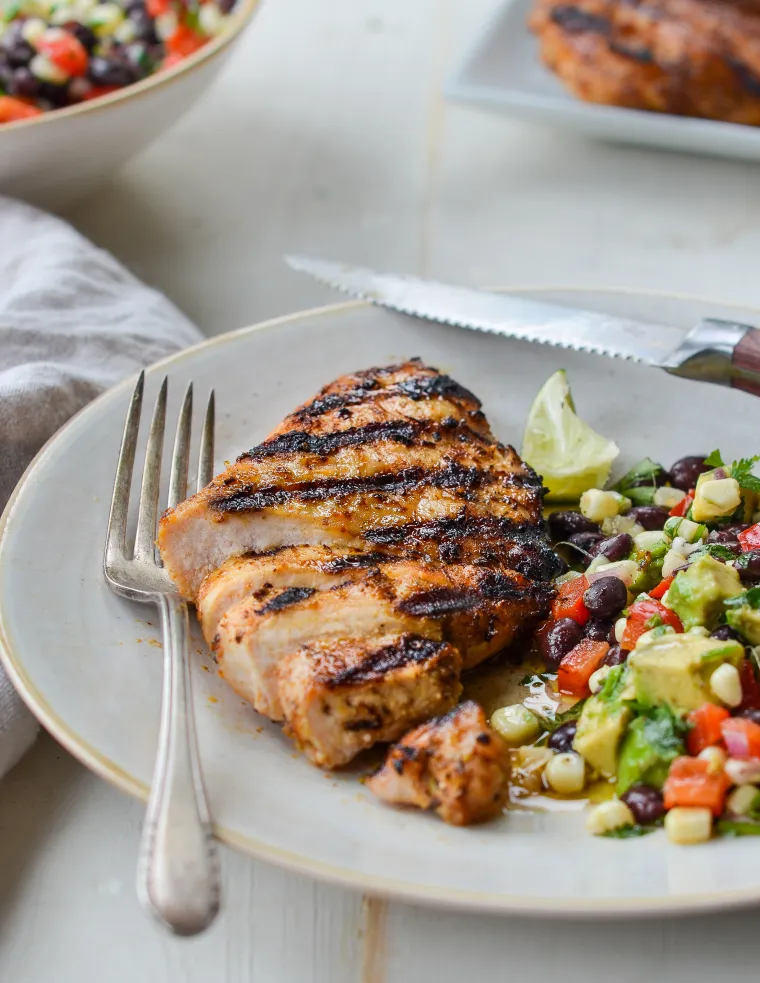
Also known as “margarita chicken,” this tequila lime chicken is loaded with bright Southwestern flavor.
Tequila Lime Chicken, a.k.a. Margarita Chicken, is one of those dishes that just screams fun. The marinade is a combination of tequila, lime, garlic and spices, and it’s loaded with bright Southwestern flavor. Contrary to what you might think, this recipe is family friendly. The tequila is mild and the chicken isn’t too spicy. Pair it with my black bean salad, restaurant-style salsa, cornbread muffins, and margaritas for a Southwestern-themed cookout.
What You’ll Need To Make Tequila Lime Chicken
How To Make Tequila Lime Chicken
Step 1: Pound the Chicken
Place the chicken breasts in a 1-gallon freezer bag and pound to an even ½-inch thickness. This both tenderizes the meat and ensures even cooking. Left in their natural shape, the thin side of the fillet dries out while the thicker side finishes cooking.
Step 2: Make the Marinade
Begin by zesting the limes with a fine or Microplane grater. Simply rub the lime in one direction against the blades, turning the fruit as you go. Be sure to remove only the green part; the white pith underneath is bitter.
I don’t use the juice of the limes in the marinade because, contrary to popular belief, acidic ingredients (such as vinegar or lemon juice) do not tenderize lean boneless chicken breasts. Just the opposite: they “cook” the exterior of the meat and give it a leathery texture. The zest is enough to give the chicken the essence of lime, while still maintaining its succulent texture.
Mix all of the ingredients except for the chicken together in a 1-gallon zip-lock bag (go ahead and use the same one you used for pounding if it is still in good shape). Add the chicken breasts to the bag and massage the marinade into the meat until evenly coated.
Step 3: Marinate
Seal the bag and place in a bowl in the refrigerator (the bowl protects against leakage); let the chicken marinate for at least 4 hours or overnight.
Step 4: Grill
Preheat the grill to high heat and cook, covered, for 2 to 3 minutes per side. Be careful not to overcook; when pounded thin, chicken breasts cook very quickly.
Note: This recipe has been written by Jenn Segal and republished on MudMatter with Author’s Permission. Please find the original link here – Grilled Tequila Lime Chicken.

This easy vegetarian pasta bake gives you all the flavor of classic spinach and cheese cannelloni without the fuss.
This vegetarian pasta bake is a quick and easy riff on classic spinach and ricotta cannelloni. Instead of stuffing traditional pasta shells, I toss penne pasta in a creamy sauce made with spinach, basil, and ricotta. After topping the dish with two flavorful cheeses, I bake it until golden and bubbly. To ensure a smooth and creamy texture, I add mascarpone (or cream cheese) to the sauce, which eliminates any potential graininess that can sometimes occur with ricotta-based sauces. While the pasta bakes, I usually toss a big salad to complete the meal.
You’ll need to make Baked penne with spinach, ricotta & fontina
How to make Baked penne with spinach, ricotta & fontina
To begin, bring a large pot of salted water to a boil and add the penne. Cook until al dente, about 9 minutes. The pasta will continue to cook in the oven, so you want it a bit underdone.
Drain the pasta, then place it back in the pan and set aside.
Meanwhile, drain the spinach and squeeze as dry as possible. In the bowl of a food processor fitted with the steel blade, combine the dry spinach, basil, ricotta, mascarpone (or cream cheese), half-and-half cream, 1 cup fontina, 3 tablespoons Parmigiano Reggiano, salt, pepper, and nutmeg.
Process until puréed.
Add the spinach mixture to the pasta.
Stir to combine.
Transfer to a baking dish.
Top with the remaining fontina and Pecorino Romano cheese.
Bake until the pasta is bubbling and the top is golden in spots, about 20 minutes. Let cool for a few minutes, then serve.
Note: This recipe has been written by Jenn Segal and republished on MudMatter with Author’s Permission. Please find the original link here – Baked Penne with Spinach, Ricotta & Fontina.
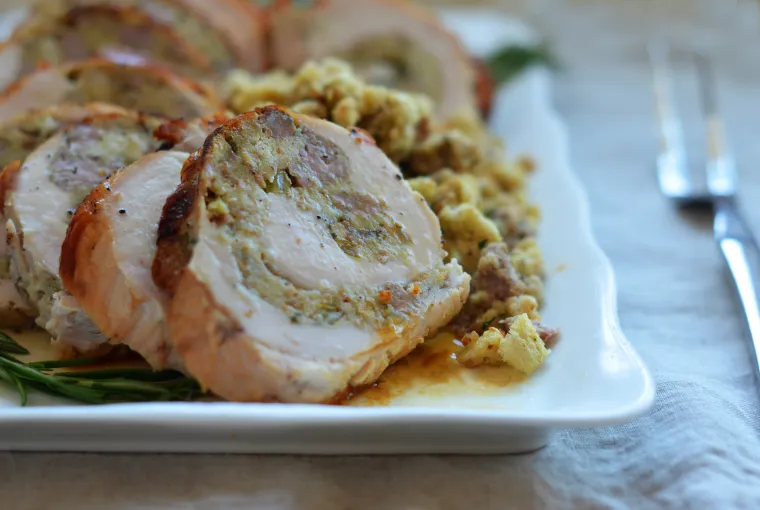
A delicious (and make-ahead!) alternative to traditional holiday turkey.
Whether you’re cooking for a smaller crowd for the holidays or looking for an alternative to traditional turkey, this stuffed turkey breast is the answer. Adapted from Patrick and Gina Neely, it is much more flavorful and juicy than your typical roast turkey and cooks in just 1¼ hours. What’s more, it can be made entirely ahead of time and is a cinch to carve. The hardest part of the recipe is pounding the turkey breast thin, so I suggest asking your butcher to do it for you. This recipe has become part of my family’s Thanksgiving tradition — everyone prefers it to traditional roast turkey, even the dark-meat lovers. Sometimes I even make it in addition to roasting a large bird to guarantee we have plenty of leftovers.
What You’ll Need To Make Rolled Turkey Breast with Sausage & Herb Stuffing
Step-by-Step Instructions
To begin, make the stuffing. Melt the butter in a large skillet over medium heat.
Add the onions and celery and cook, stirring frequently, until soft.
Add the garlic and sausage.
Continue to cook, breaking up the meat with a wooden spoon, until the sausage is cooked and slightly browned, about 5 minutes. Add the wine, rosemary and thyme.
Cook for two minutes more, using your wooden spoon to scrape up any browned bits from the bottom of the pan. Remove from the heat.
n a large mixing bowl, combine the egg, stuffing cubes, chicken broth, parsley, 1/2 teaspoon kosher salt, 1/4 teaspoon pepper, and sausage mixture. Stir until all the bread is moistened.
Place the butterflied turkey breast skin-side down on a countertop or work surface.
Pound to an even 1/2-inch thickness.
Spoon about half of the stuffing in an even 1/2-inch layer over the breast, leaving a 1-inch border all around. (You’ll cook the remaining stuffing separately.)
Starting at the long end, roll the turkey into a long cylinder.
Tie the roll with kitchen string with about 2 inches between each knot, and then trim the strings.
Line a baking sheet with aluminum foil and place an oven-proof rack over top. Place the turkey seam-side down on the rack, drizzle with olive oil and season with salt and pepper.
Remove the turkey from the oven and let rest, loosely tented with foil for 15 minutes. The turkey will rise in temperature as it rests to 165°F. Snip the kitchen twine. Transfer the roll to a cutting board and slice into 1/2-inch thick slices. Arrange on a platter and serve with gravy.
Note: This recipe has been written by Jenn Segal and republished on MudMatter with Author’s Permission. Please find the original link here – Rolled Turkey Breast with Sausage & Herb Stuffing.
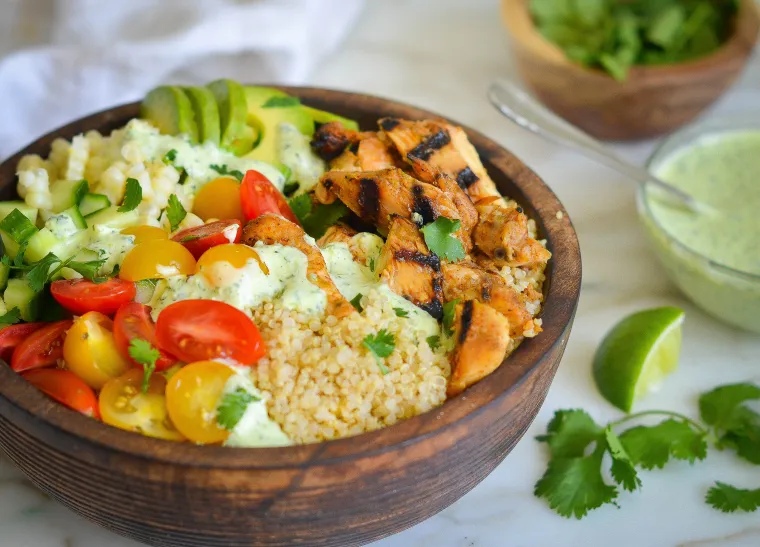
Good and good for you! You’ll love these protein-packed chicken and quinoa burrito bowls with a spicy green sauce.
These burrito bowls are really three stand-alone dishes in one: an easy grilled chicken recipe you’ll put on repeat throughout grilling season; a spicy green sauce you’ll want to put on everything; and foolproof quinoa. The toppings are up to you – fresh corn, beans, tomatoes, cucumbers, avocado, or whatever your heart desires. These bowls are totally doable for a dinner party since you can make most of the recipe ahead, and everyone will love assembling their own bowls. They’re healthy and gluten-free to boot.
What you’ll need to make Burrito Bowls
How to make burrito bowls
Begin by making the marinade for the chicken. To make life easy, I combine everything in a ziplock bag (no dirty bowls!).
Lime gives the chicken wonderful flavor but note that I only use the zest. Lime juice, or any acidic ingredient, will turn lean boneless skinless chicken breasts into shoe leather before they ever hit the grill. To zest the limes, it’s best to use a rasp grater like the one above.
Marinate the chicken in the refrigerator for at least six hours or overnight.
Next make the sauce.
Simply combine all of the ingredients in a blender or food processor and blend until smooth. You’ll notice that I add some of the seeds of the jalapeño to make it spicy — go easy at first and add more to your liking.
Finally, make the quinoa by combining the quinoa, salt, and water in a medium saucepan. You’ll notice that my recipe calls for a little less water than the instructions on the package. I find it comes out better (read: less mushy) this way, and you can always add a little more water at the end if need be. Cover and simmer until the quinoa is cooked.
Up to this point, the entire recipe can be made ahead. Come dinnertime, preheat the grill. Place the chicken on the grill and cook, covered, for 2-3 minutes per side, turning only once.
Cut the chicken into bite-sized pieces and serve with the quinoa, green sauce, and toppings of your choosing.
Note: This recipe has been written by Jenn Segal and republished on MudMatter with Author’s Permission. Please find the original link here – Chicken & Quinoa Burrito Bowls with Spicy Green Sauce.
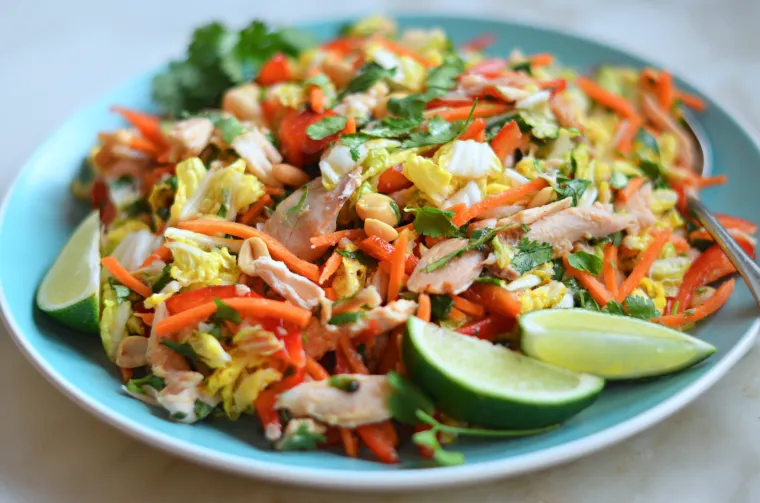
Made with a rotisserie chicken, this salad is easy to whip up and full of bright, spicy Southeast Asian flavor.
As much as I love salad as a meal, it’s not usually enough for my husband, who is more of a protein/two sides kind of a guy. But this is one salad that I can get away with serving for dinner — it’s satisfying and full of bright, spicy Southeast Asian flavor. It’s easy, too! You simply shred a rotisserie chicken, chop some veggies, whisk the dressing, and dinner is done. The recipe makes enough for 2 to 3 main course salads; if you want to stretch it, serve some store-bought crispy spring rolls on the side.
What you’ll need to make Vietnamese Shredded Chicken Salad
Step-by-Step Instructions
To begin, combine all of the salad ingredients, except for the peanuts, in a large bowl.
Next, make the dressing. You’ll need to juice a few limes; an inexpensive juicer like this one is helpful but not necessary.
Whisk together the freshly squeezed lime juice, Sriracha, garlic, sugar, fish sauce, and vegetable oil.
Pour the dressing over the salad and toss well.
Top with peanuts and serve.
Note: This recipe originally comes from Saveur magazine but I’ve tweaked it a bit to make it my own. (I omitted the rice vinegar and Thai peppers, increased the lime, and added bell peppers, scallions, Sriracha, and peanuts.)
Note: This recipe has been written by Jenn Segal and republished on MudMatter with Author’s Permission. Please find the original link here – Vietnamese Shredded Chicken Salad.
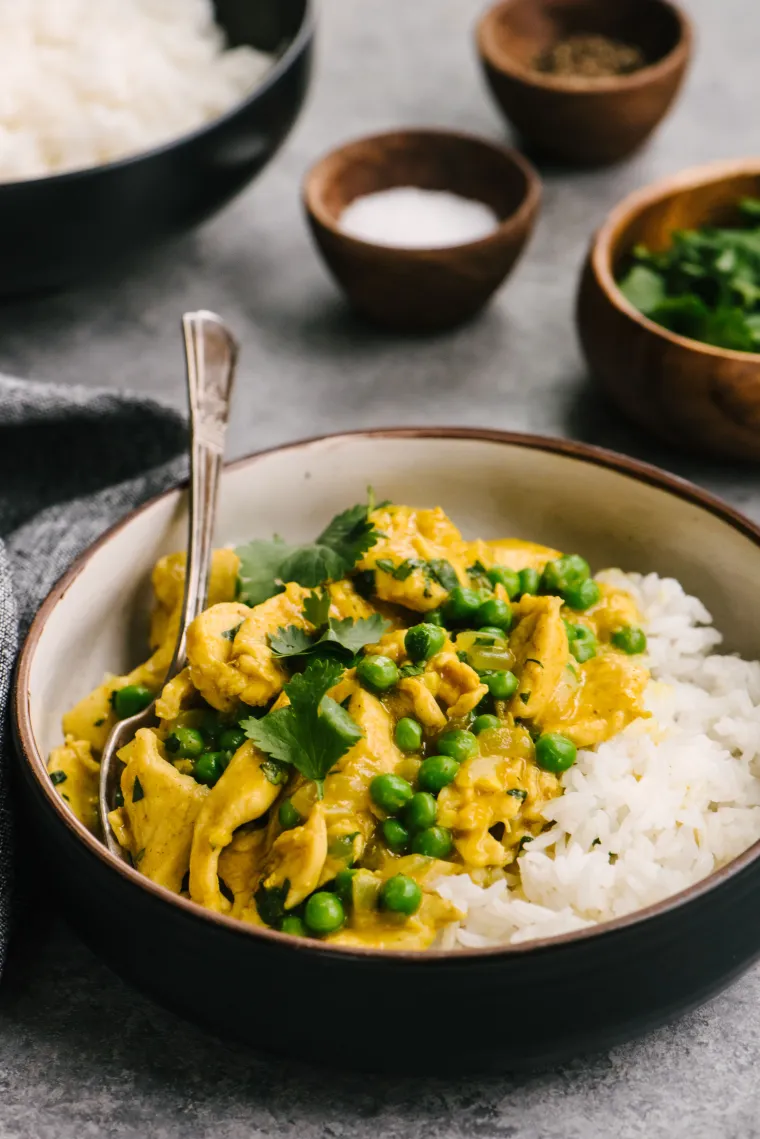
This chicken curry recipe is family-friendly and easy enough for a busy weeknight. Serve it with basmati rice and dinner is done!
In this family-friendly chicken curry dish, thinly sliced chicken breasts are sautéed with curry powder and simmered in an aromatic curry sauce thickened with Greek yogurt. You can have it on the table in 30 minutes — or in the time it takes to make some basmati rice — and the cooking method ensures that the chicken comes out reliably tender every time. As with many Indian dishes, the taste and spice level of this dish will vary a bit depending on the type of curry powder you use, so adjust the seasoning as necessary.
What you’ll need to make chicken curry
Step-By-Step Instructions
Begin by cutting the chicken into 1/4-inch slices. The best way is to cut each breast in half lengthwise, then slice on the diagonal. Don’t make yourself crazy over it, but try to make each piece about the same size; this ensures that they cook evenly. Next, season the chicken with salt, pepper and curry powder.
Heat some vegetable oil in a large skillet, then briefly sauté the chicken until it is lightly browned but still pink in spots.
Transfer the partially cooked chicken to a clean bowl, then add the onions to the pan and cook until soft and translucent.
Add the ginger, garlic, and more curry powder and sauté until fragrant.
Add the chicken stock and cornstarch to the vegetables.
Cook until the sauce is thickened, then add the chicken back to the pan, along with the frozen peas and simmer until the chicken is just cooked.
Add the Greek yogurt and fresh chopped cilantro.
Stir until combined.
Serve with basmati rice and/or naan.
Note: This recipe has been written by Jenn Segal and republished on MudMatter with Author’s Permission. Please find the original link here – Chicken Curry.
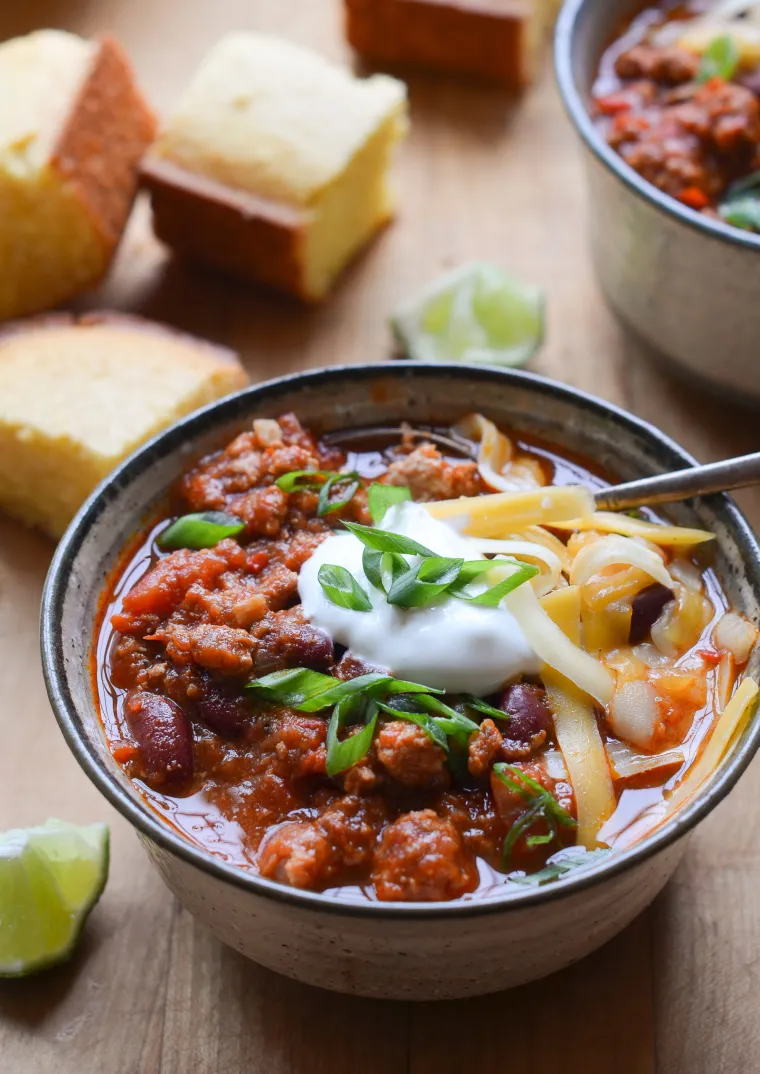
This healthy turkey chili has a rich, spicy flavor and thick texture — and it’s loaded with nutrient-rich kidney beans.
When it’s cold outside, there’s nothing more inviting than a big pot of chili simmering on the stove, and this turkey chili adapted from The Complete One Pot Cookbook from America’s Test Kitchen always hits the spot. It has a rich, spicy flavor and thick texture, and it’s loaded with fiber-rich kidney beans. Since ground turkey is lean and can easily dry out, the recipe uses a genius technique to ensure the meat stays moist. Instead of adding all of the meat at once, a portion of the turkey is sautéed in the beginning and cooked low and slow to build flavor. Then, towards the end of the simmering time, the remaining turkey is pinched into small pieces and stirred into the chili, creating chunks of tender turkey in every bite. Be sure to use 93% lean ground turkey, which is a combination of light and dark meat, rather than 99% lean ground turkey breast. Serve with cornbread or cornbread muffins and your favorite chili toppings.
What You’ll Need To Make Turkey Chili
Step-by-Step Instructions
Roughly chop the onions, bell pepper, and garlic and place in the bowl of a food processor fitted with the steel blade.
Pulse, scraping down the sides as necessary, until the vegetables are finely chopped. Do not over-process; the vegetables should not be puréed. (Alternatively, finely chop the onions, bell pepper, and garlic by hand.)
Heat the oil in a large pot or Dutch oven over medium heat. Add the chopped vegetables, chili powder, cumin, coriander, red pepper flakes, oregano, and cayenne pepper.
Cook, stirring often, until the vegetables are softened, about 10 minutes.
Add about 1-1/4 pounds of the turkey to the pot.
Increase the heat to medium-high, and cook, breaking up the meat with a wooden spoon, until no longer pink, about 4 minutes.
Stir in the beans, diced tomatoes and their juice, crushed tomatoes, broth, and salt and bring to a simmer.
Reduce the heat to medium-low and cook, uncovered, until the chili has begun to thicken, about 1 hour.
Pat the remaining 3/4 pound turkey together into a ball, then pinch off teaspoon-size pieces of meat and stir into the chili.
Continue to simmer, stirring occasionally, until turkey is tender and chili is slightly thickened, about 40 minutes. (If the chili begins to stick to the bottom of the pot or looks too thick, stir in extra broth as needed.)
Taste and adjust seasoning, if necessary, and serve with your favorite chili toppings.
Note: This recipe has been written by Jenn Segal and republished on MudMatter with Author’s Permission. Please find the original link here – Classic Turkey Chili.
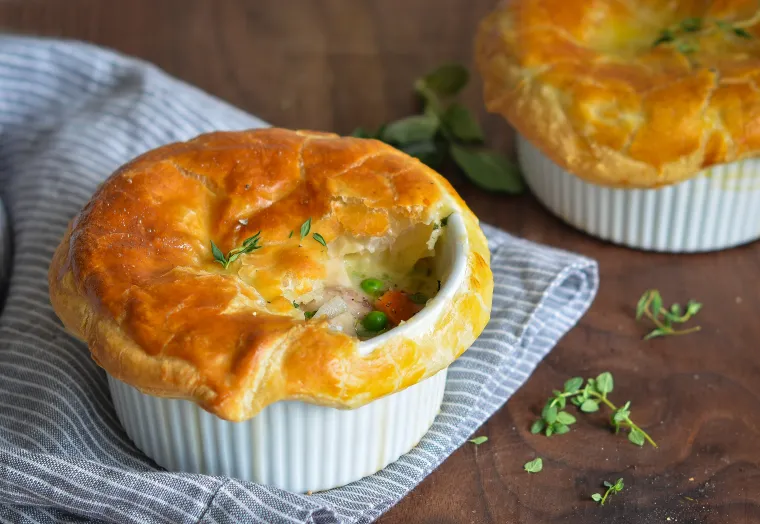
Store-bought rotisserie chicken and puff pastry make these individual chicken pot pies easy to prepare.
Between the chicken, the sauce, and the crust, you could spend an entire day in the kitchen making traditional chicken pot pie. For this version, my goal was to come up with an easy recipe that didn’t sacrifice flavor. After many trials, I found that using a rotisserie chicken for the filling and a good quality store-bought puff pastry for the crust were both excellent shortcuts. With that settled, I moved on to tackle the problem with most chicken pot pies: the bland, goopy white sauce. I thinned the sauce to a chowder-like consistency. I also borrowed an ingredient from my favorite turkey gravy – Cognac – and it added that je ne sais quoi that makes these chicken pot pies next-level delicious.
What you’ll need to make chicken pot pie
recommend Dufour all-butter puff pastry if you can find it (it’s sold at Whole Foods) but Pepperidge Farm, which is readily available in the freezer section of most supermarkets, is very good, too.
How to make chicken pot pie
To begin, dust a clean, dry work surface with flour and place the puff pastry over top.
Sprinkle the pastry with flour and roll to about 1/8-inch thick, smoothing the creases with the rolling pin at the same time. Using a sharp knife, kitchen shears, or a pizza cutter, cut out 4 circles about 2 inches larger than the circumference of your soup bowls. Place the dough rounds on a foil-lined baking sheet and refrigerate until ready to use.
Next, make the filling. In a large sauté pan over medium heat, melt the butter, Add the yellow onion, garlic, celery, pearl onions, and carrots.
Sauté for 8 to 10 minutes, or until the carrots are just cooked.
Add the flour.
Cook, stirring constantly, for about 2 minutes.
Add the broth, cognac, salt, and white pepper. Bring to a boil, stirring with a wooden spoon to incorporate the flour.
Simmer until thickened, a few minutes. Off the heat, stir in the heavy cream, herbs, chicken, and peas.
Ladle the filling into oven-safe ramekins or soup bowls (be sure they are oven proof up to 425°F). The filling should come up no more than three-quarters of the way to the top of the bowls. If you have extra, make another bowl.
Brush the outside edges of each bowl with an egg wash.
Place the cold dough rounds over the soup bowls, pressing firmly around the edges so that the dough adheres, and then brush the top of the dough with the egg wash.
Using a sharp knife, make a ½-inch slit in the top of each pie. Bake for 20 to 25 minutes, or until the pastry is a rich golden brown.
Let cool for about 10 minutes, then use a wide spatula to carefully transfer the hot ramekins to serving plates. Sprinkle a few fresh thyme sprigs over top of the bowls and serve.
For this recipe, you’ll need oven-safe (up to 425°F) soup bowls. To make four servings, use bowls with an 18 to 20-oz capacity. To make six servings, use bowls with a 12 to 14-oz capacity.
Note: This recipe has been written by Jenn Segal and republished on MudMatter with Author’s Permission. Please find the original link here – Chicken Pot Pie.